How to use ConvertKit to send a Lead Magnet (Opt In) to your Email List Subscribers
Disclaimer: Hey there, friend! This article includes ConvertKit affiliate links & I would LOVE if you decided to use them. Affiliate links + referral programs help creators and educators like me to fund the free content that we provide on our blogs. Thank you for your endless support!
So how’s that email list coming? Still chuggin’ along?
know, I know. Figuring out how to build an email list from scratch isn’t exactly a walk in the park.
But… you know it’s gonna make a massive difference in your bottom line. Might as well take a shot at it, right?
You just need to focus on providing your audience with VALUE. Content so good, they won't even think twice about hitting that "Subscribe" button. And the key? Offering it for free.
You know it’s true, everyone likes free stuff. So go ahead + create that lead magnet if you haven’t already— an ultimate guide, worksheet, a checklist— whatever it is.
Then use your email marketing service provider to create an opt-in form for your digital download, easy peezy!
Alright, alright. Setting up the opt-in form does take a little work. But don’t worry, I’m here to help!
In this tutorial, I’ll be walking you through how to send a free download (lead magnet or content upgrade) to site visitors who opt-in to your email list, by creating forms in ConvertKit.
You can click here to sign up for ConvertKit if you don’t have an account yet (And yes— that’s an affiliate link. My piggy bank thanks you kindly!).
Alright, time to get moving! Those forms aren’t gonna build themselves. ;)

PS if you need a refresher on lead magnets + content upgrades, feel free to check out my guide below which walks you through allll the crazy email marketing terms.
Related: How to use Content Upgrades to Increase Conversions + grow your Email List
1. Create a new form in ConvertKit
To create the form for your freebie download, you’ll first need to login to your ConvertKit account and go to the main dashboard.
Click the ‘Landing Pages & Forms’ tab at the top of your screen

From there, scroll down past the graph of your subscriber analytics until you see ‘Landing Pages & Forms’.
Click ‘Create New’

You have the option to either embed a form on your website or create a landing page (which would be hosted in ConvertKit).
For this example, we’ll go ahead and choose ‘Form’

2. Select a display format for your form
Now you should see a few different form options. Here’s a quick breakdown:
Inline: This form is going to give you the most flexibility. You’re free to embed it pretty much anywhere on your website
Modal: This is a fancy name for a ‘pop-up’ form— you can adjust the Timing Display so that your form pops up exactly when you specify (i.e. when a visitor is about to leave your page, after a certain number of seconds, or once a user has scrolled through a certain percentage of your article
Slide In: This form will slide up from the bottom right or bottom left of your visitor’s screen— again, you can specify when your form will slide in (i.e. after a certain time or scroll percentage)
Sticky Bar: ConvertKit just recently rolled this form out— it’s basically an “announcement bar” which displays at the top or bottom of your visitor’s screen (i.e. after a certain time or scroll percentage)

For this example, select ‘Inline’
3. Choose your form template
Now you can choose from one of ConvertKit’s form templates.

ConvertKit recently re-designed their opt in forms (Dec 2019), and I can’t even begin to tell you how pumped I was about this.
I actually switched over from ConvertKit to Flodesk for a few months because ConvertKit’s previous templates were just not cutting it for me.
I desperately wanted opt-in forms that matched my branding/had a little more visual appeal, and Flodesk definitely fit the bill in that department. But I eventually figured out that Flodesk wasn’t the best match for my business (still love them!).
I think the team at ConvertKit must have been reading my mind, though… because now they have amazing forms to choose from and everything is right in the world again! :)
Alright— now back to the show.
For this example, let’s keep it simple.
Choose the ‘Clare Form’ (this one just includes the form fields + CTA button)

4. Customize the Style of your Form
Now you can begin making any style edits, add your brand colors or change out the placeholder text for something more custom.
Click on each text field (First Name and Email Address) to change the following:
Custom Field Label (i.e. Your first name >> First Name)
Font color
Border color
Border radius (change to 0px if you don’t like rounded edges)
Font weight

Then go ahead and make any changes to your CTA. Click on the button to change:
Font Color
Background color
Border radius
Font Weight
Now double click on the button to change your CTA copy.
And I beg you— please change ‘Subscribe’ to something more personal. Nobody wants to ‘subscribe to your newsletter’… except maybe your mom.

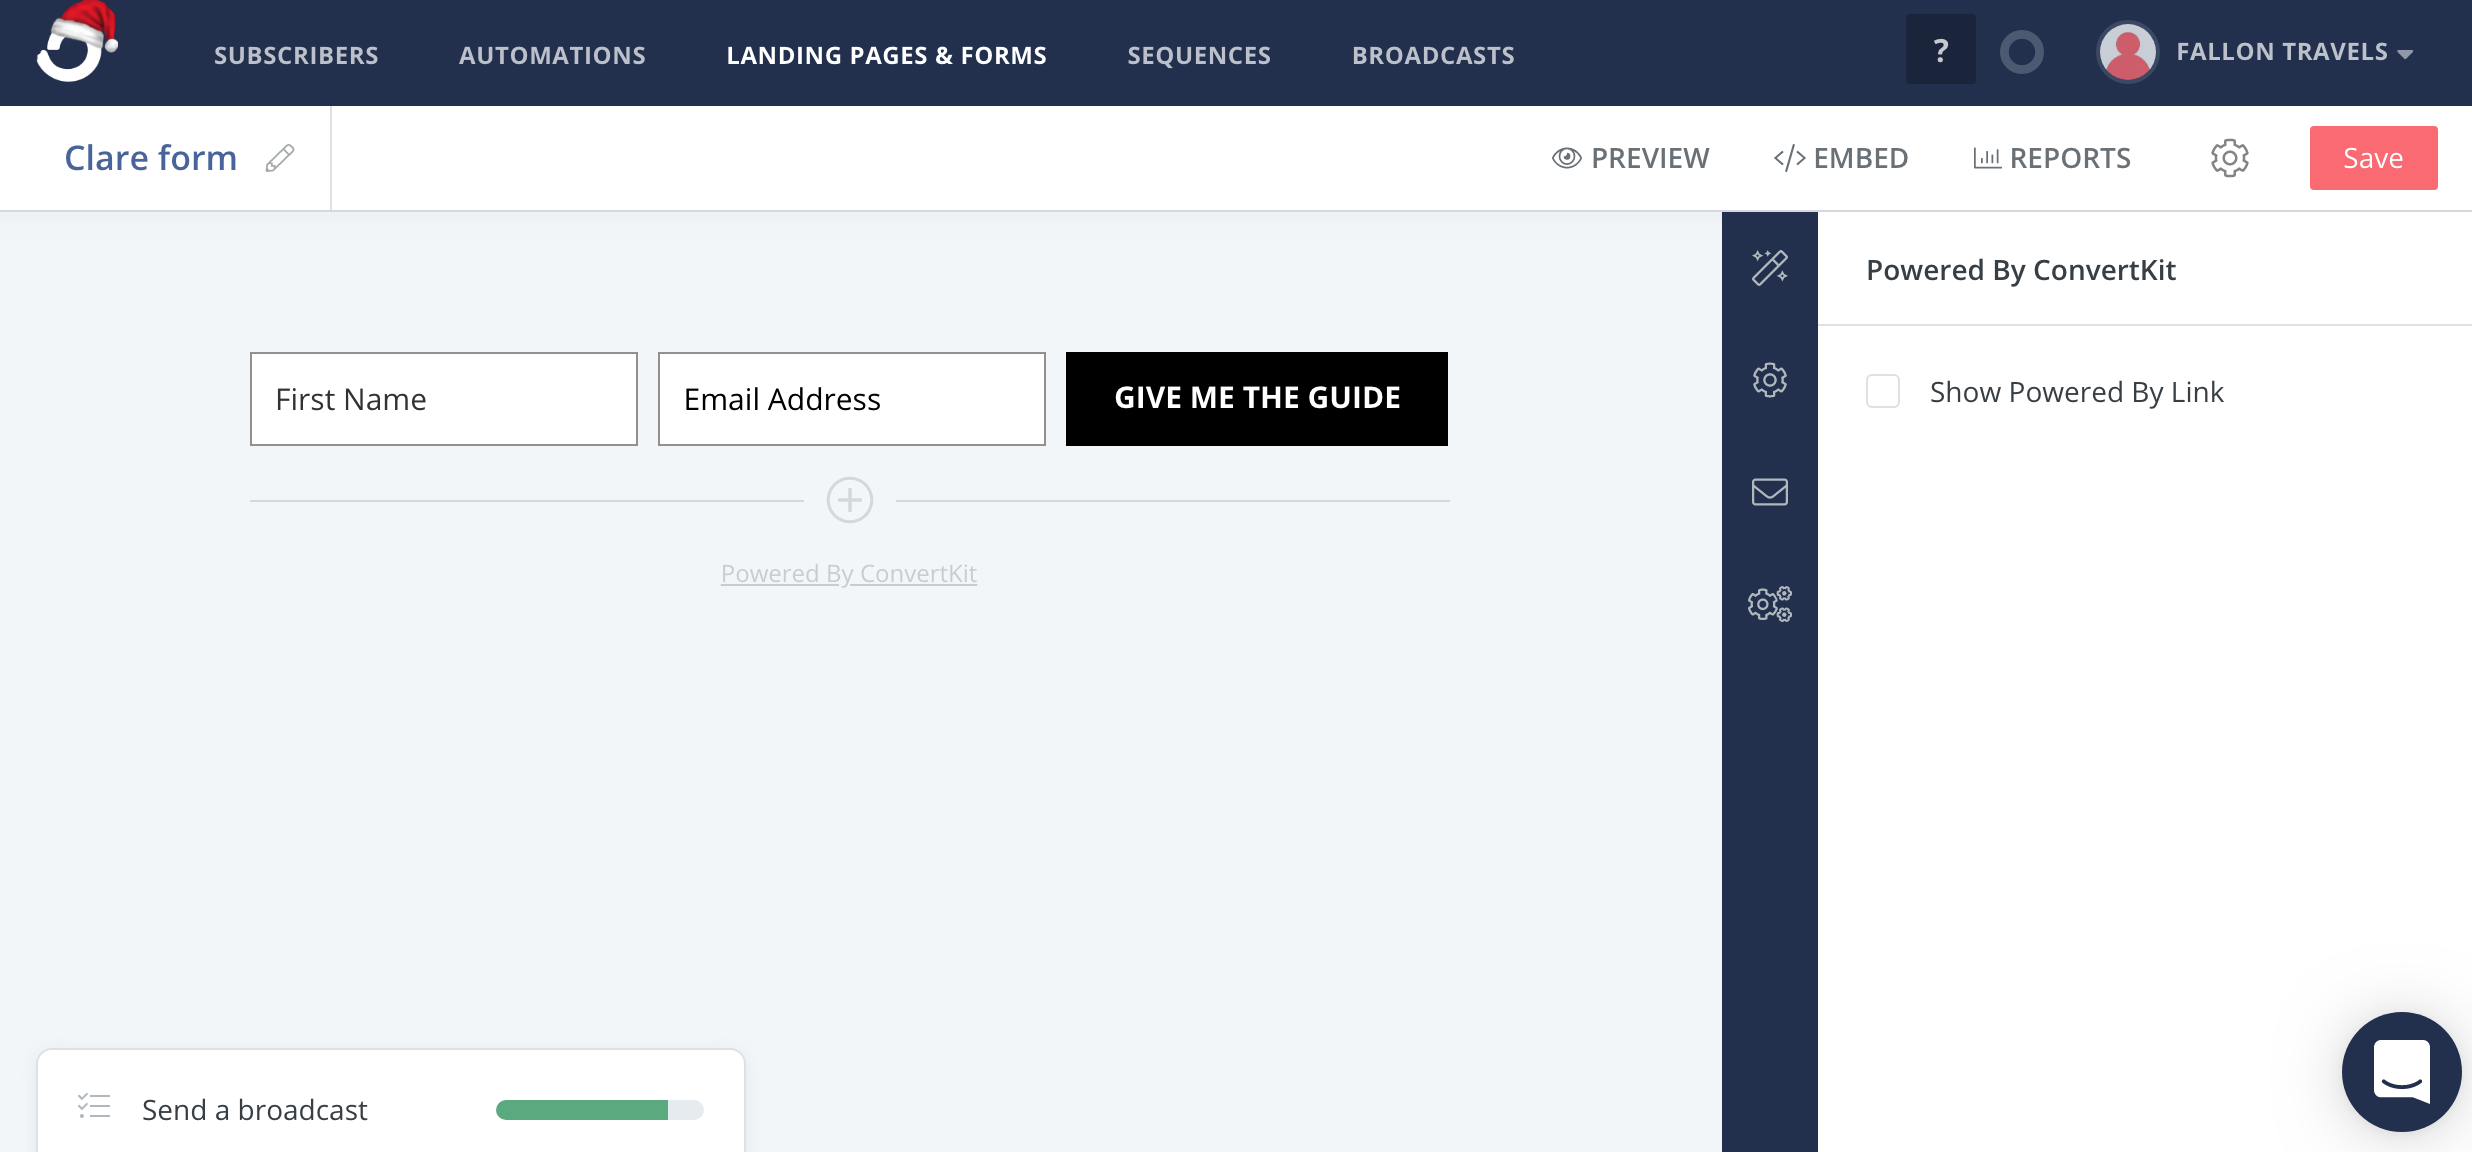
5. Remove ‘Powered By ConvertKit’
Your form will automatically include text that says, “Powered By ConvertKit’. Totally cool if you wanna keep repping them, but if not— here’s how you can remove it.
Click on the ‘Powered By ConvertKit’ text at the bottom of your form
You’ll see that ‘Show Powered By Link’ has been checked
Uncheck the box
Now it will be removed!
6. Change Form Settings— Redirect Subscribers to a ‘Thank You’ page
Now you can click the gear icon over to your right— this is where you’ll change your form settings.
You don’t need to bother with the Custom Domain section. But see where it says, “When a visitor subscribes to the form”?
Well, this is a chance for you to shine with your subscribers! Andddd increase open rates. :)
ConvertKit automatically checks off, “Show a success message”. This means that after your new subscriber submits their name and email address, they’ll get a message that says,
“Success! Now check your email to confirm your subscription.”
That’s all fine and dandy, but I think you could make it a littleeeee more interesting.
Instead of displaying a message, consider creating an optimized ‘Thank You’ page in your website that you can redirect new subscribers to!

Just set it up once and then reuse it for all of your opt-in forms!
Customize the page however you’d like, but consider adding any CTAs that “invite” your audience to take an extra step with you. Things like:
A social sharing plugin
An additional offer
Access to your Resource Library
And make sure to tell your new besties how excited you are to have them in your tribe!
I added my page below if you need some reference. Just don’t steal it because plagiarism’s not cool, k?

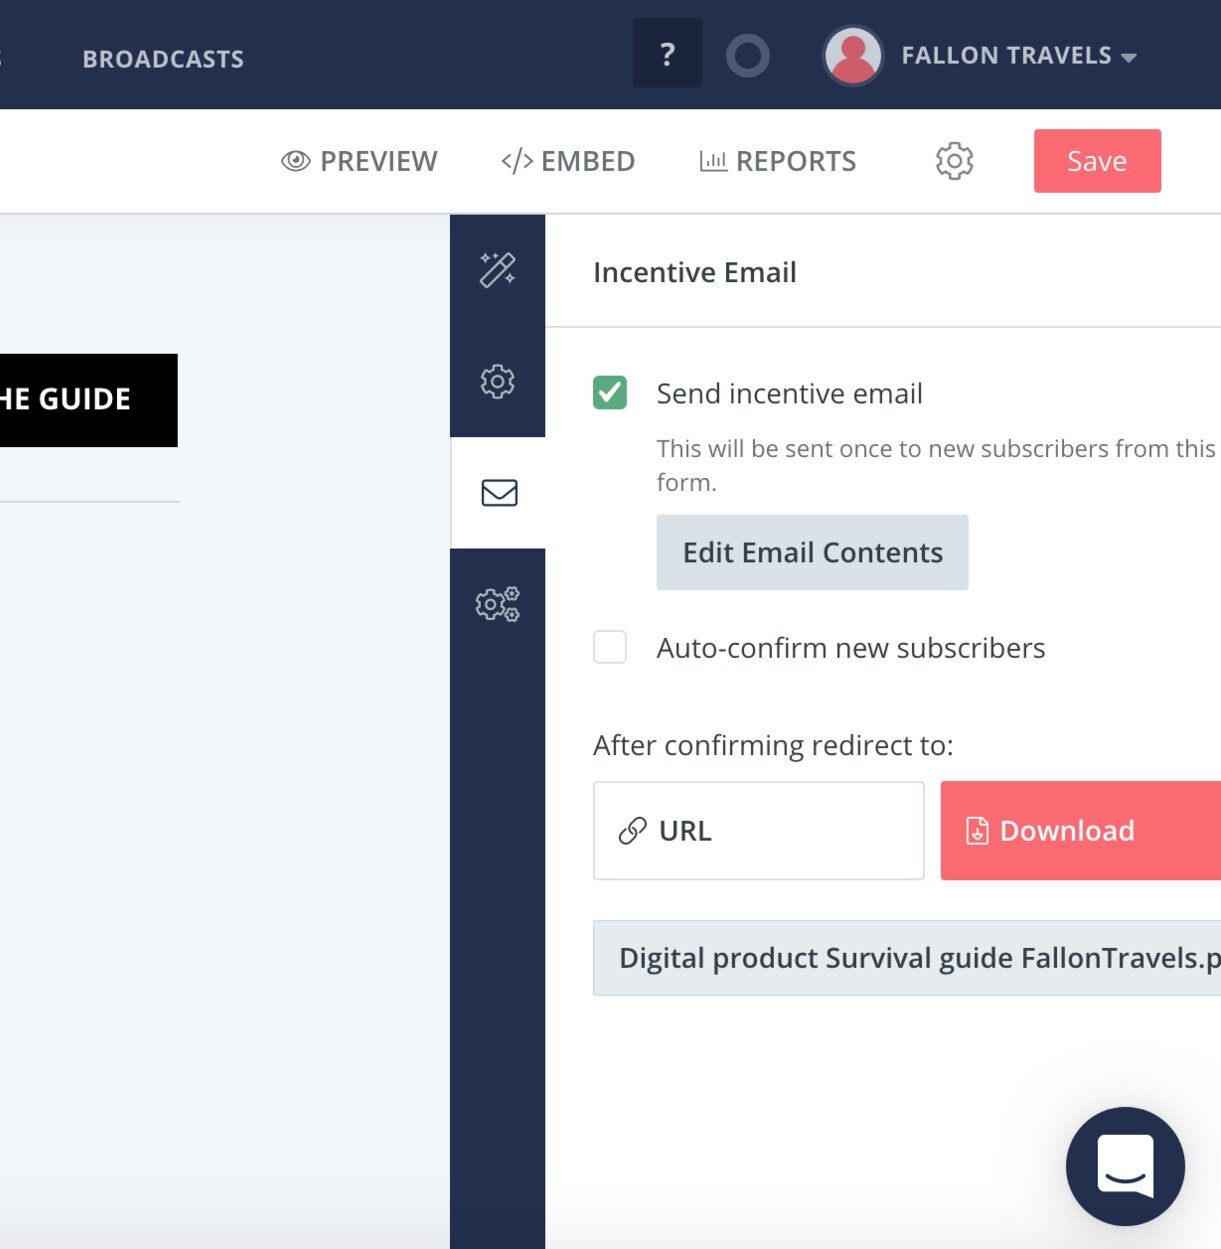
7. Upload your Lead Magnet (Opt In Freebie)
Click on the envelope icon— this is where you can upload your lead magnet/freebie download!
But first, make sure you have the right settings applied:
Send incentive email should be checked— this is what allows you to add your opt-in download or the link to your freebie
Auto-confirm new subscribers should be unchecked
If you want more information about this, make sure to check out ConvertKit’s article on why using a Double Opt-In with subscribers leads to higher engagement.

You can then add your opt-in incentive:
Click URL if your freebie can be accessed with a link (i.e. a webinar or live training, a resource library on your website, etc.)
Click Download if you need to upload your freebie (i.e. a PDF or ZIP folder)
8. Edit your Confirmation Email
Once you’re finished uploading the freebie, go back up to the top of your ‘Incentive Email’ section. This is the email you’ll be sending to your new pals after they subscribe to your form— AKA the Confirmation Email.
Now click ‘Edit Email Contents’
The email will pop up on your screen.

Make sure to change out the placeholder text for each field and make it relevant to your opt-in.
And again, let’s not be tacky here— don’t leave ‘Confirm your subscription’ as the CTA. Change it to whatever your freebie is about (i.e. ‘Download Worksheet’, or ‘Download XYZ Topic Checklist’).

Andddd you’re finished— well, almost.
9. Embed the form on your website
Now you just need to add that form to your website and you’ll be golden!
Right above the form, you’ll see a white toolbar with some additional settings:
Preview
Embed
Reports
Save
Click the Embed tab. This is going to produce the code you need to add the form to your website.

You can choose from Javascript, HTML or the Wordpress short code.
If you decide to use HTML, just be cautious…
Along with all the amazing features included in the ConvertKit update… also came a not-so-great-for-SEO change to the HTML code. What used to be a super short piece of code is now a giant HTML block.
It’s ok to add this in a few landing pages or prominent spots on your website, but definitely don’t go crazy with it.
If you do, you will slow down your website. And poor site speed = poor user experience (ain’t nobody tryin' to wait 15 seconds for your site to load, come on— we live in the age of Amazon).
*This is why I personally suggest using Javascript over HTML And with Javascript, you won’t have to copy + paste the code each time you update your form, the changes will show up automatically.*

If you’re on Wordpress, don’t bother with the HTML. Just use ConvertKit’s Wordpress Plugin to embed the form on your site.

Alright, that’s all I have for now.
Thanks for tuning in to my latest tech tutorial (try saying that 10 times fast).
Hope you enjoyed the ConvertKit walkthrough and that you’re feeling way more confident setting up those opt-in forms! Your subscribers are going to LOVE your amazing freebies, and I just know that you’ll have them comin’ back for more!
If for any reason you’re still feeling confuzzled on the form setup process, drop a comment below! I’d be more than happy to walk you through any challenges you’re facing. :)
Peace out girl scout, chat soon.
XO, Fal


