How to type on a path in Photoshop
Hey friends! So I recently revamped all of my branding and had a few people ask me about my new logo.
TBH this logo was kind-of-sort-of something I put together in Photoshop in less than 30 minutes (so expect to see it change pretty soon lol).
BUTTT with that being said, I realized that a lot of people don’t actually know how to type on a path in Photoshop… and more specifically, how to type on a circle path in Photoshop!
So here we go, friends! I’m gonna show you exactly how to do it. ;)
PS— If you love Photoshop, you might be interested in: How to add an image in Photoshop
Just a quick note about the Photoshop document I’m working in before we start!
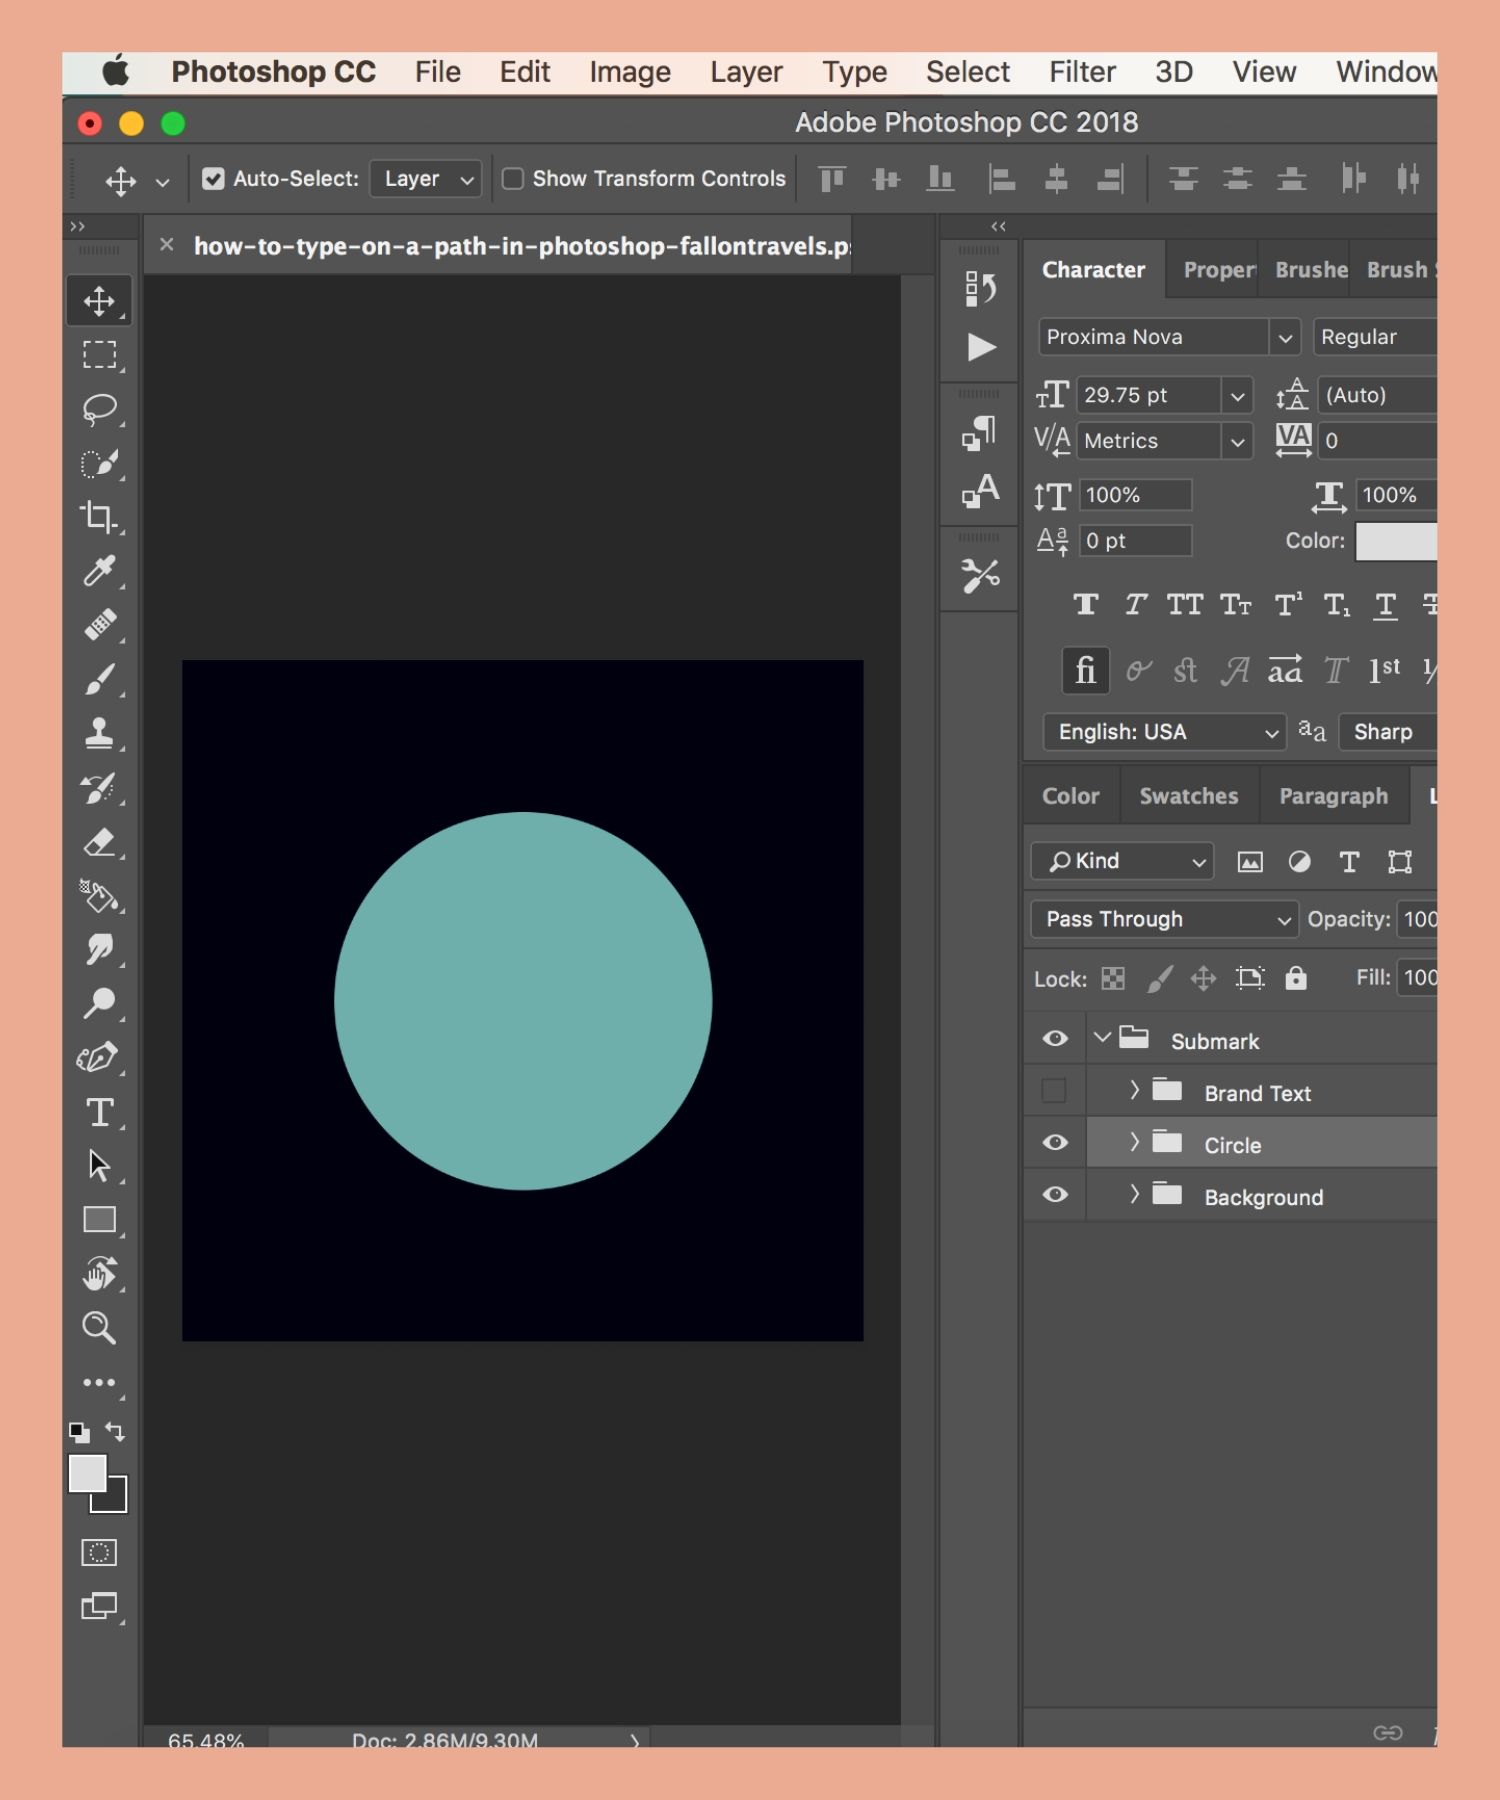
I’m currently creating this graphic in a 1000px x 1000px document that contains a few simple layers:
A black background layer (so I can see what I’m doing easier)
A basic design element (blue circle)
1. Create guides in Photoshop document
Make sure your rulers are enabled:
Go into View > Rulers (CMD + R for Mac, Ctrl + R for PC)
This will allow you to enable or disable your rulers
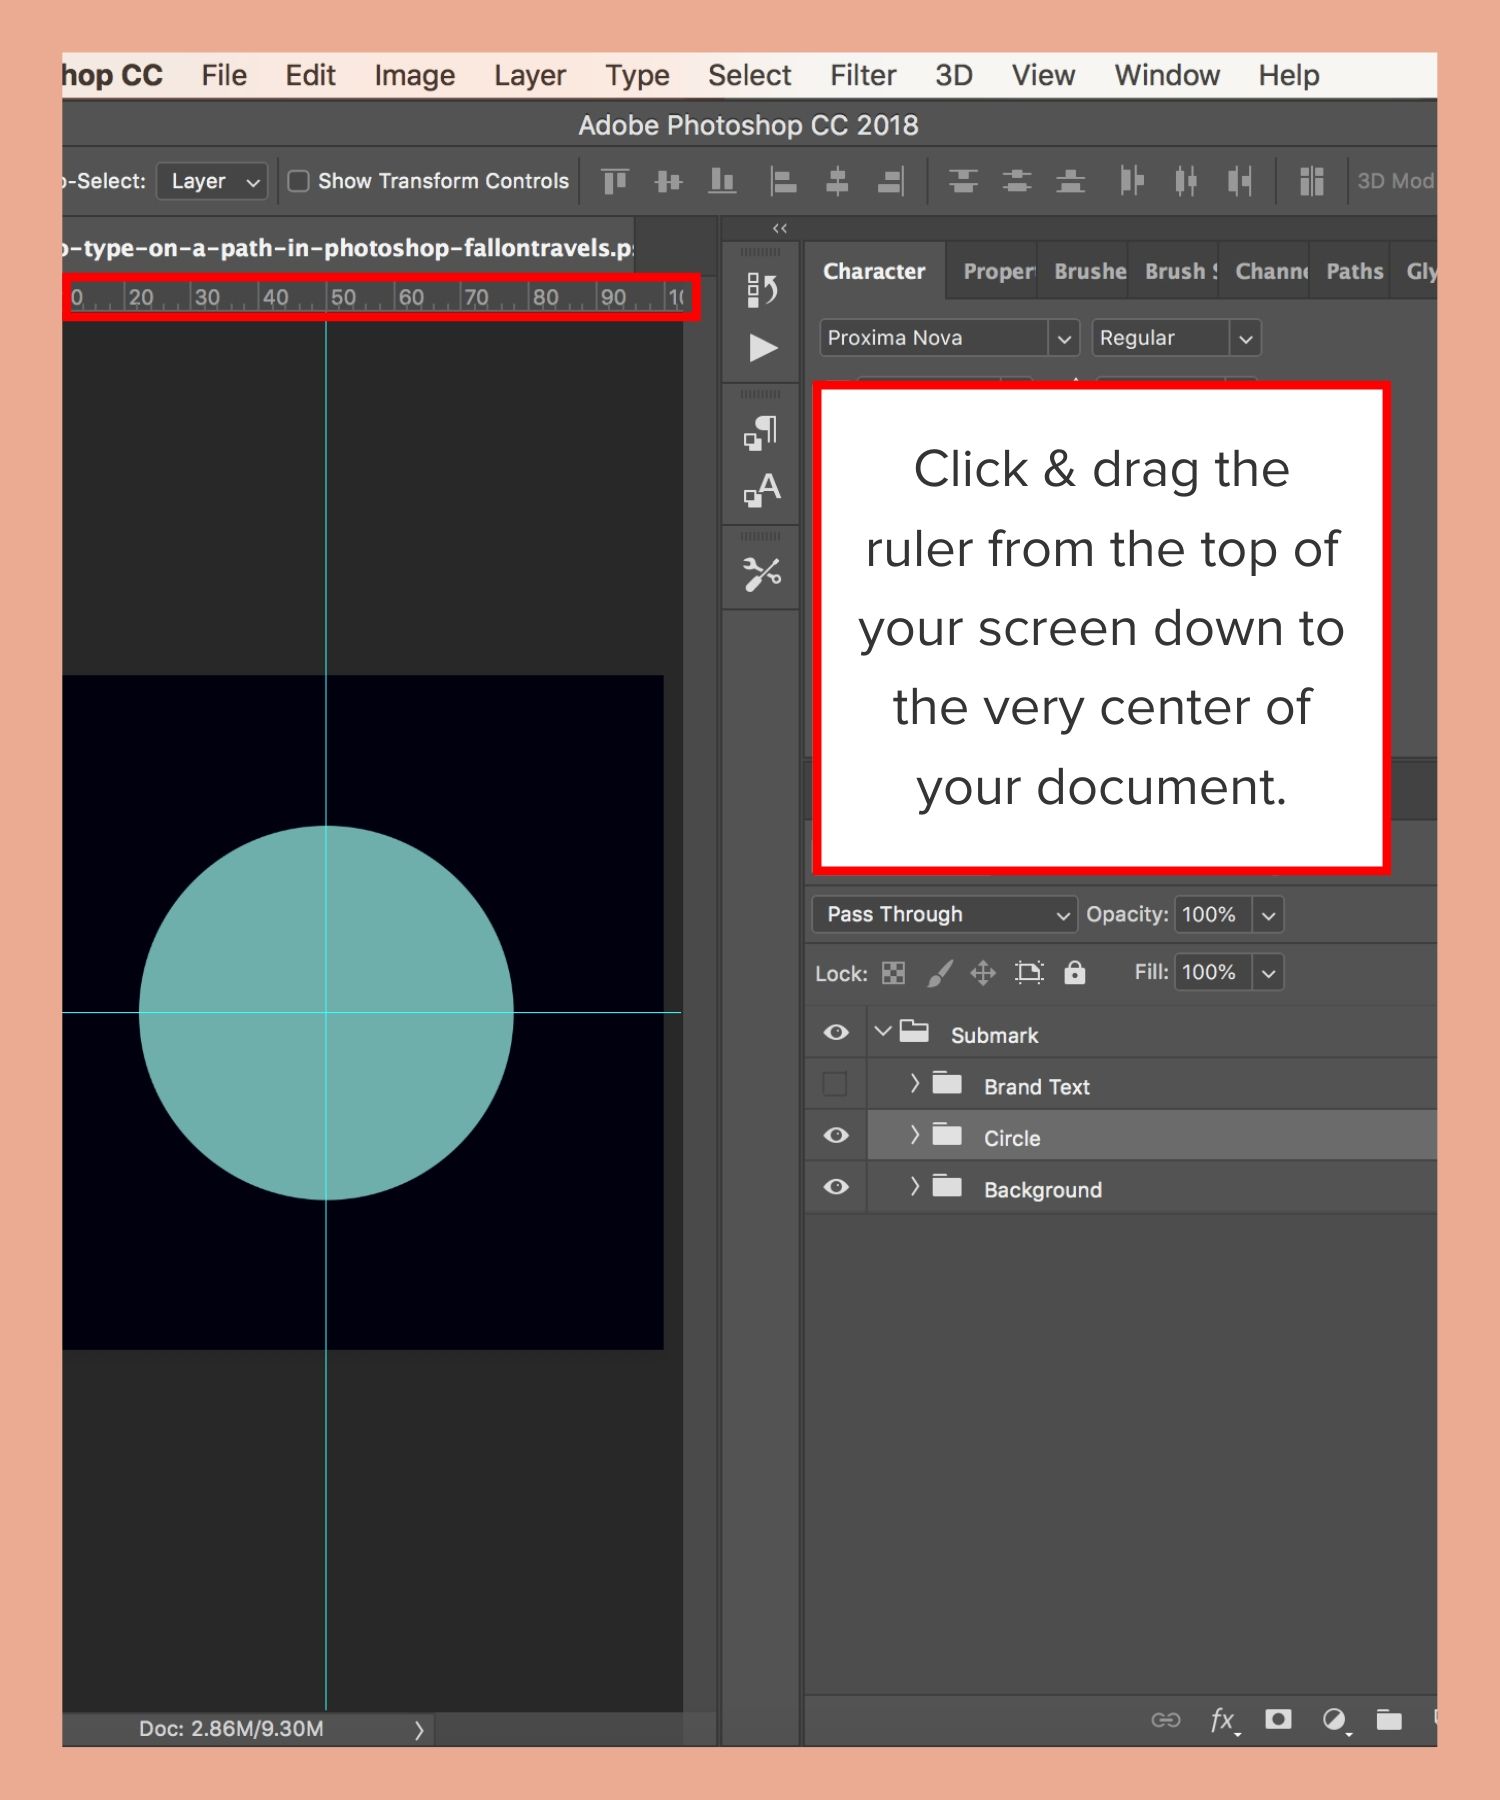
Create a horizontal guide in your Photoshop document:
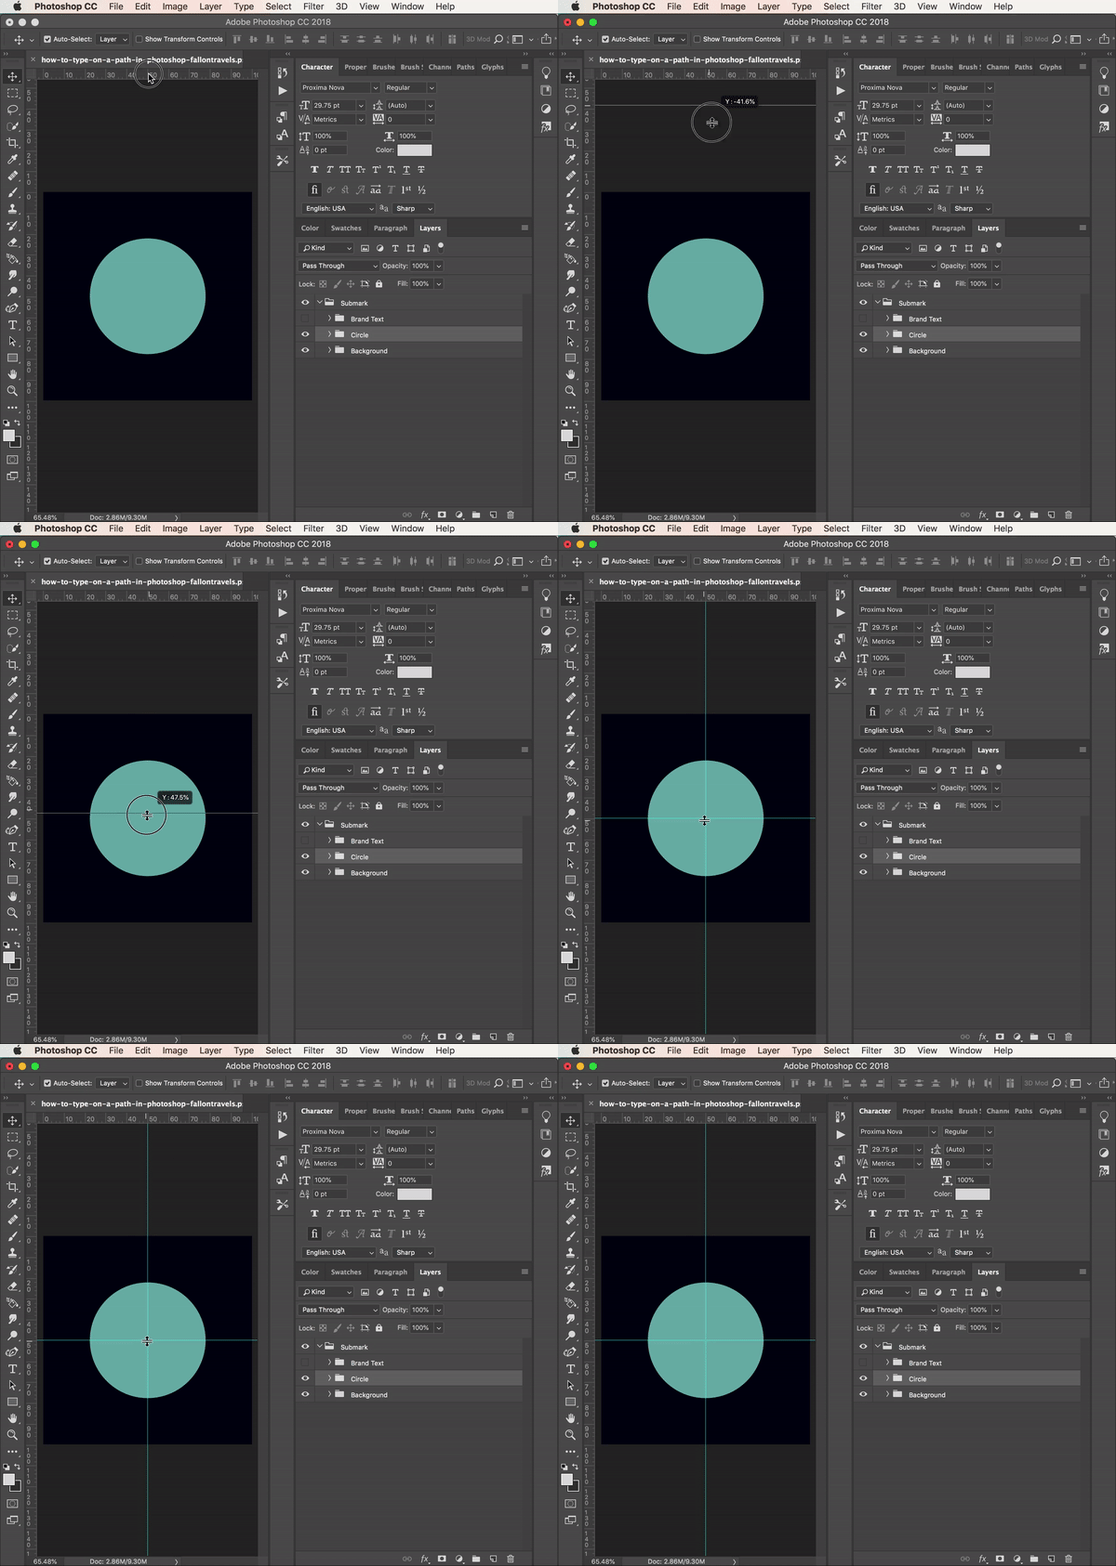
Click & drag the ruler from the top of your screen down to the very center (this should create a horizontal & vertical guide in the middle of your document)
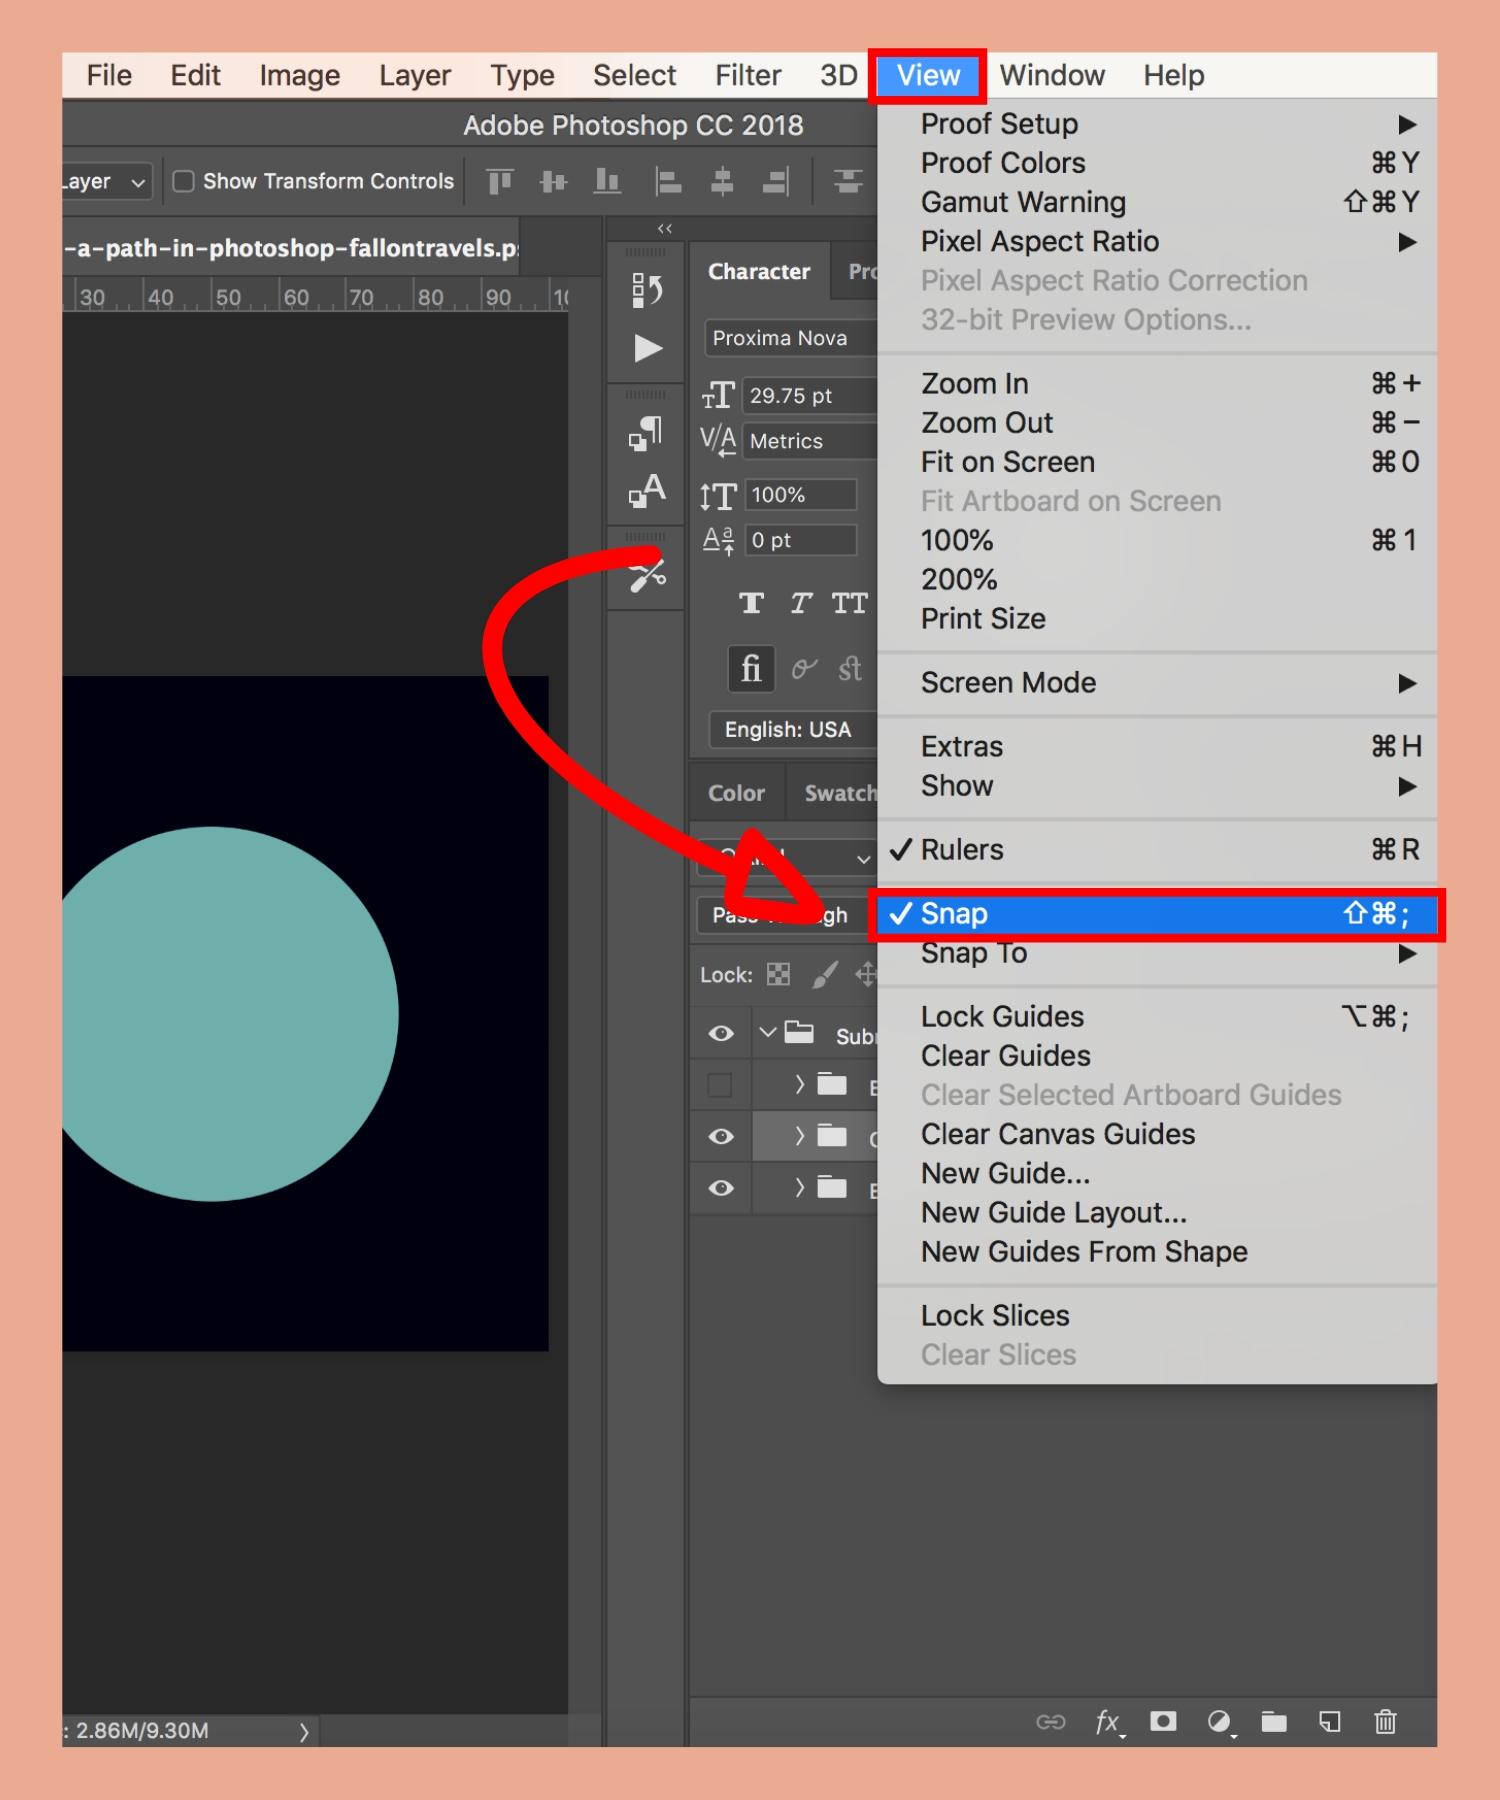
These should both snap in place on the document. If they don’t, make sure you enable snapping:
Go into View again
Make sure that Snap is enabled
2. Create a circle path using the Ellipse Tool
To create a path for your text, follow these steps:
Select the Ellipse Tool on the toolbar to the left of your screen.
Make sure that in the Options bar at the top, you have “Path” selected.
Next, you’re gonna click directly on the CENTER point where the guides meet and drag your circle out.
While you’re dragging the circle out, click the OPTION key for Mac (ALT for PC) to create a circle from the center point.
You’ll then wanna click + hold the SHIFT key (while still holding option or alt key) if you want to constrain the proportions into a perfect circle.
So click Option (or Alt) while holding Shift and drag the circle out as big as you want it for your text path. Alright, nowwwww you can release. :)
3. Add Top-half of type on your circle path
Alright, nowwww we can add the text to our circle path! Start the process by following the steps below:
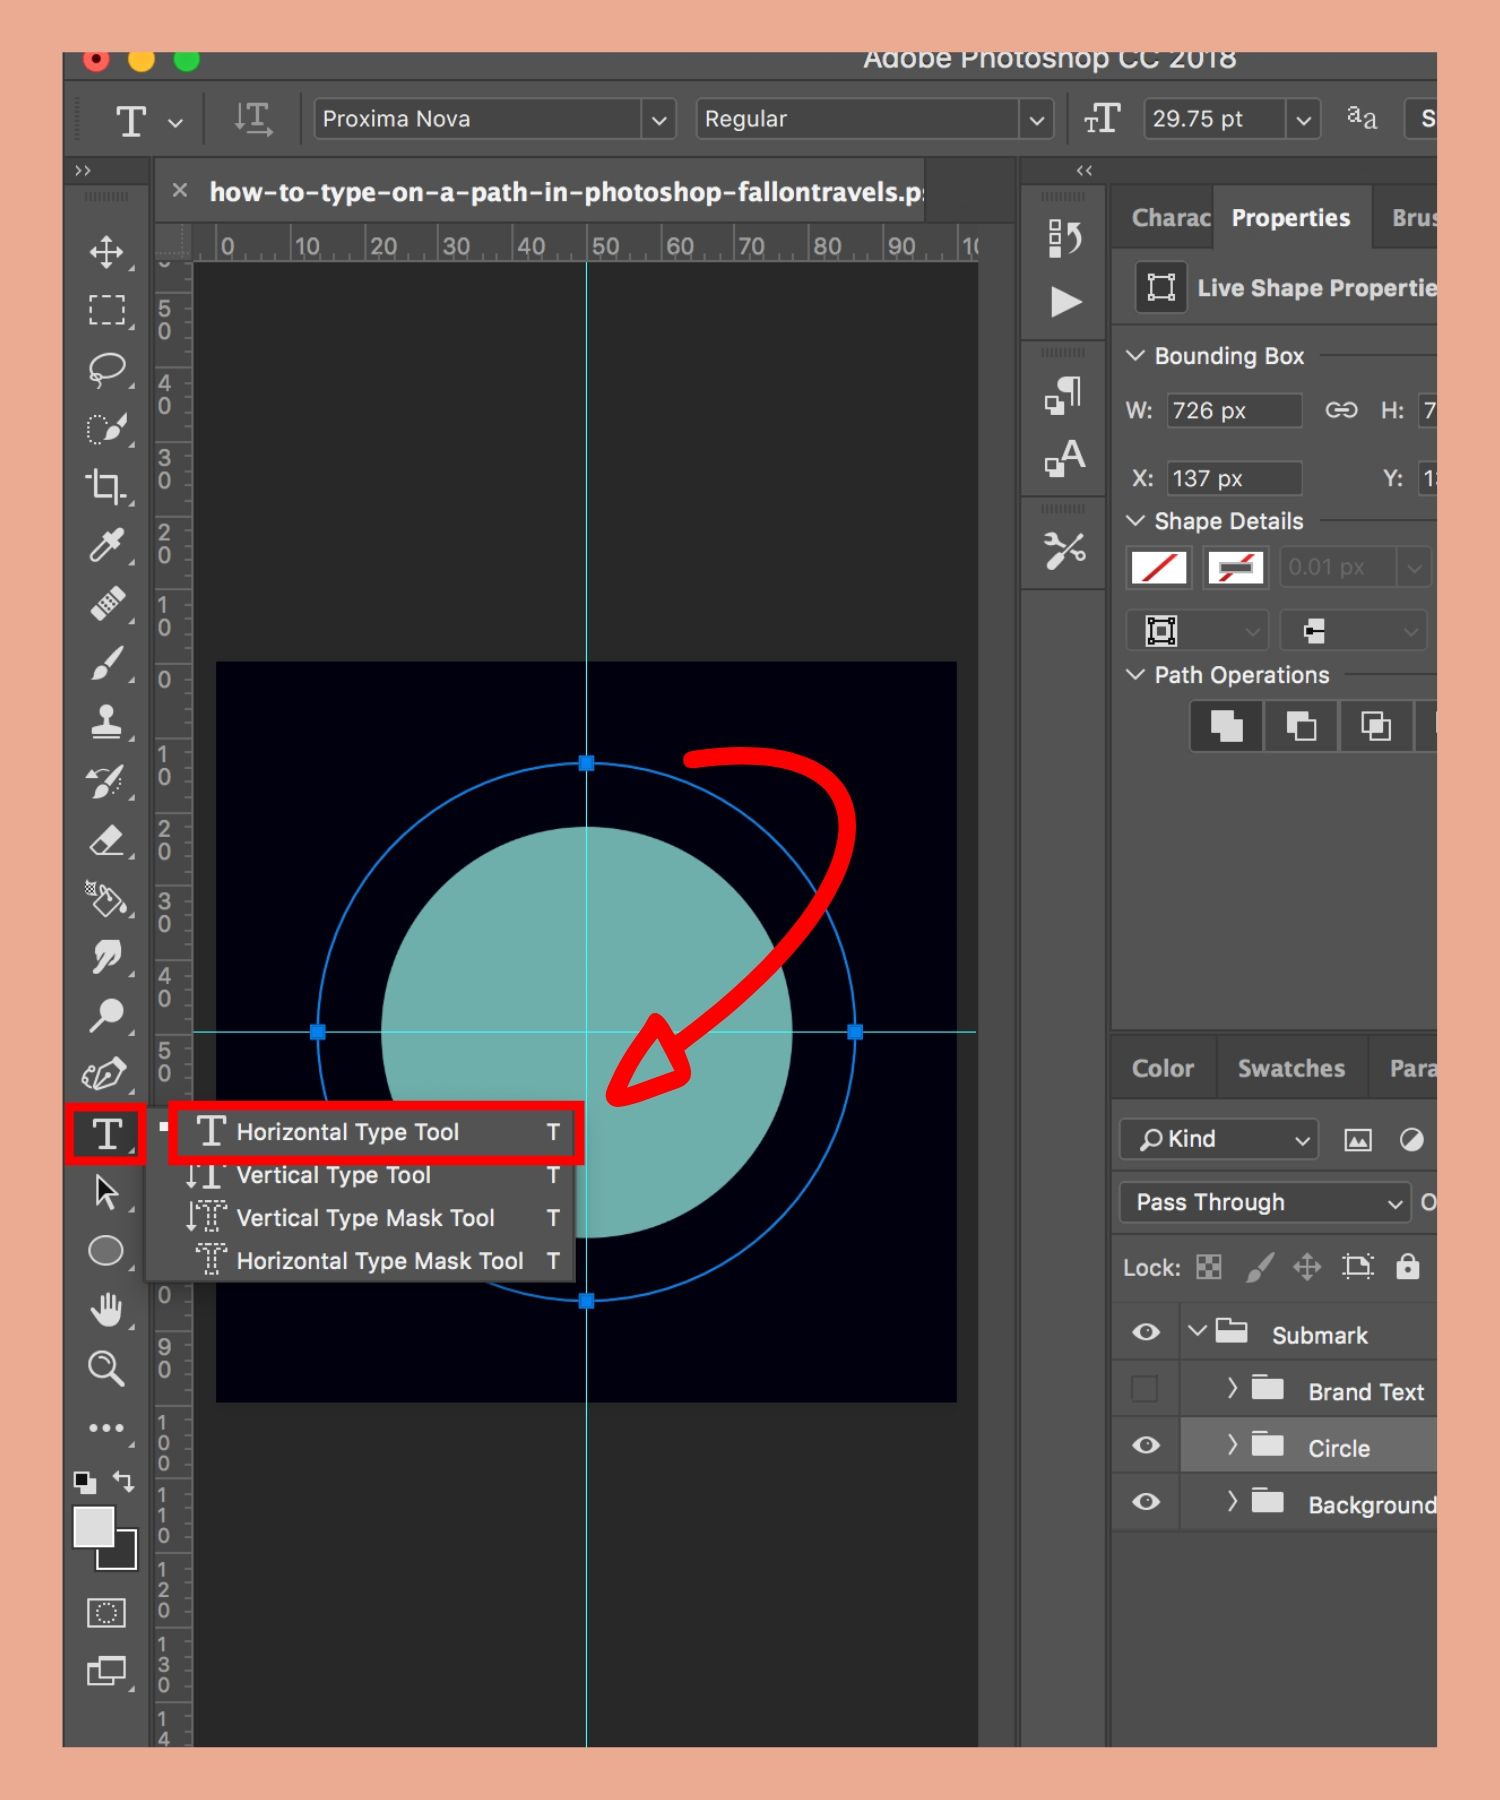
Click on the Type tool bar on the left-hand side
Select “Horizontal Type Tool”.
Make sure that white is selected as your foreground color.
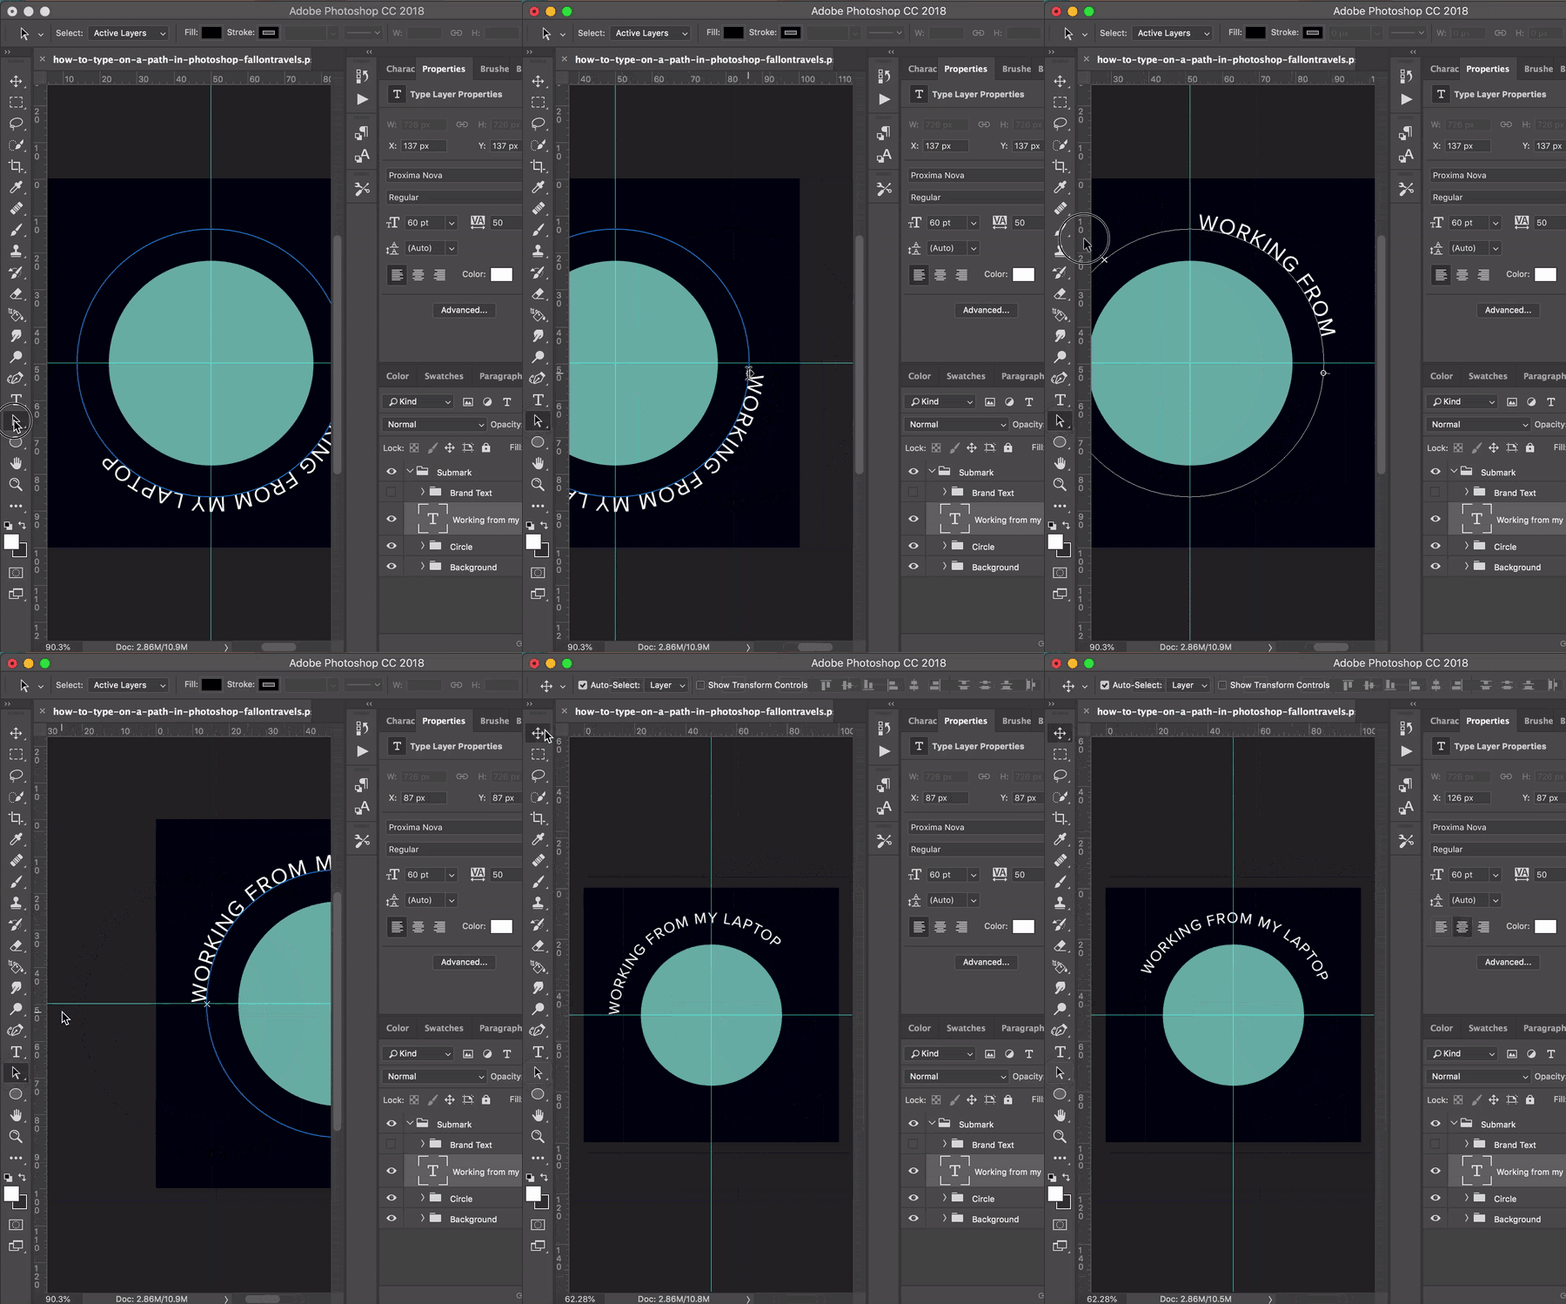
Click anywhere on the top half of your path and begin typing.
Click Enter, Return or just click the “Move” tool to move onto the next step.
4. Align top-half of type on your circle path
This part is gonna get a bit more confusing so just bear with me for a min. We’ll get through it together, friend— promise! :)
Start by following the steps below:
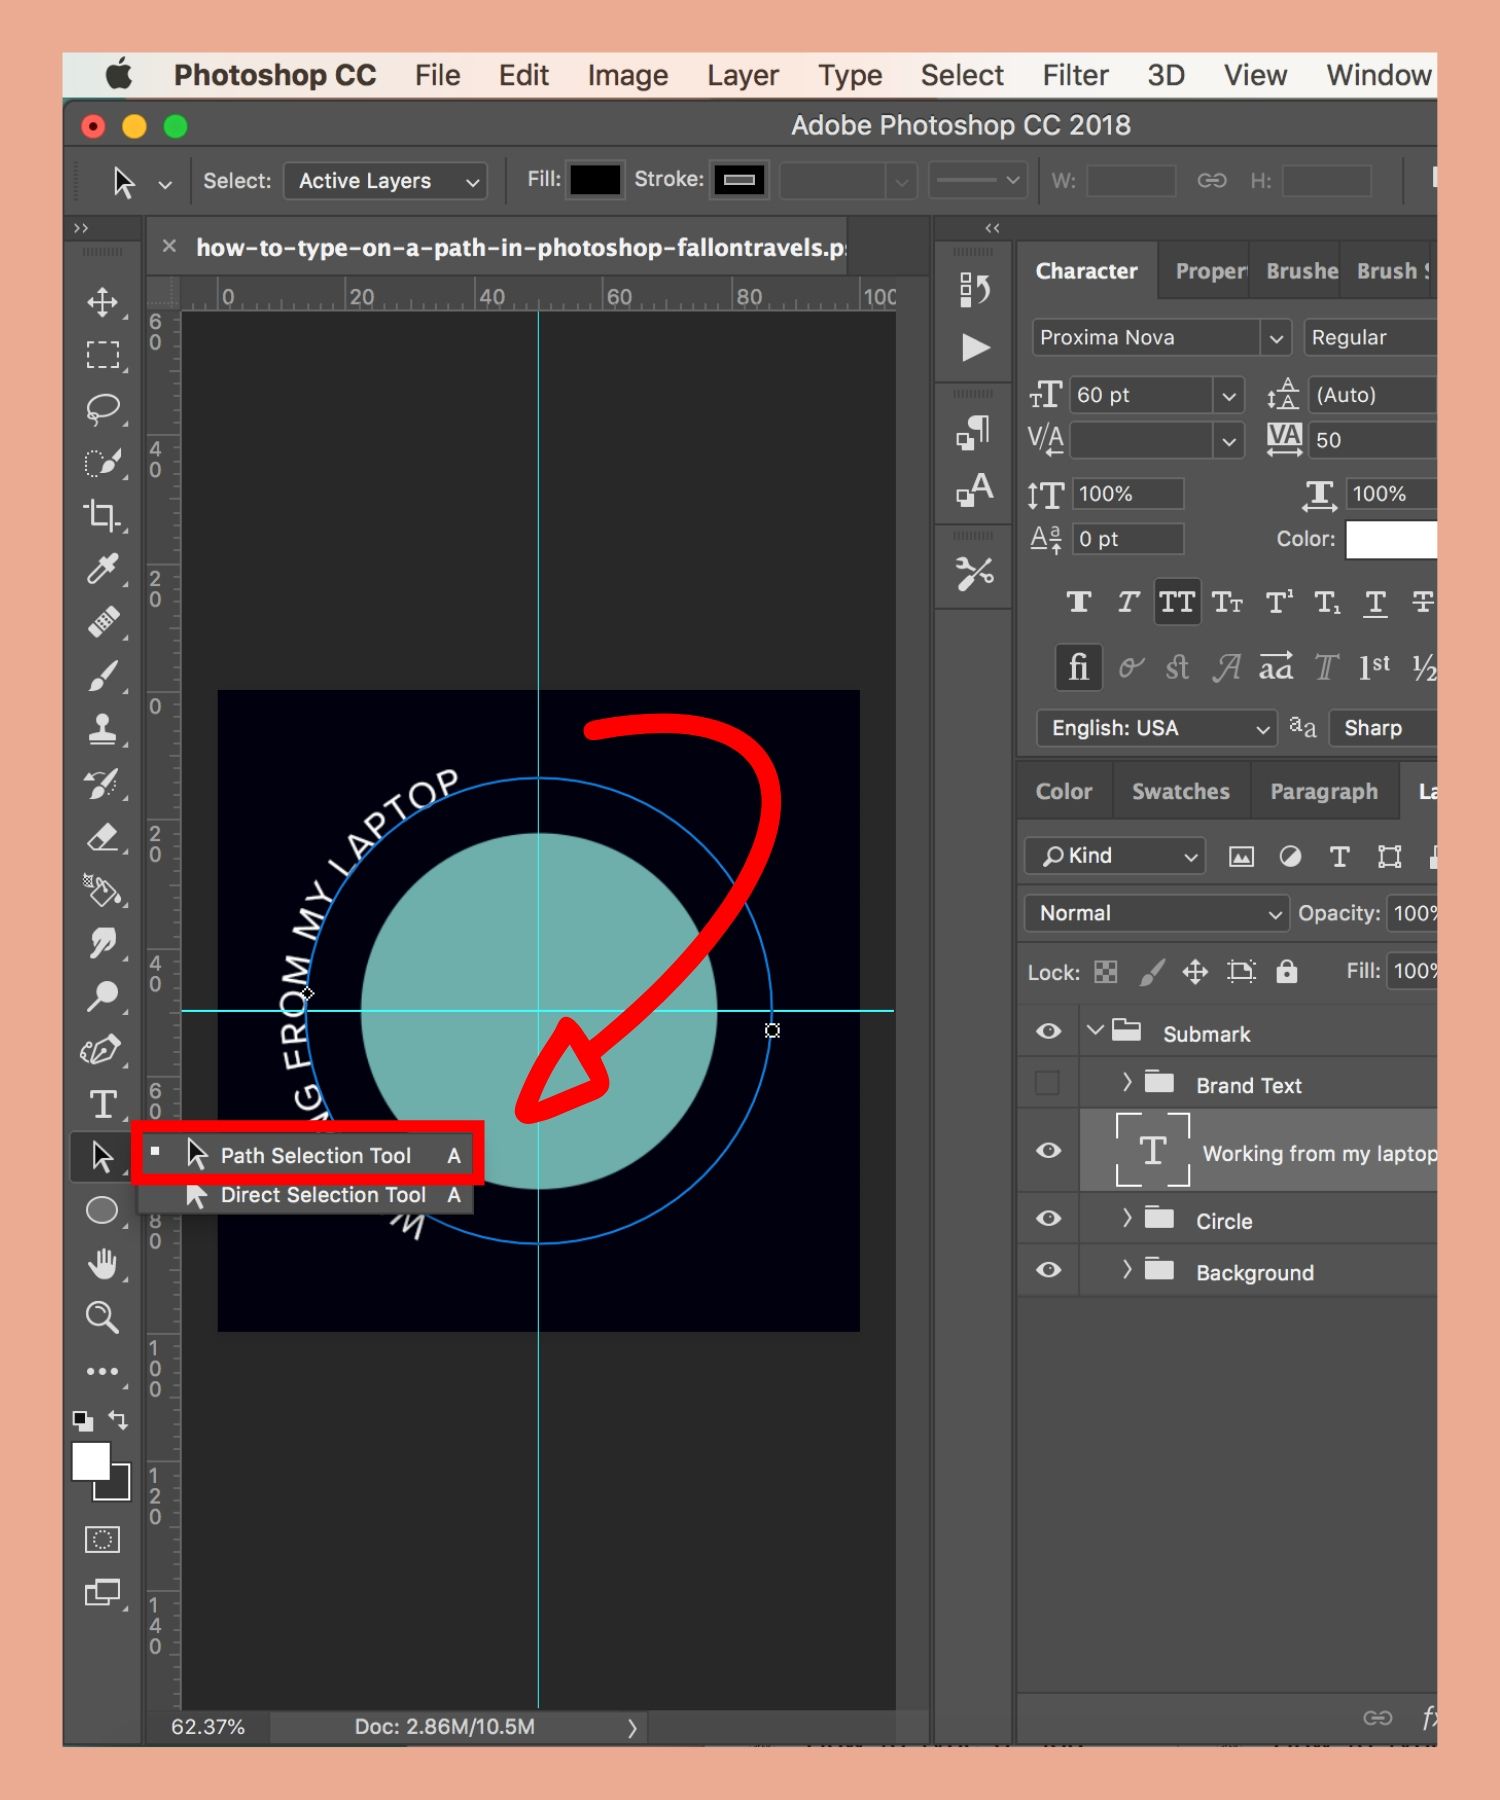
Click on the Path Selection Tool
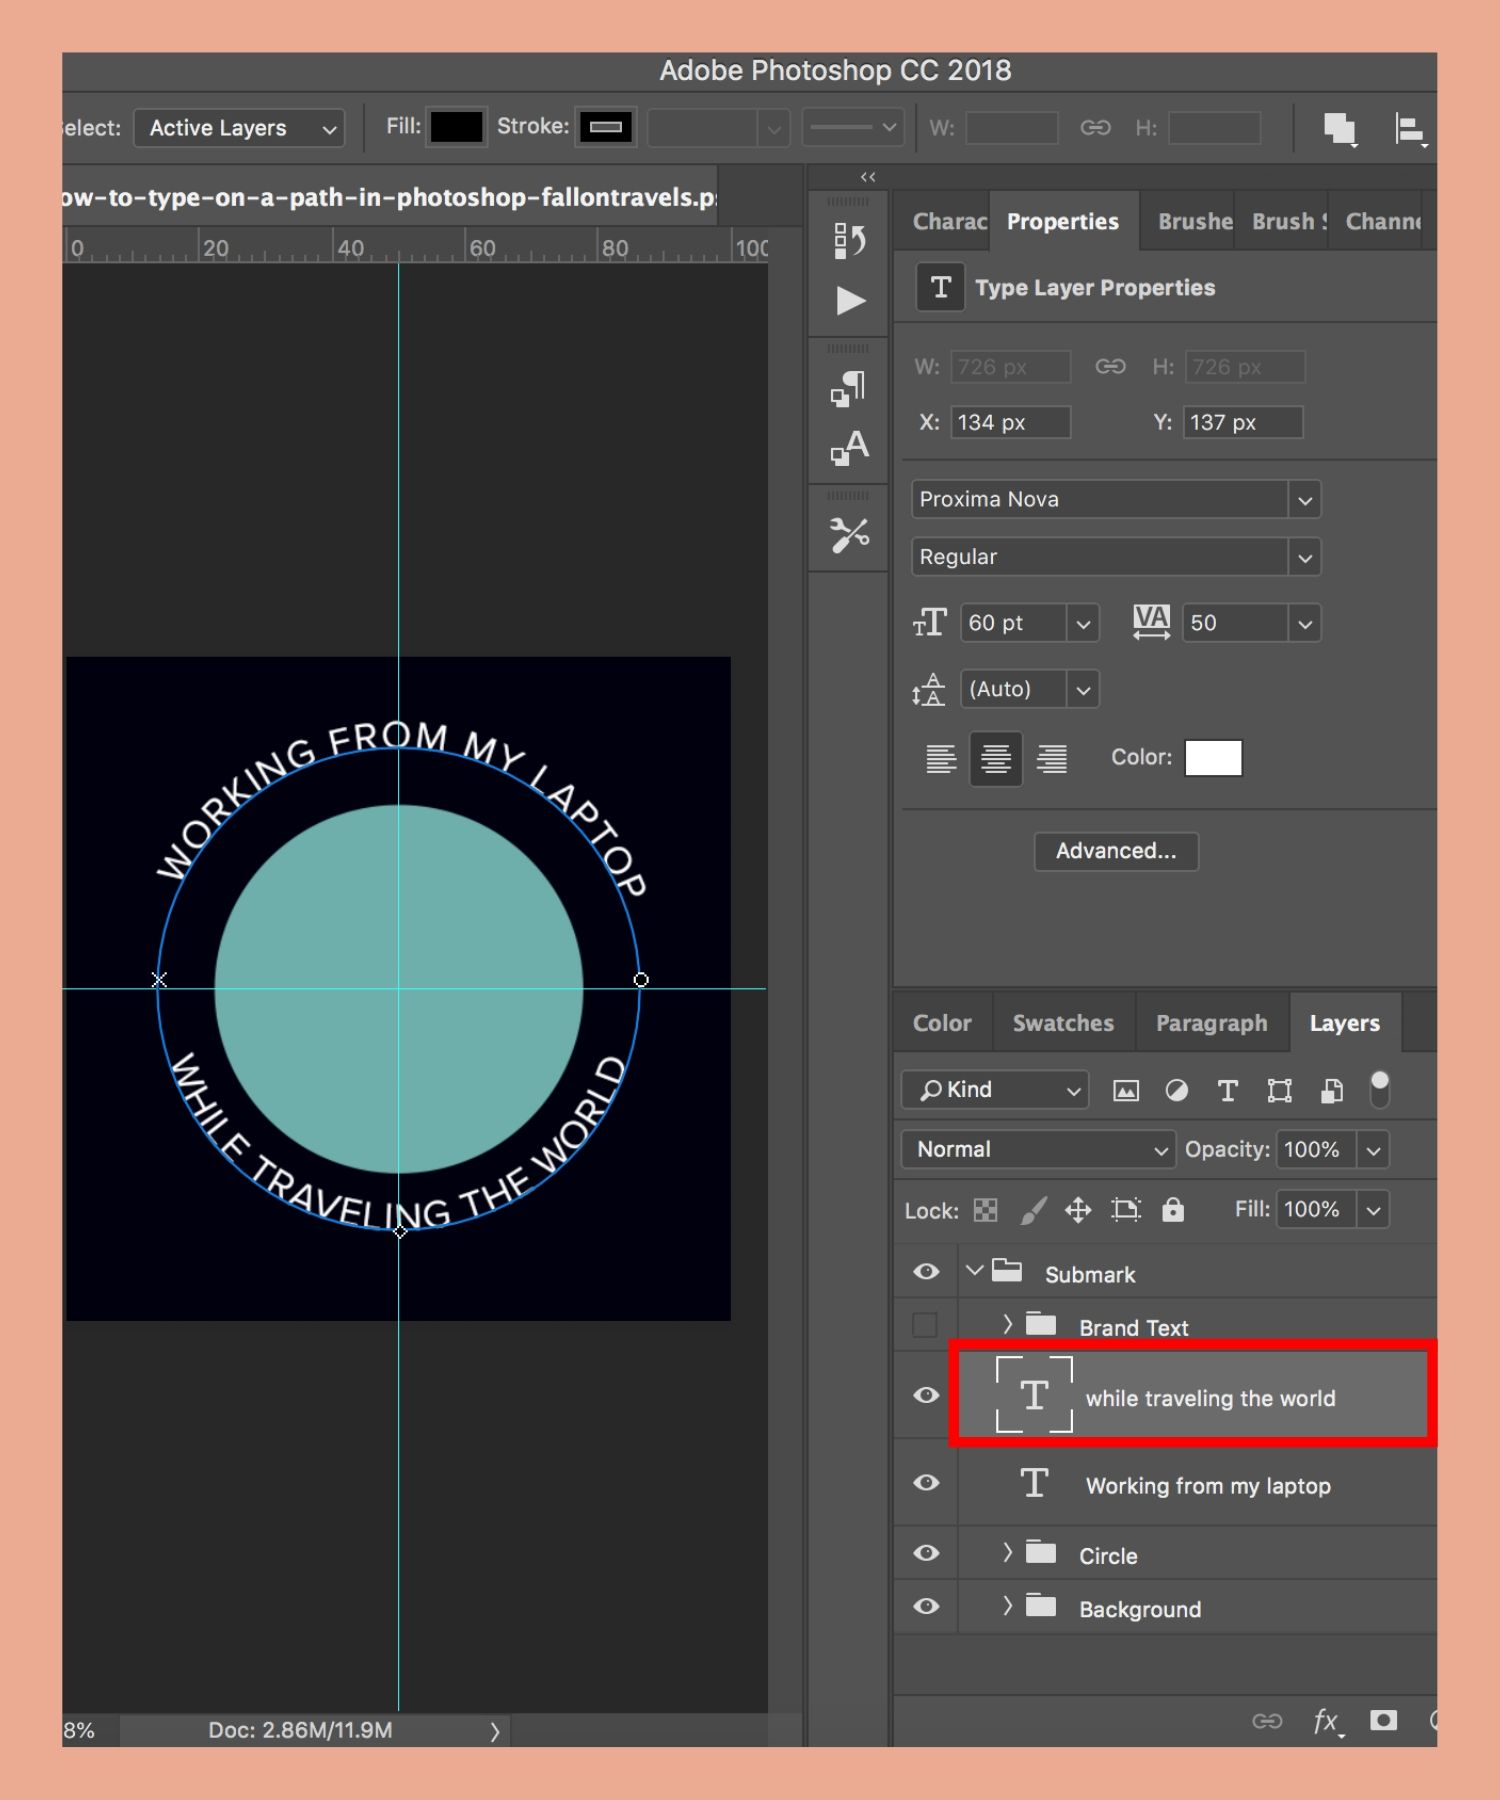
Make sure your text is aligned to the left!
If you don’t see this option, go to Window > Properties and you’ll see the panel pop-up on your right-hand side panel.
Drag your text to your ideal start point.
I’m going to drag the text directly on the horizontal line because I want my text to fill the top half of the logo circle.
5. Reformat your text (optional)
If your text is too big, you can simply go back into the Type Tool, double-click on your text and then change the font size in your Type toolbar.
Now, if you click on the “Center” align option in your Properties panel, your text will be directly aligned in the center of your logo (If you need reference, I did this in the end of the last GIF).
6. Add bottom-half of type on your circle path
Now we’re gonna create the bottom-half of our text.
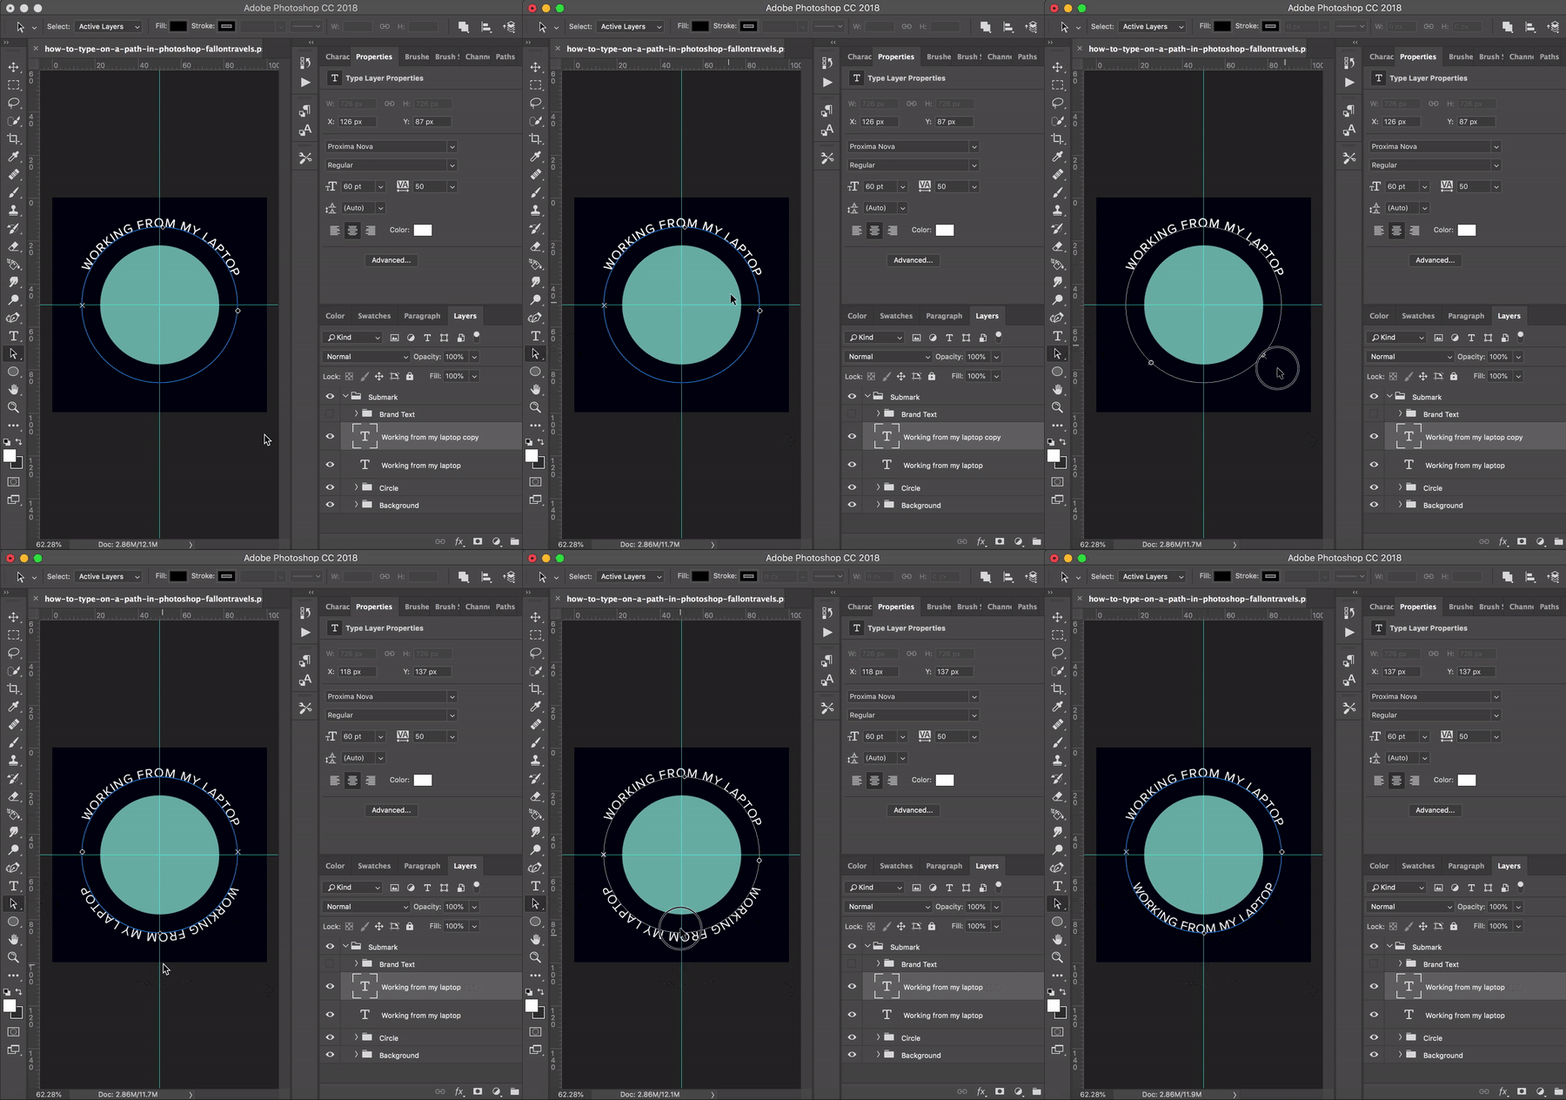
We’ll start by duplicating the text:
Cmd + J (Mac)
Ctrl + J (PC)
Then click the Path Selection Tool again & drag the text until its flipped around to the opposite side.
Click and drag inwards and you’ll see your text flip so that you can actually read what it says!
You can now double-click on the text and type out whatever you want the bottom half of the logo/graphic to say.
7. Align bottom-half of type on your circle path
Butttt now the problem is that its too close to the center of the document and looks kinda funky on our logo, so lets go ahead and try to align it a little better!
To align the bottom part of our text:
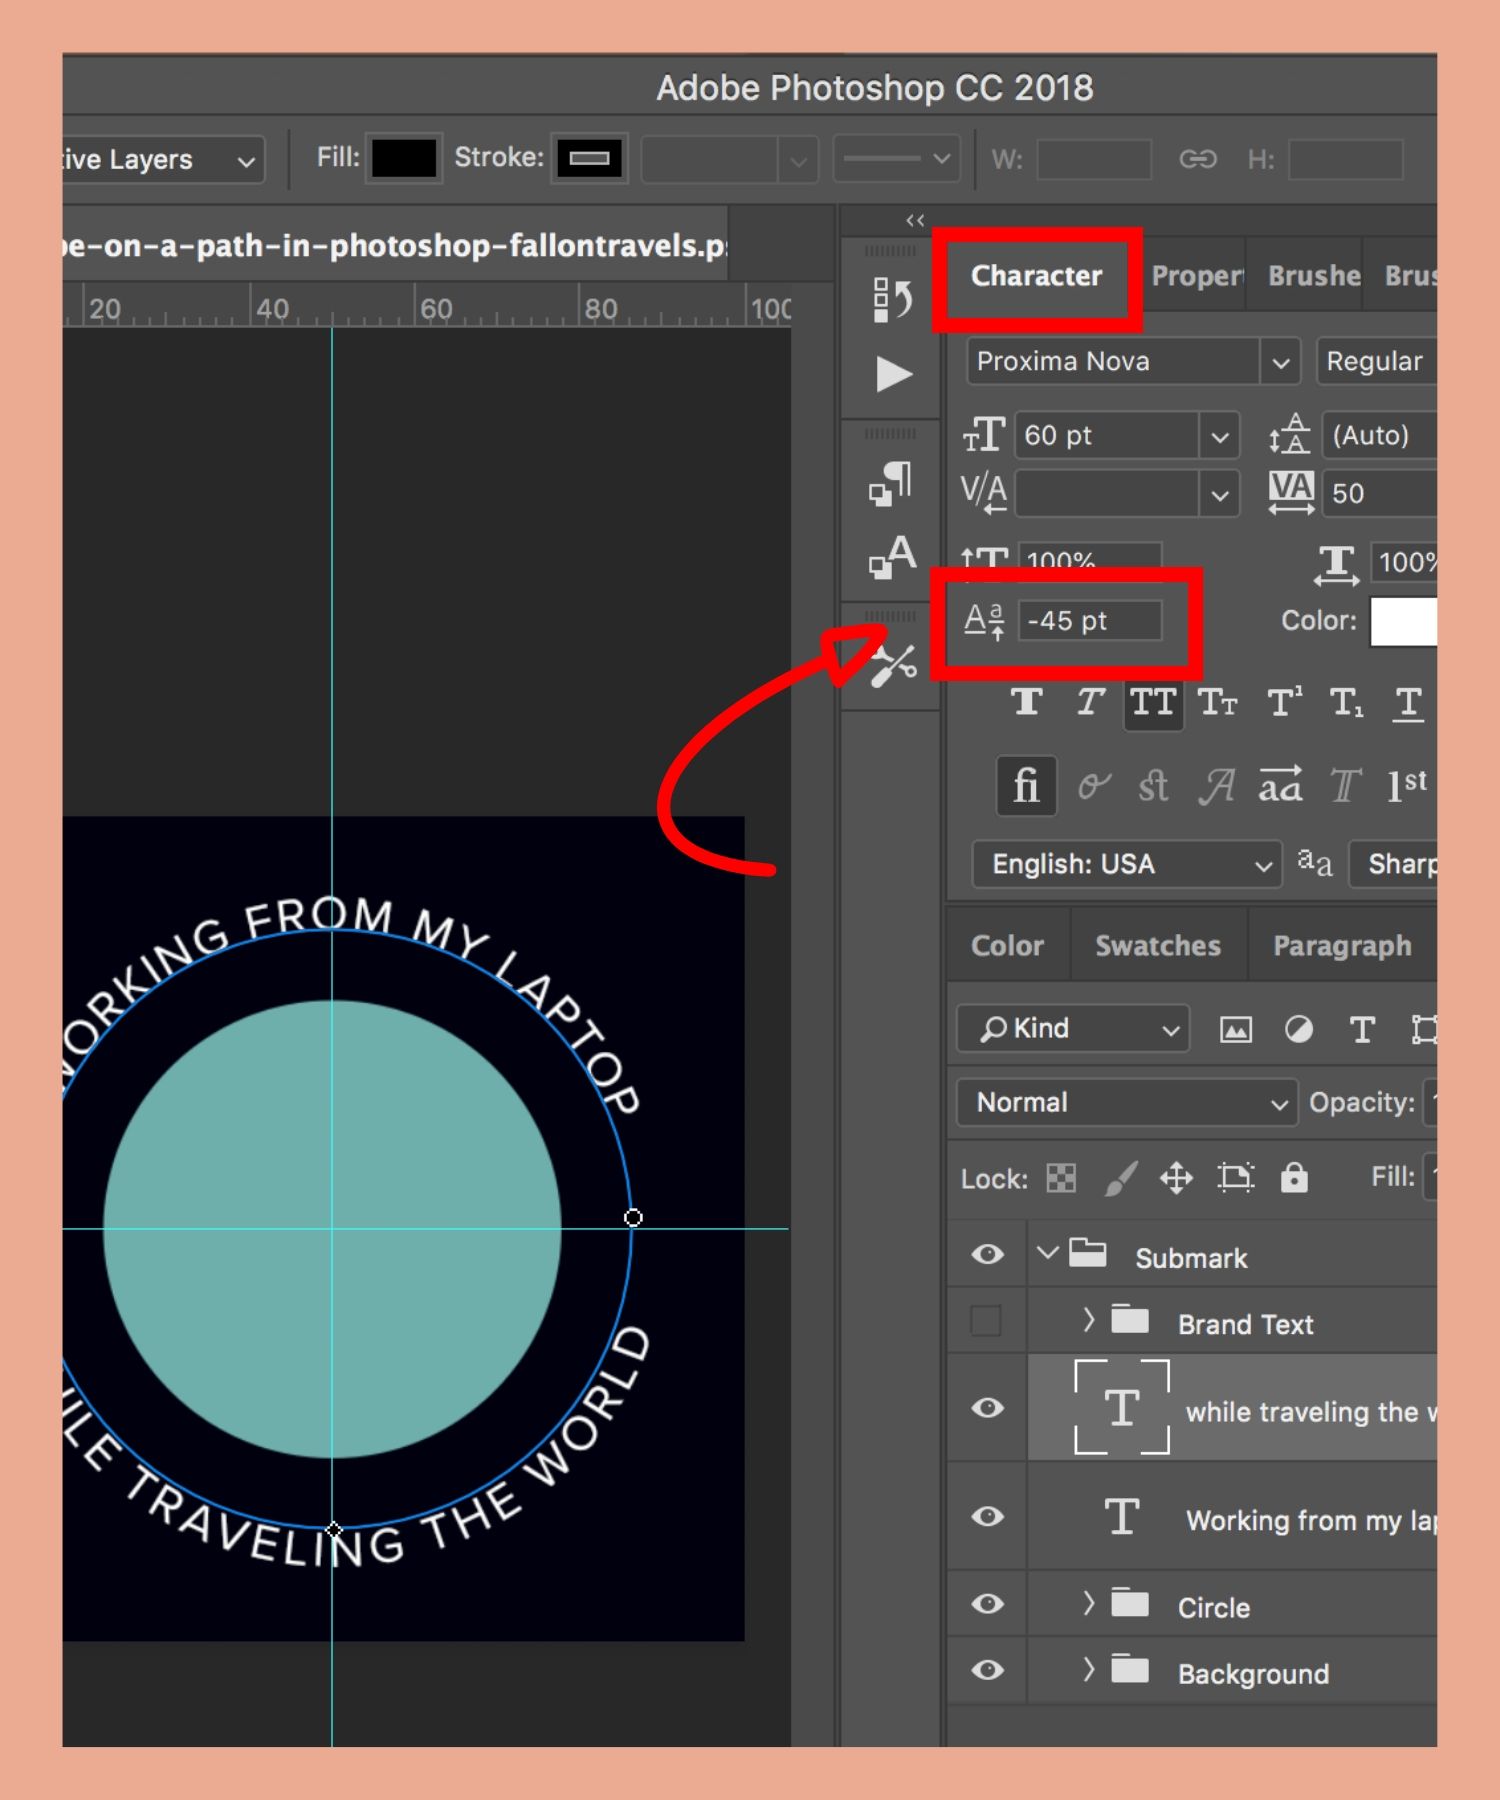
Click on Window > Character
Now we wanna adjust the baseline of our text (I’ve shown the icon below, but it will say, “Set the baseline shift” when you hover over it)
So click on this little icon in the character window and decrease the value until your bottom text aligns with your top text (you can also just hover over it and drag it to the left or the right).
Thats it! :) You can now reformat your text, change your branding colors or fonts & play around until you’re happy with your logo.
Once you’re finished, you can hide the background layer using the “eye” icon so your logo is transparent & then export as a PNG file for your website!
*PS I included a visual below so you can get a better idea of branding changes you could make! For this one, I moved the text a little closer to the inner circle, changed the font to a dark grey, added my brand name on top of the blue circle & then hid the background layer!*
If ya made it through the tutorial with zero problems, give yourself a nice pat on the back!
It might take a few trial & error attempts before you get your logo/graphic exactly how you want it, but hopefully I simplified the process for ya a bit. :)
If you enjoyed my guide on how to type on a path in Photoshop, I would love for you to consider sharing it on social media using any of the images below (hint, hint— click that little “Pin” button in the corner to pin it to your Pinterest boards!).
Peace & blessings, my Photoshop lovin’ friends!
XO, Fal :)


