How to use Canva 2.0 to design branded templates
Disclaimer: Hey there, friend! This article includes affiliate links & I would LOVE if you decided to use them. Affiliate links + referrals programs help creators and educators like me to fund the free content that we provide on our blogs. Thank you for your endless support!

I have to come clean about something…
Over the past few months… I’ve been using Canva 2.0 more often than Adobe Photoshop to design my templates and graphics. Say what? The girl who’s always shouting to the masses about her love for Photoshop… opting for a free design tool instead?
Alright, just hear me out for a second.
If this were the outdated (1.0) version of the Canva design platform I would NOT be writing this post right now (sorry Canva). My frustration levels used to hit an all-time high with this version of the platform, but my feelings have changed drastically since the Canva 2.0 update was released.
*Quick note: if you would like to convert your Canva 1.0 templates to the 2.0 version, check out this post.
Now, I find designing in Canva to be easier than ever & saves me SO much time with the simplicity of its design tools & features. I even put myself to the test & timed how long it took me to create a set of templates in Canva vs. designing the same set in Photoshop. I honestly could not believe it— designing in Canva cuts my design time by over 50% (no, I’m not joking).
If you want to learn how to use Canva 2.0 to create stunning graphics & design templates (quickly & easily!), then read on to check out my list of the platform’s most useful features.
Table of Contents
How to choose Canva Fonts
Listed below are some of my favorite tips, tricks & hacks for choosing brand fonts in Canva!
Rule of thumb for choosing brand fonts:
Its important to limit the amount of fonts you use in any given design— the eye naturally finds it difficult to process multiple typefaces and readers will undoubtedly scroll past the design if it seems unappealing & busy.
To combat for this, just keep it SIMPLE!
Use 2-3 fonts MAX in your designs
Use 1 serif font (typeface with an embellishment on the letters) & 1 sans serif font (typeface without embellishments), along with several variations for each (I.e. capitalized, italic, bold, letter spacing, etc.)
How to use Canva Letter Spacing
How to use letter spacing in Canva
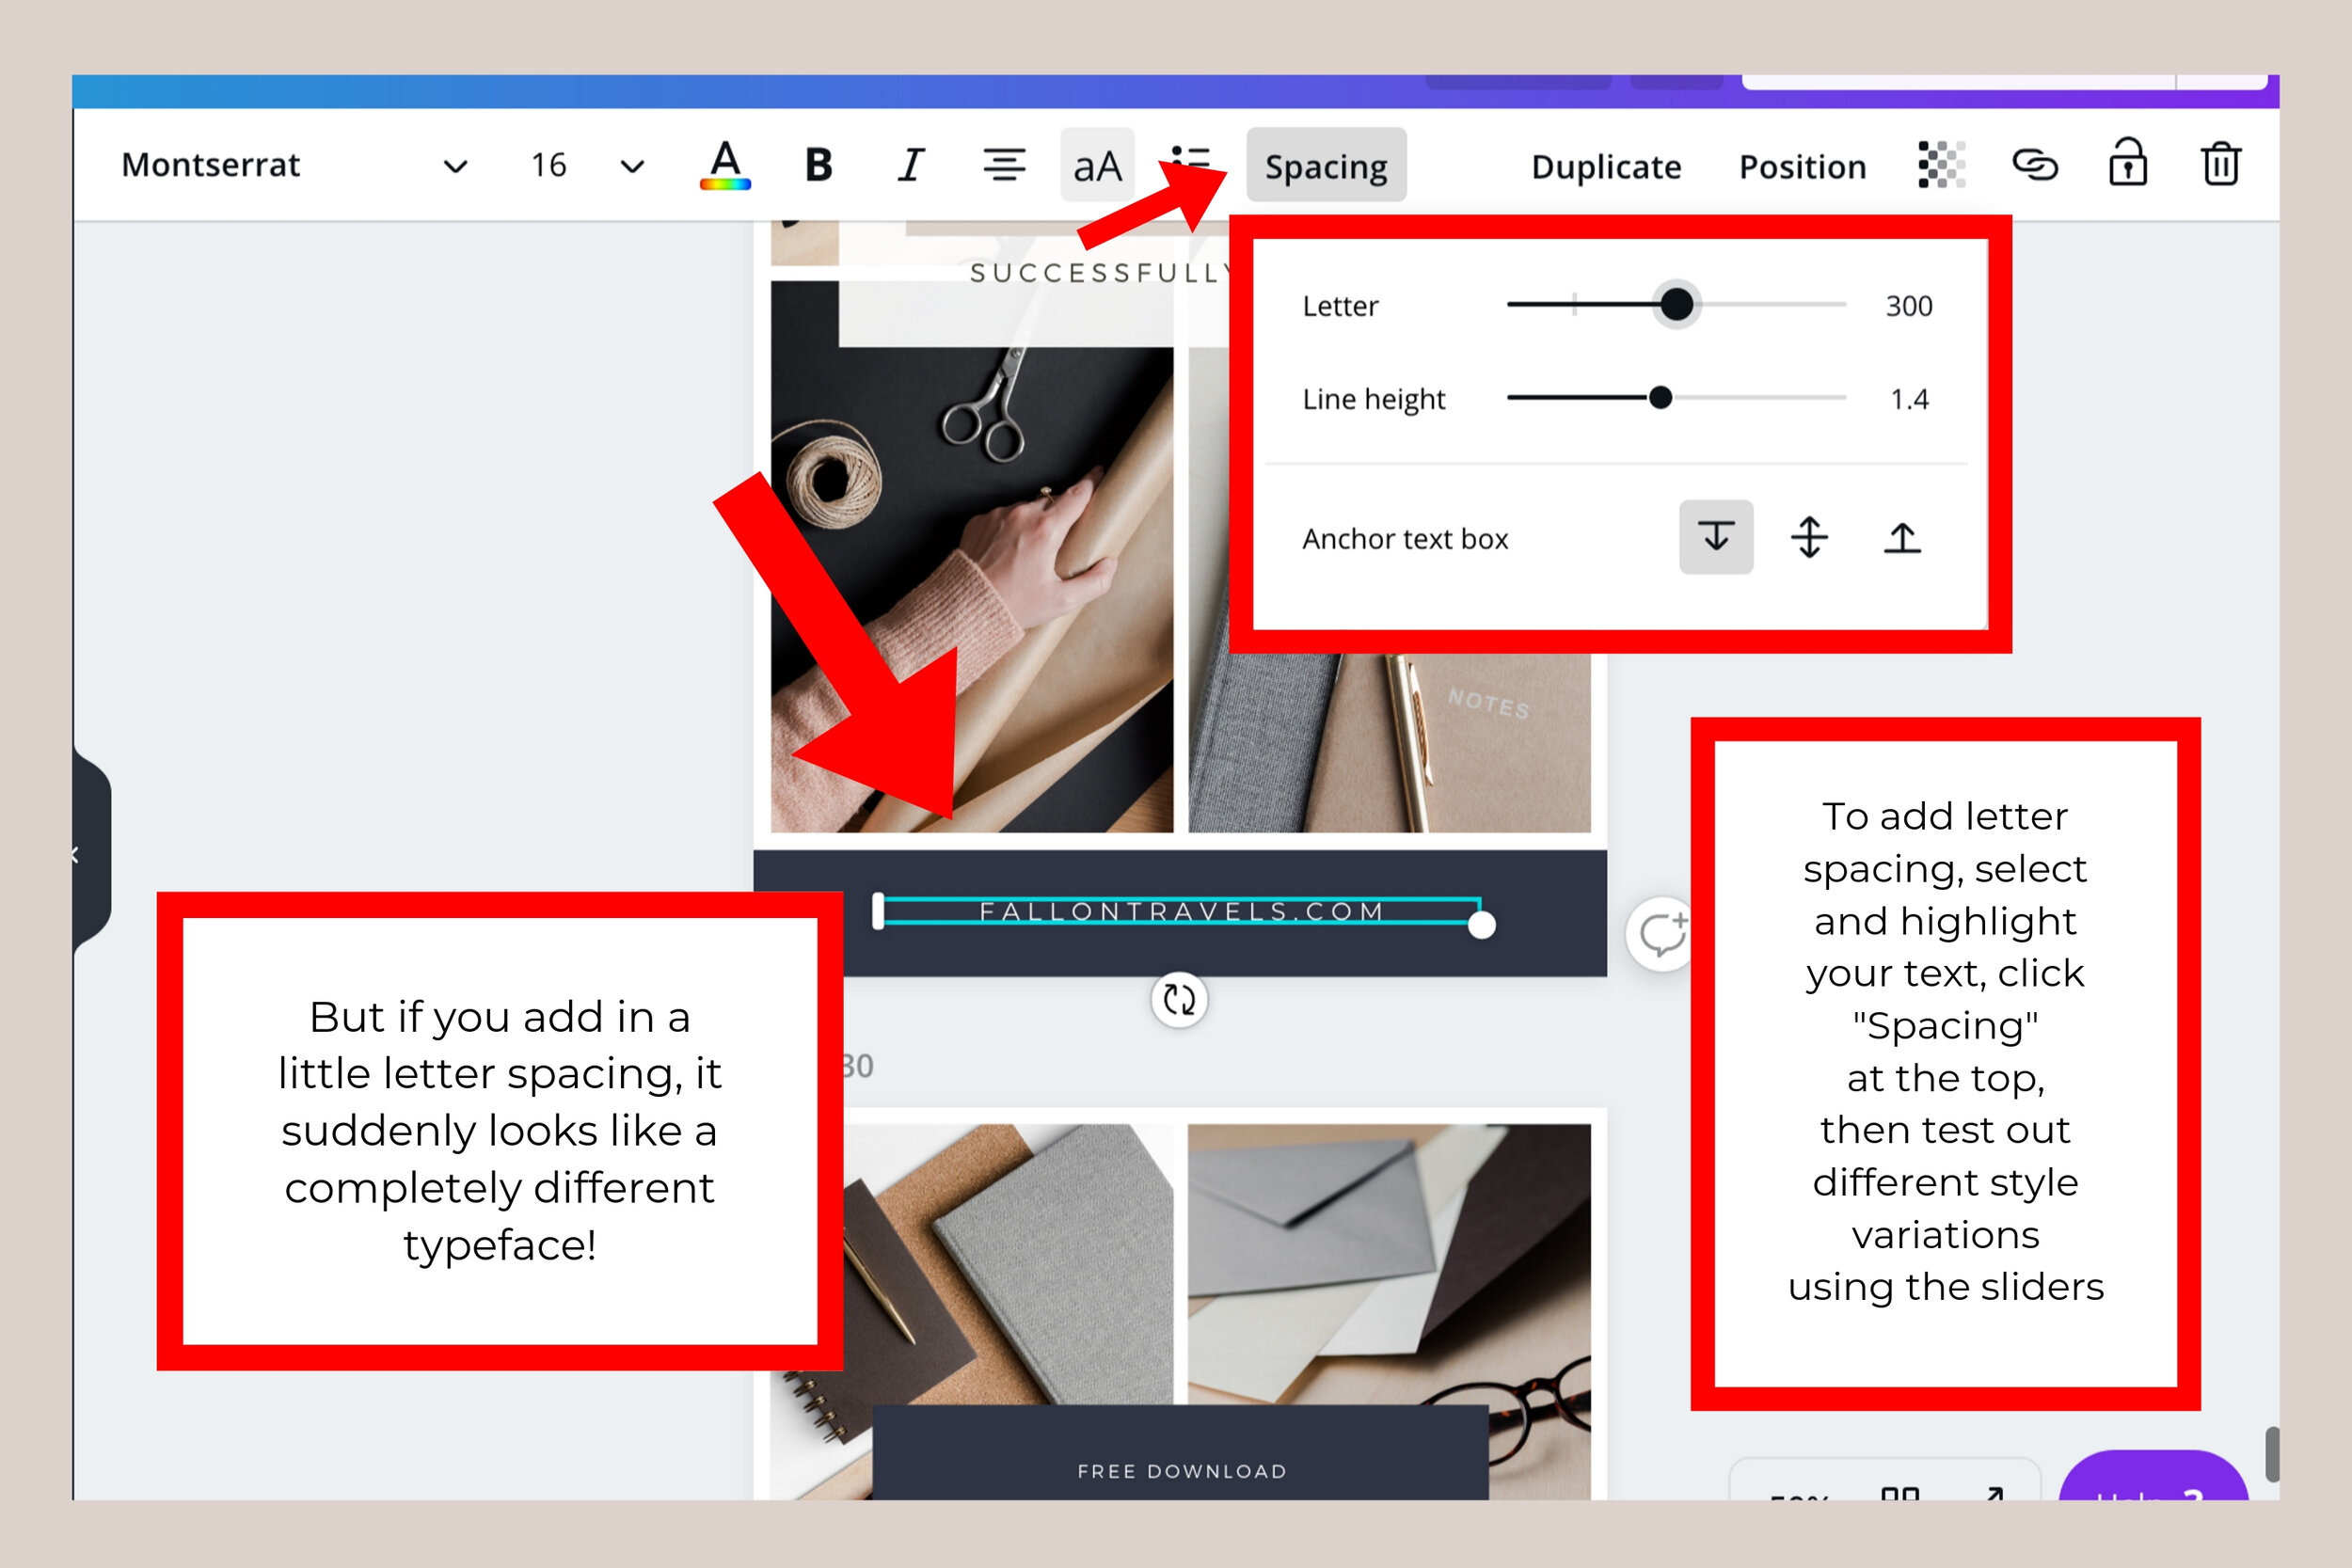
One great way to make variations for your typeface is by using letter spacing to fill in any dead space in your design.
However, you’ll want to make sure you don’t take this too far— you want your audience to be able to read what your text says!

How to use letter spacing in Canva:
To add letter spacing, select and highlight your text
Click “Spacing” in the top toolbar
Test out different style variations using the sliders
Try Increasing “Letter” to add spacing in between the letters, and then “Line Height” to add spacing in between your text lines
How to align text & elements
How to align your elements:
Click and drag your cursor over the element you want to align
Select “Position” in the toolbar at the top
Choose an alignment style under the “Align to page” section - for example, if you would like to align your text to the center of the page, choose, “Center”

How to use Canva color tools
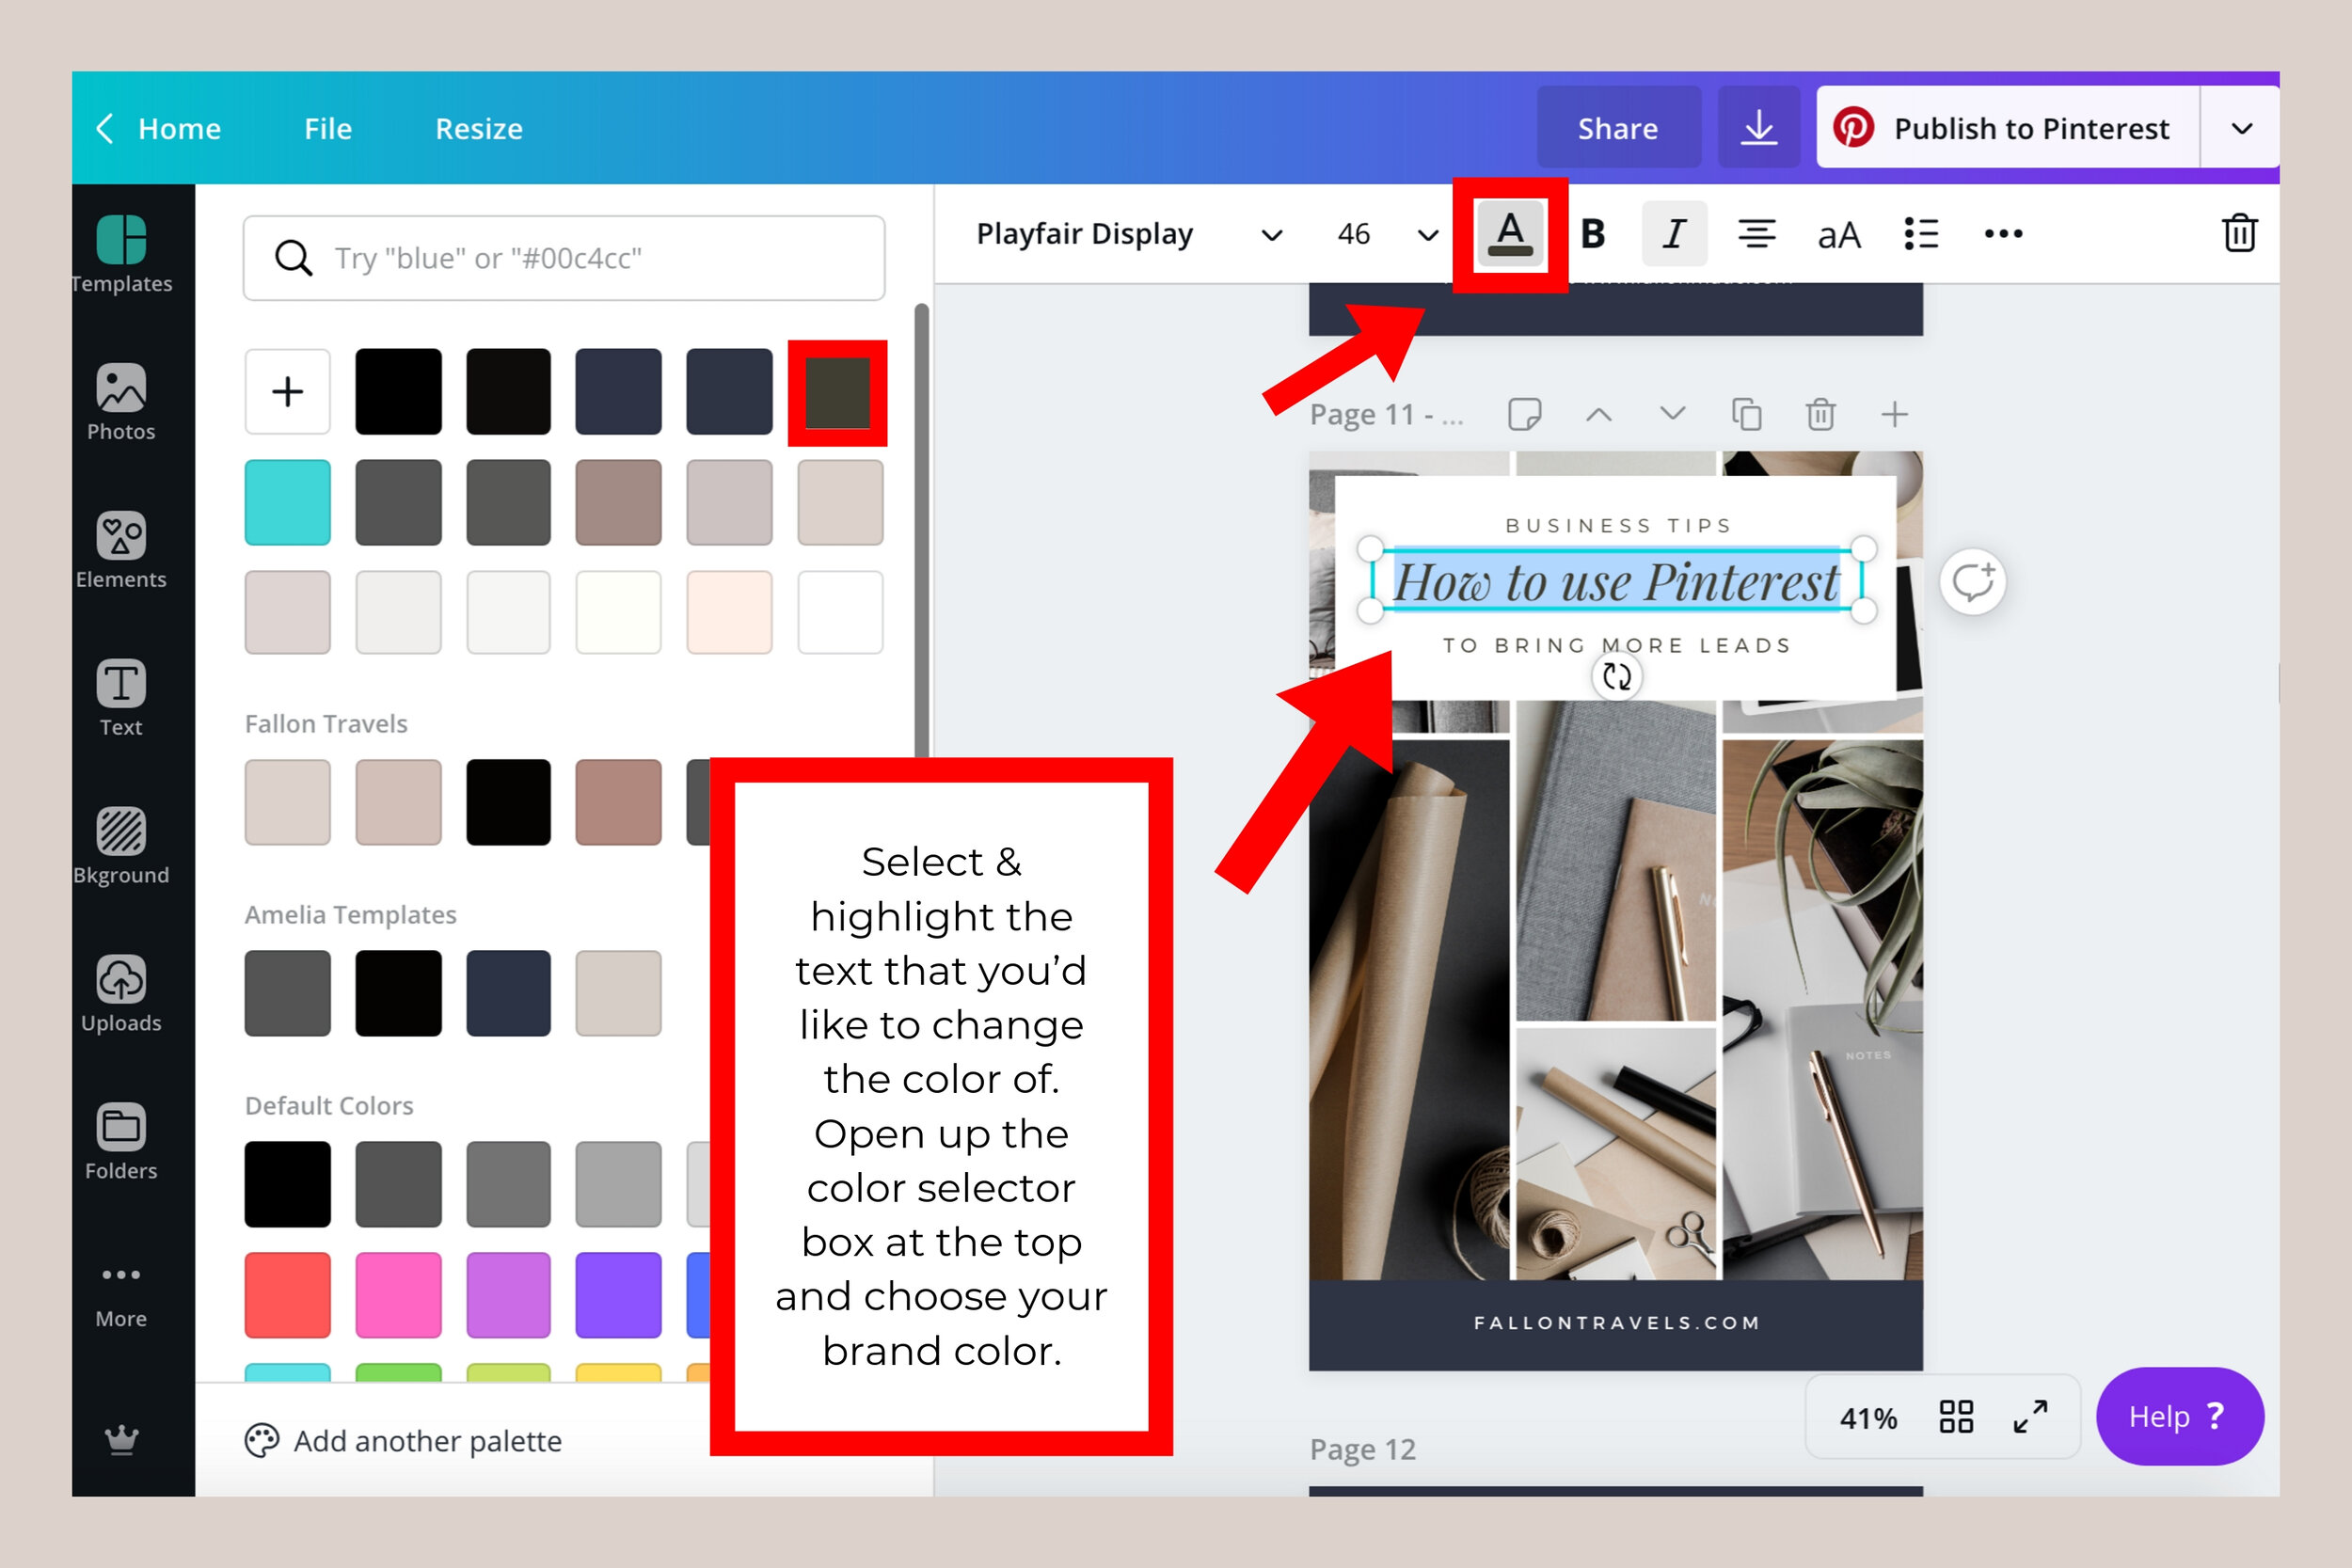
How to change FONT color in Canva:
Select & highlight the text that you’d like to change the color of
Open up the color selector box at the top and choose your brand color.
Select the + to add a new color or type in the HEX code (i.e. #ffffff) - once chosen, the color will be applied to your typeface
Note: If you’ve upgraded to Canva for Work, you can add your brand colors as a color palette to choose from easily while you design
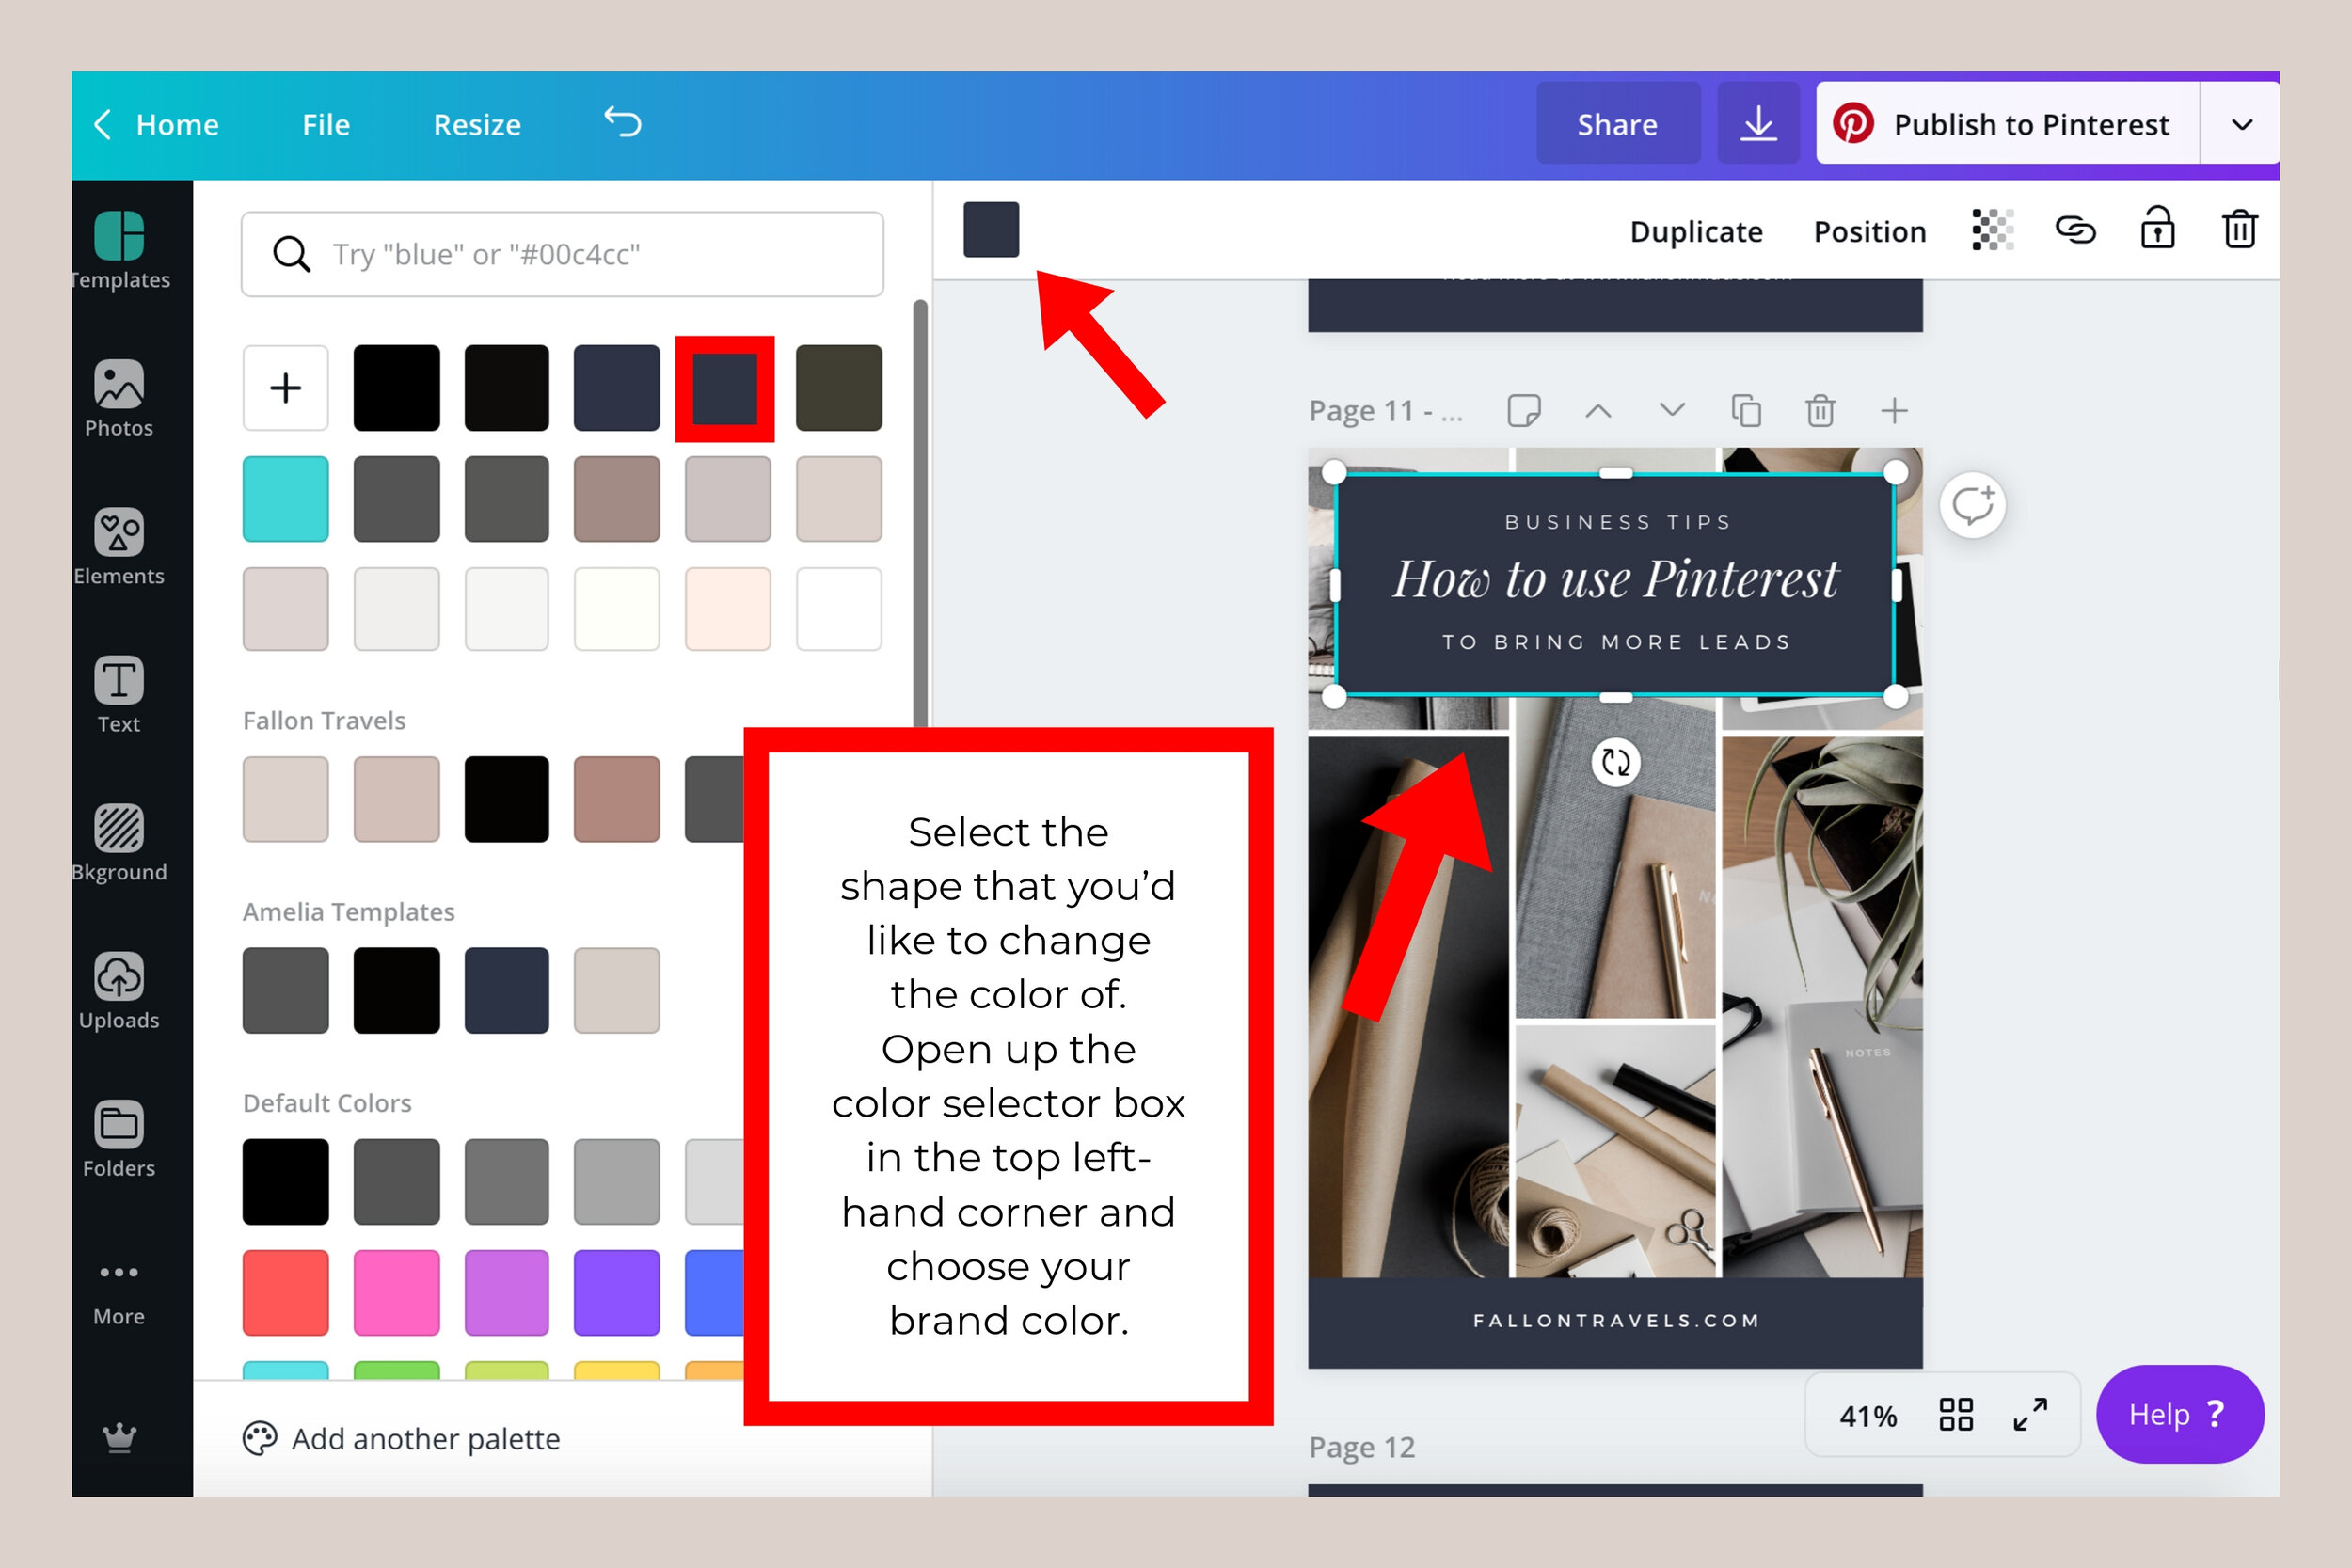
How to change SHAPE color in Canva:
Select the shape that you’d like to change the color of
Open up the color selector box in the top left-hand corner and choose your brand color.
How to upload images to Canva
Add images to your design template:
Upload your image by clicking on the “Uploads” tab on the far left-hand side
of your screen.
Click “Upload an image” and choose from your files.
Drag your image onto the placeholder box. It will automatically crop to fit
that area.
You can also adjust the image within the box by double clicking on it, making your edits, and then hitting return on your keyboard.

How to use frames in Canva
How to use the “Frames” feature:
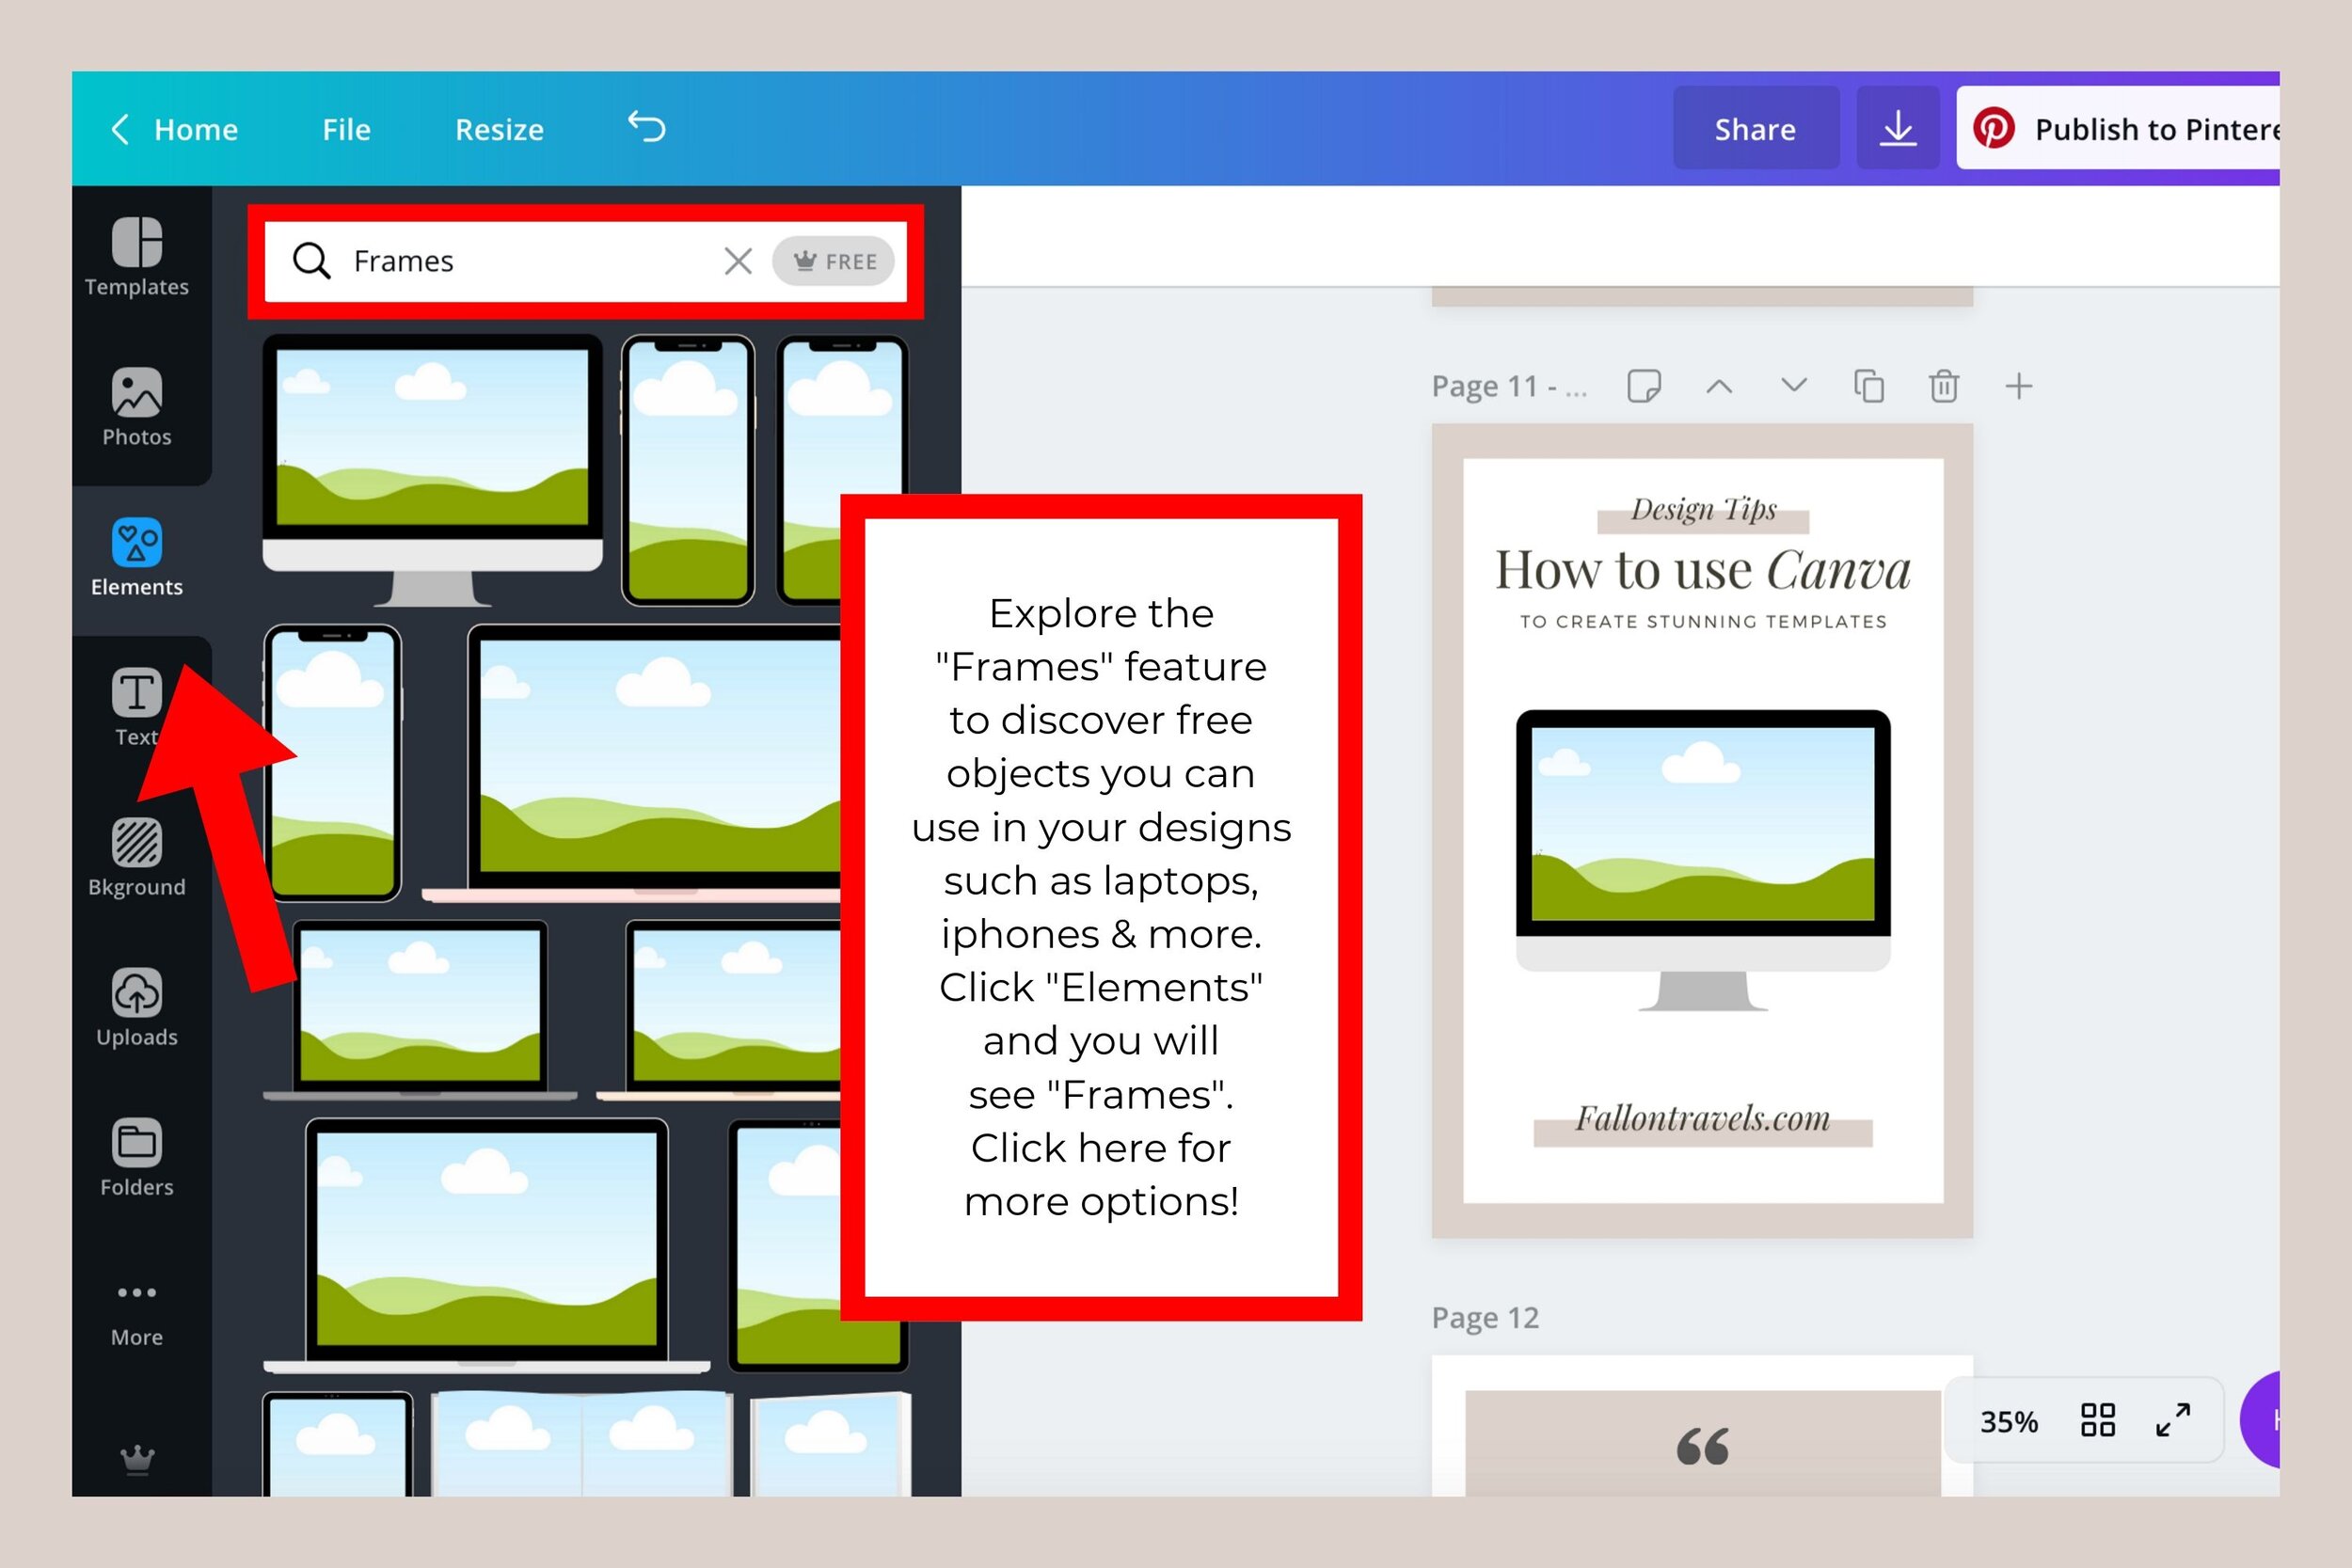
You can add various framed elements using the “Frames” feature— some of these objects include computer monitors, iphones, laptops, postcard stamps, uppercase letters & more.
Click “Elements” and you will see “Frames”
Click here for tons of design options!
Quick Tip: You can resize and adjust the color of your frame elements easily. Just use the tips in this article as guidance on how to make those adjustments!
How to use Canva Grids
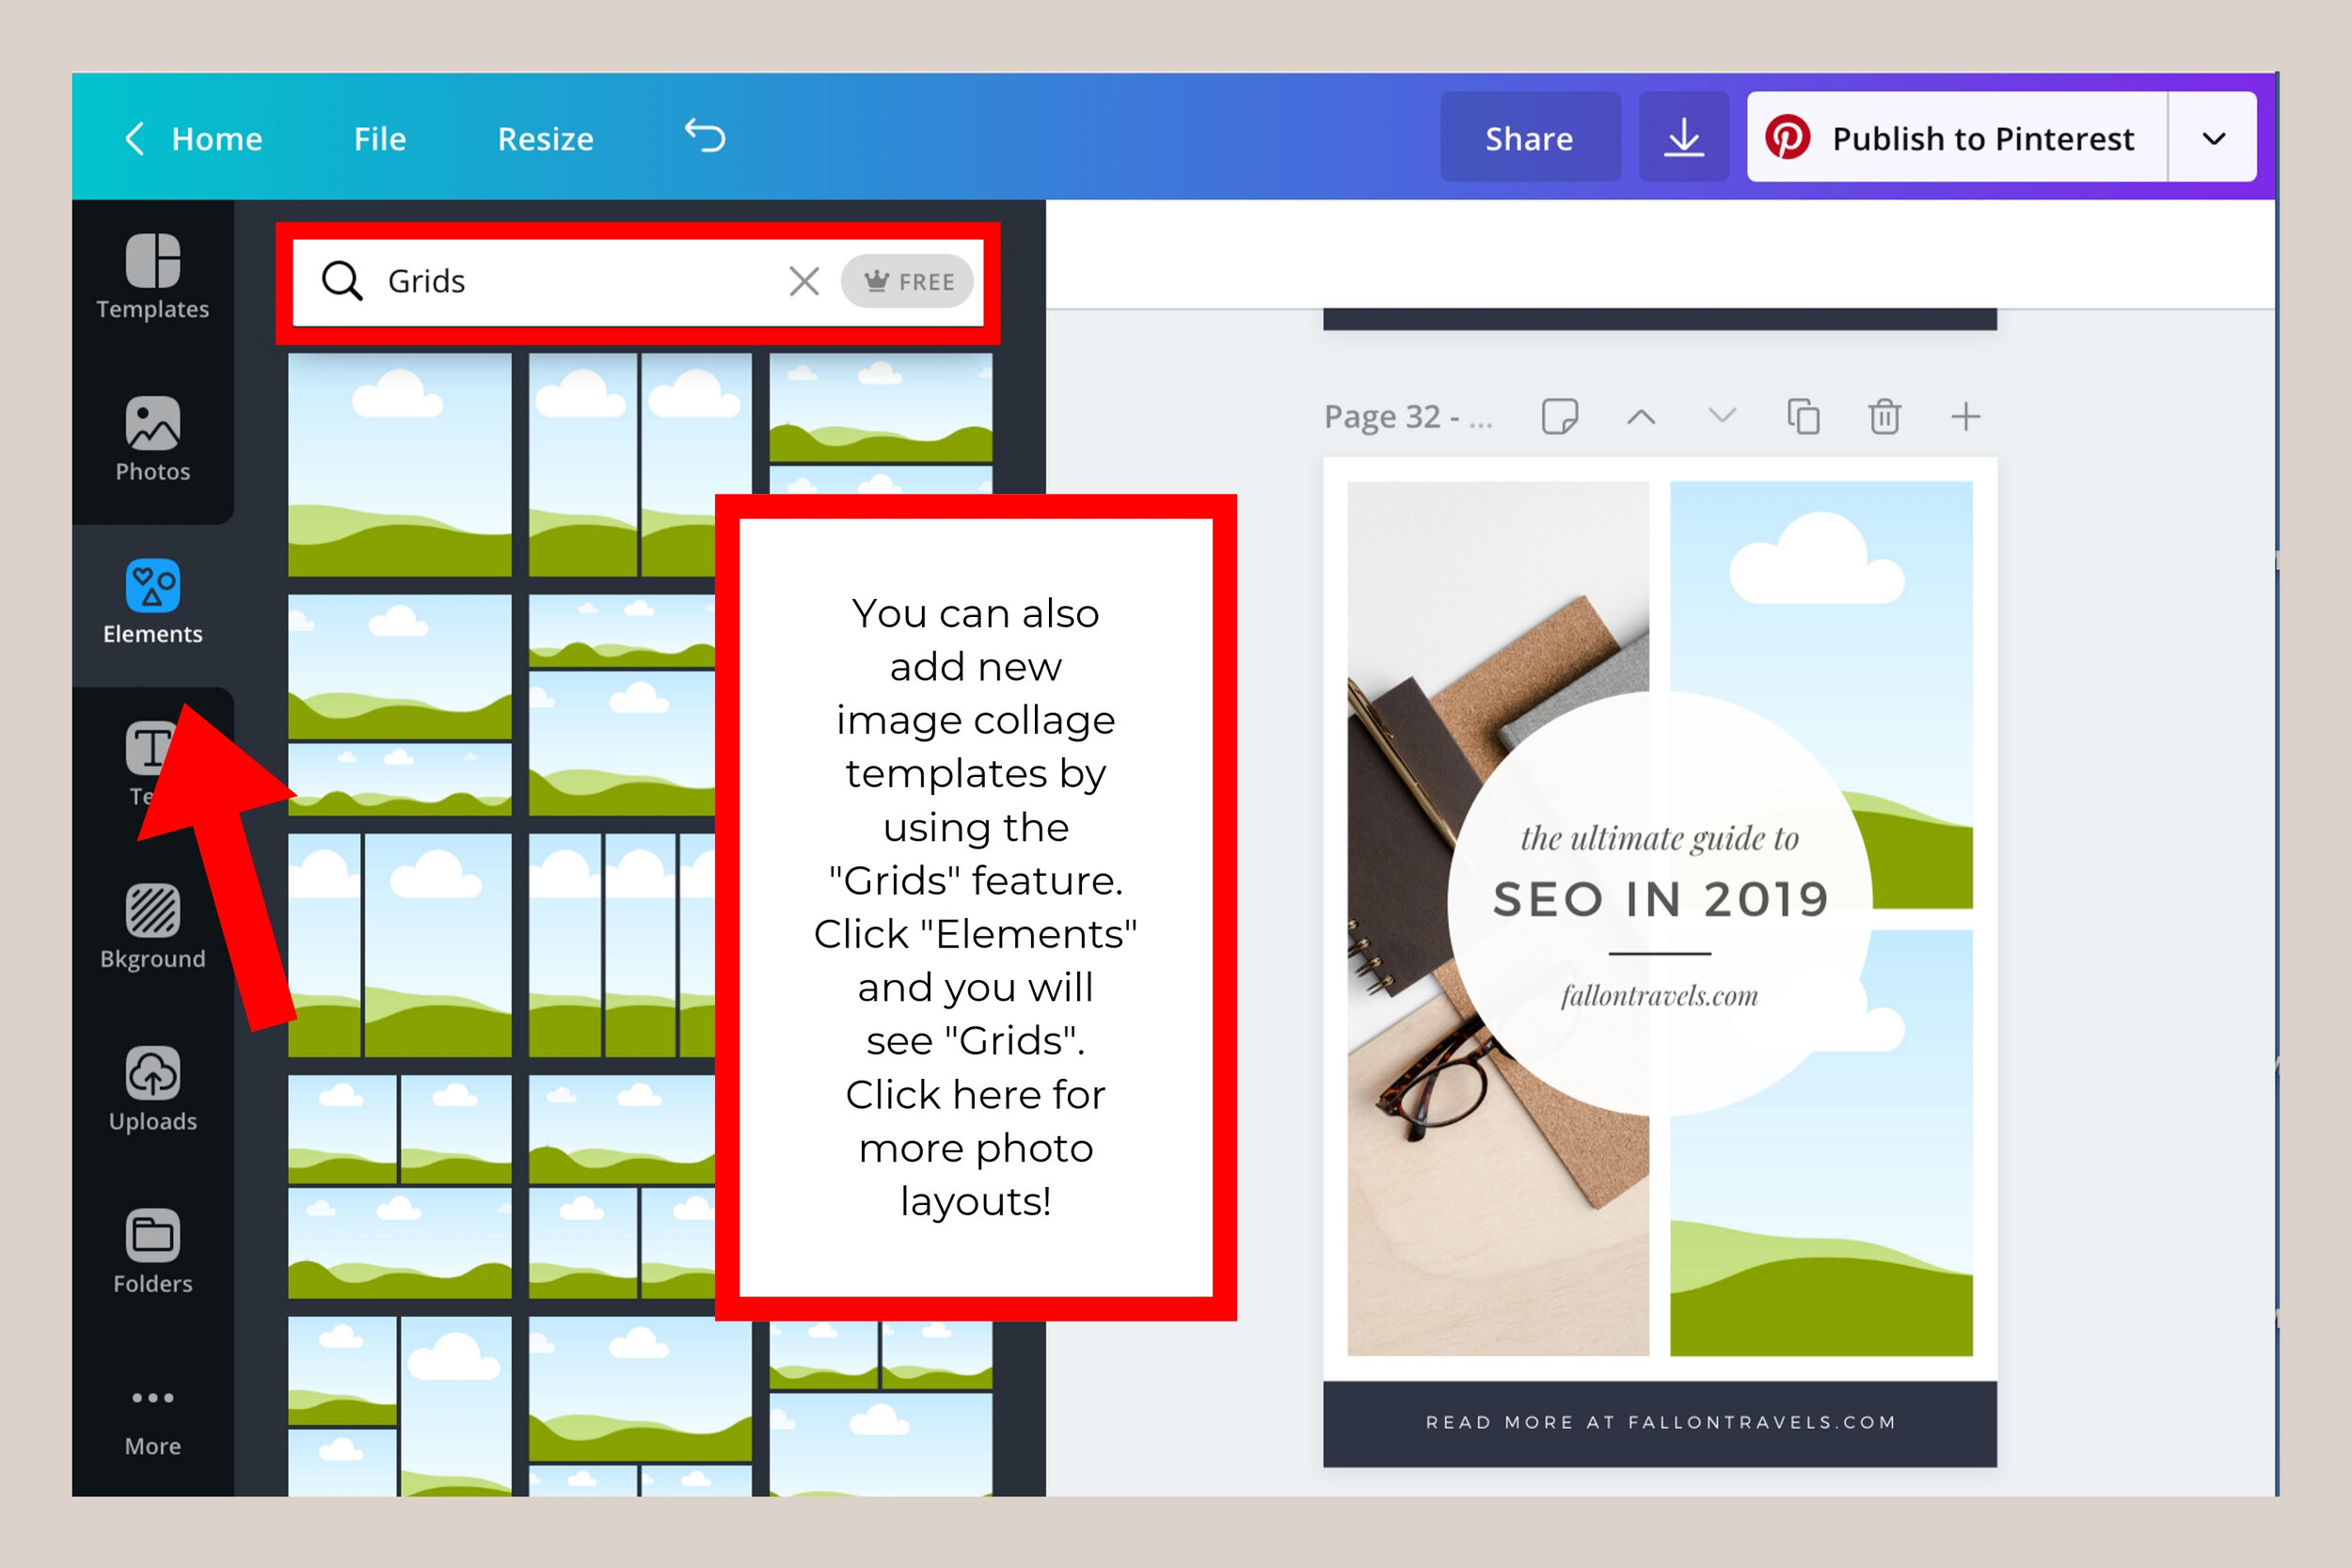
How to use the “Grid” feature:
You can add new photo collage templates by using the “Grids” feature
Click “Elements” and you will see “Grids”
Click here for additional photo layouts!
How to use Canva Layers
While Canva technically doesn’t have a “layers” feature, there are a few tools you can use that function very similar to layers.
Move an element forward in Canva
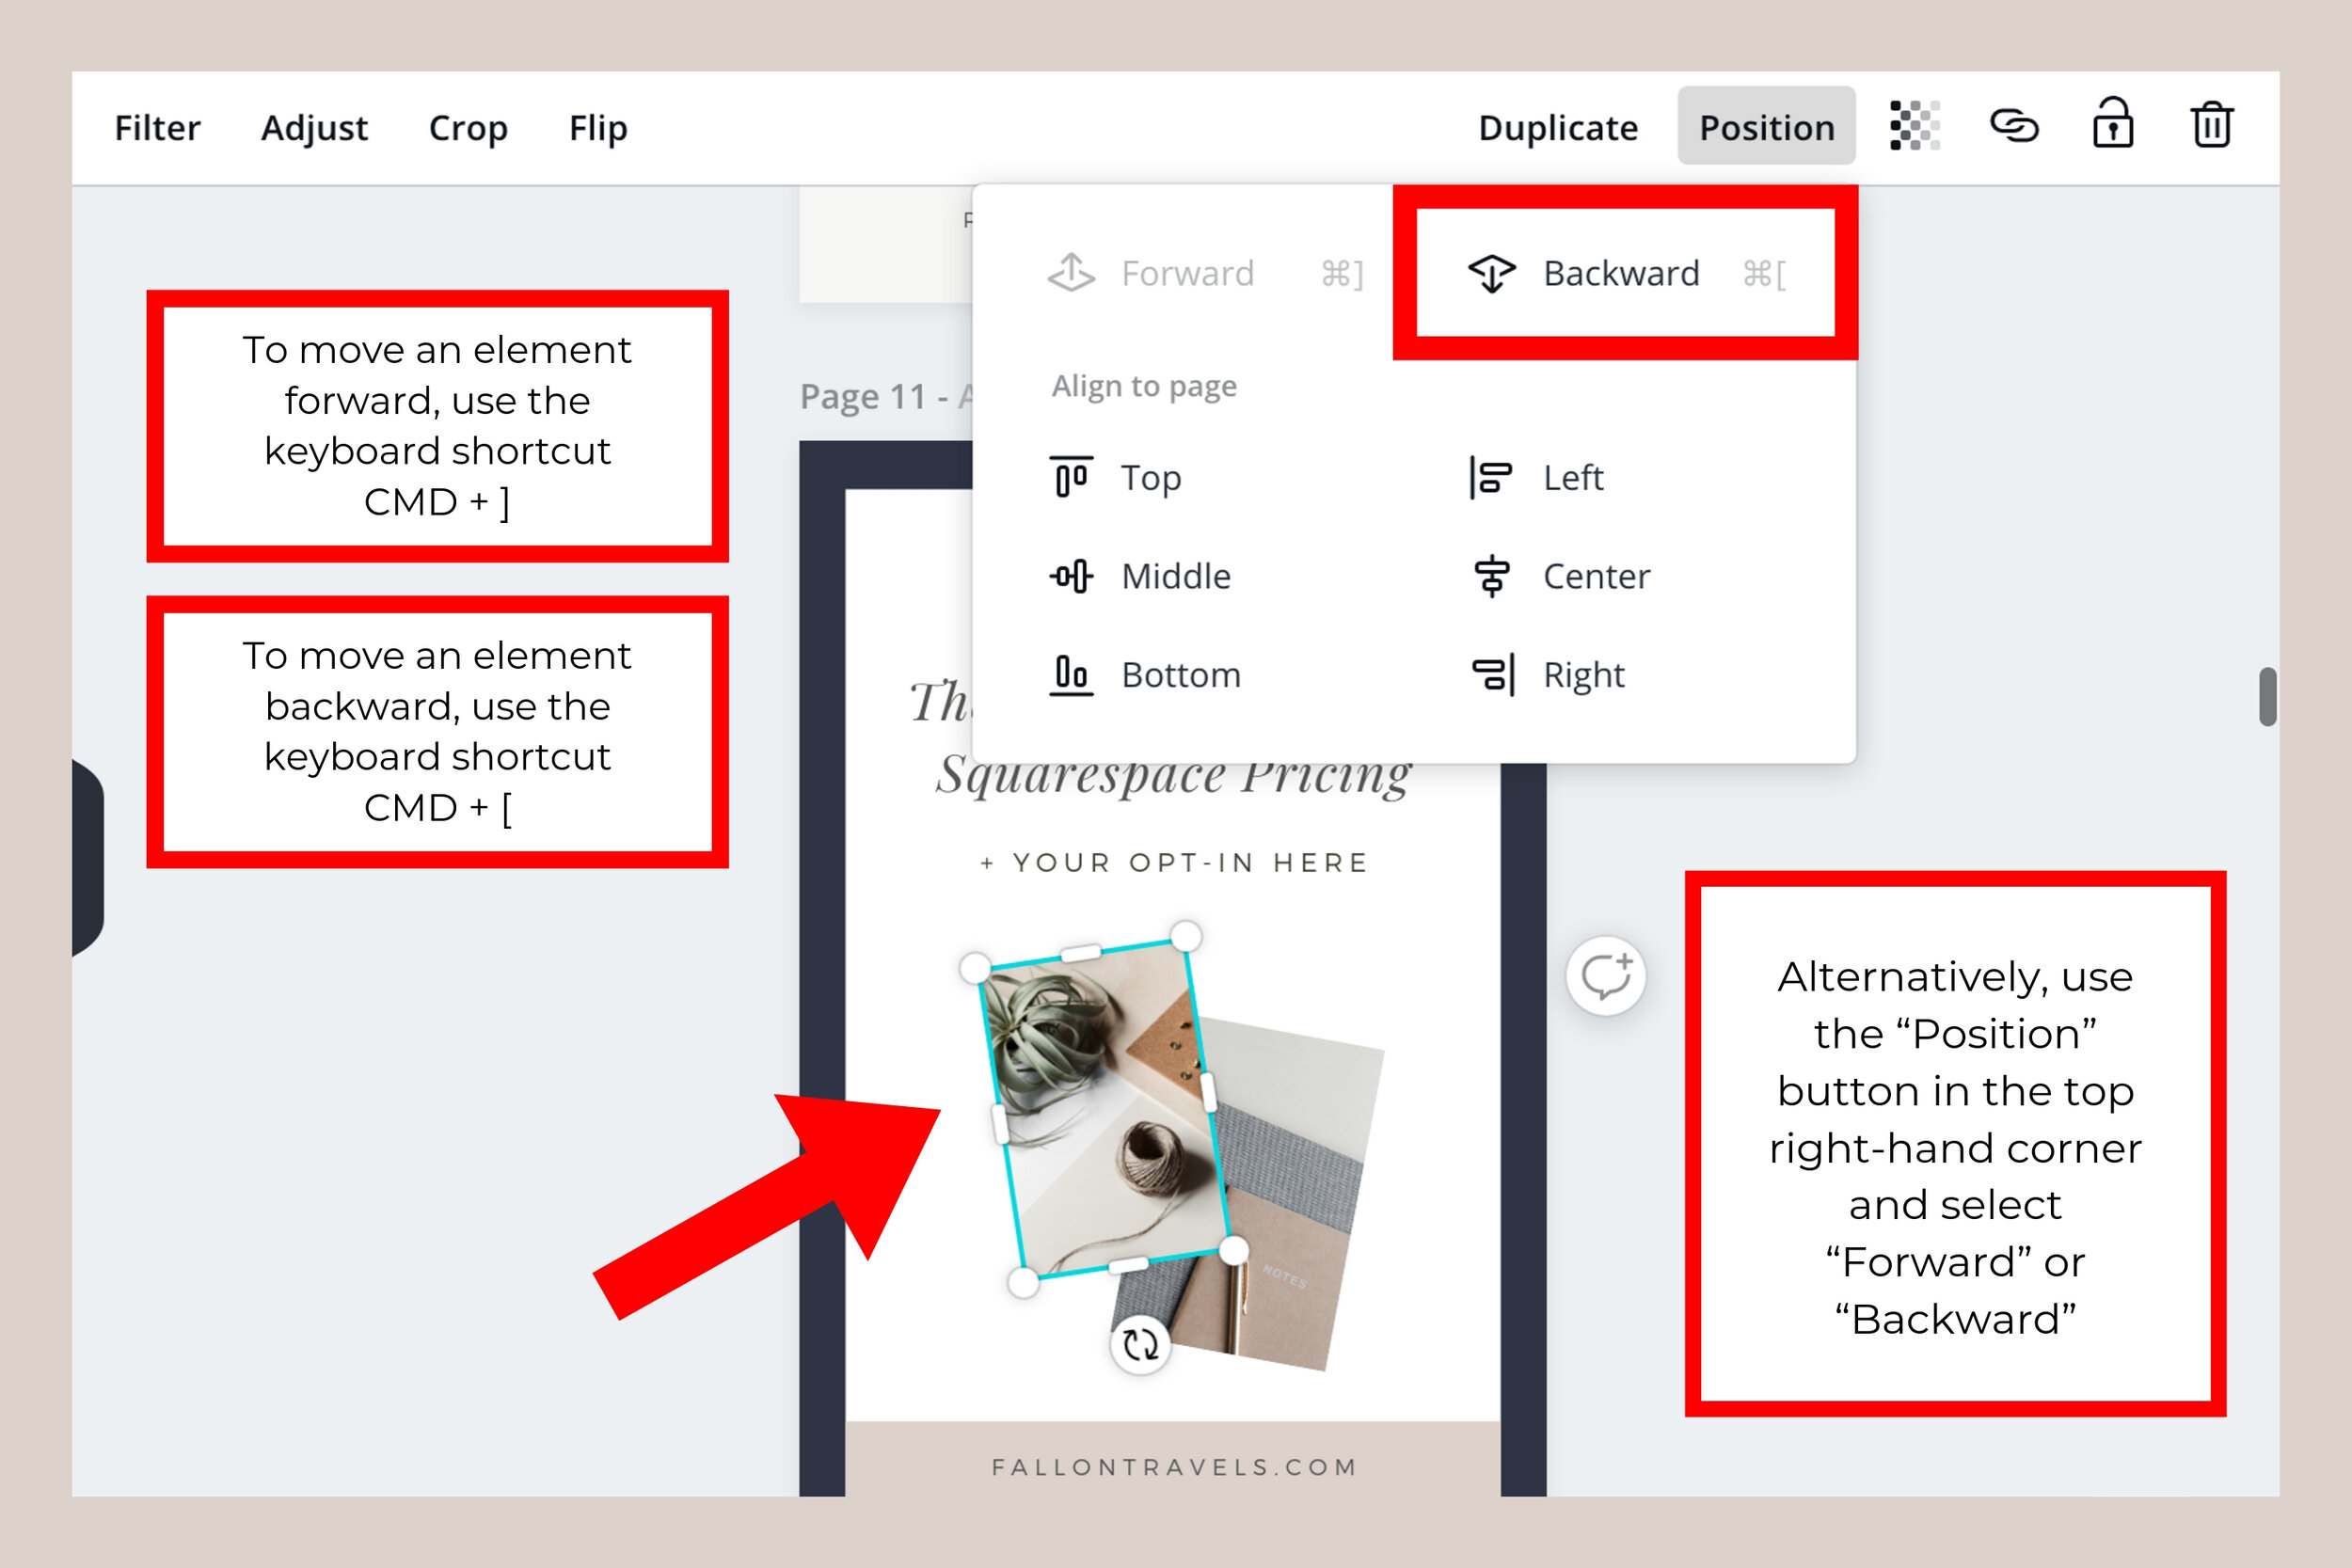
To move an element forward, follow the steps below:
Use the keyboard shortcut CMD + ]
Alternatively, use the “Position” button in the top right-hand corner and select “Forward”
Move an element backward in Canva
To move an element backward, follow the steps below:
Use the keyboard shortcut CMD + [
Alternatively, use the “Position” button in the top right-hand corner and select “Backward”

How to group elements in Canva
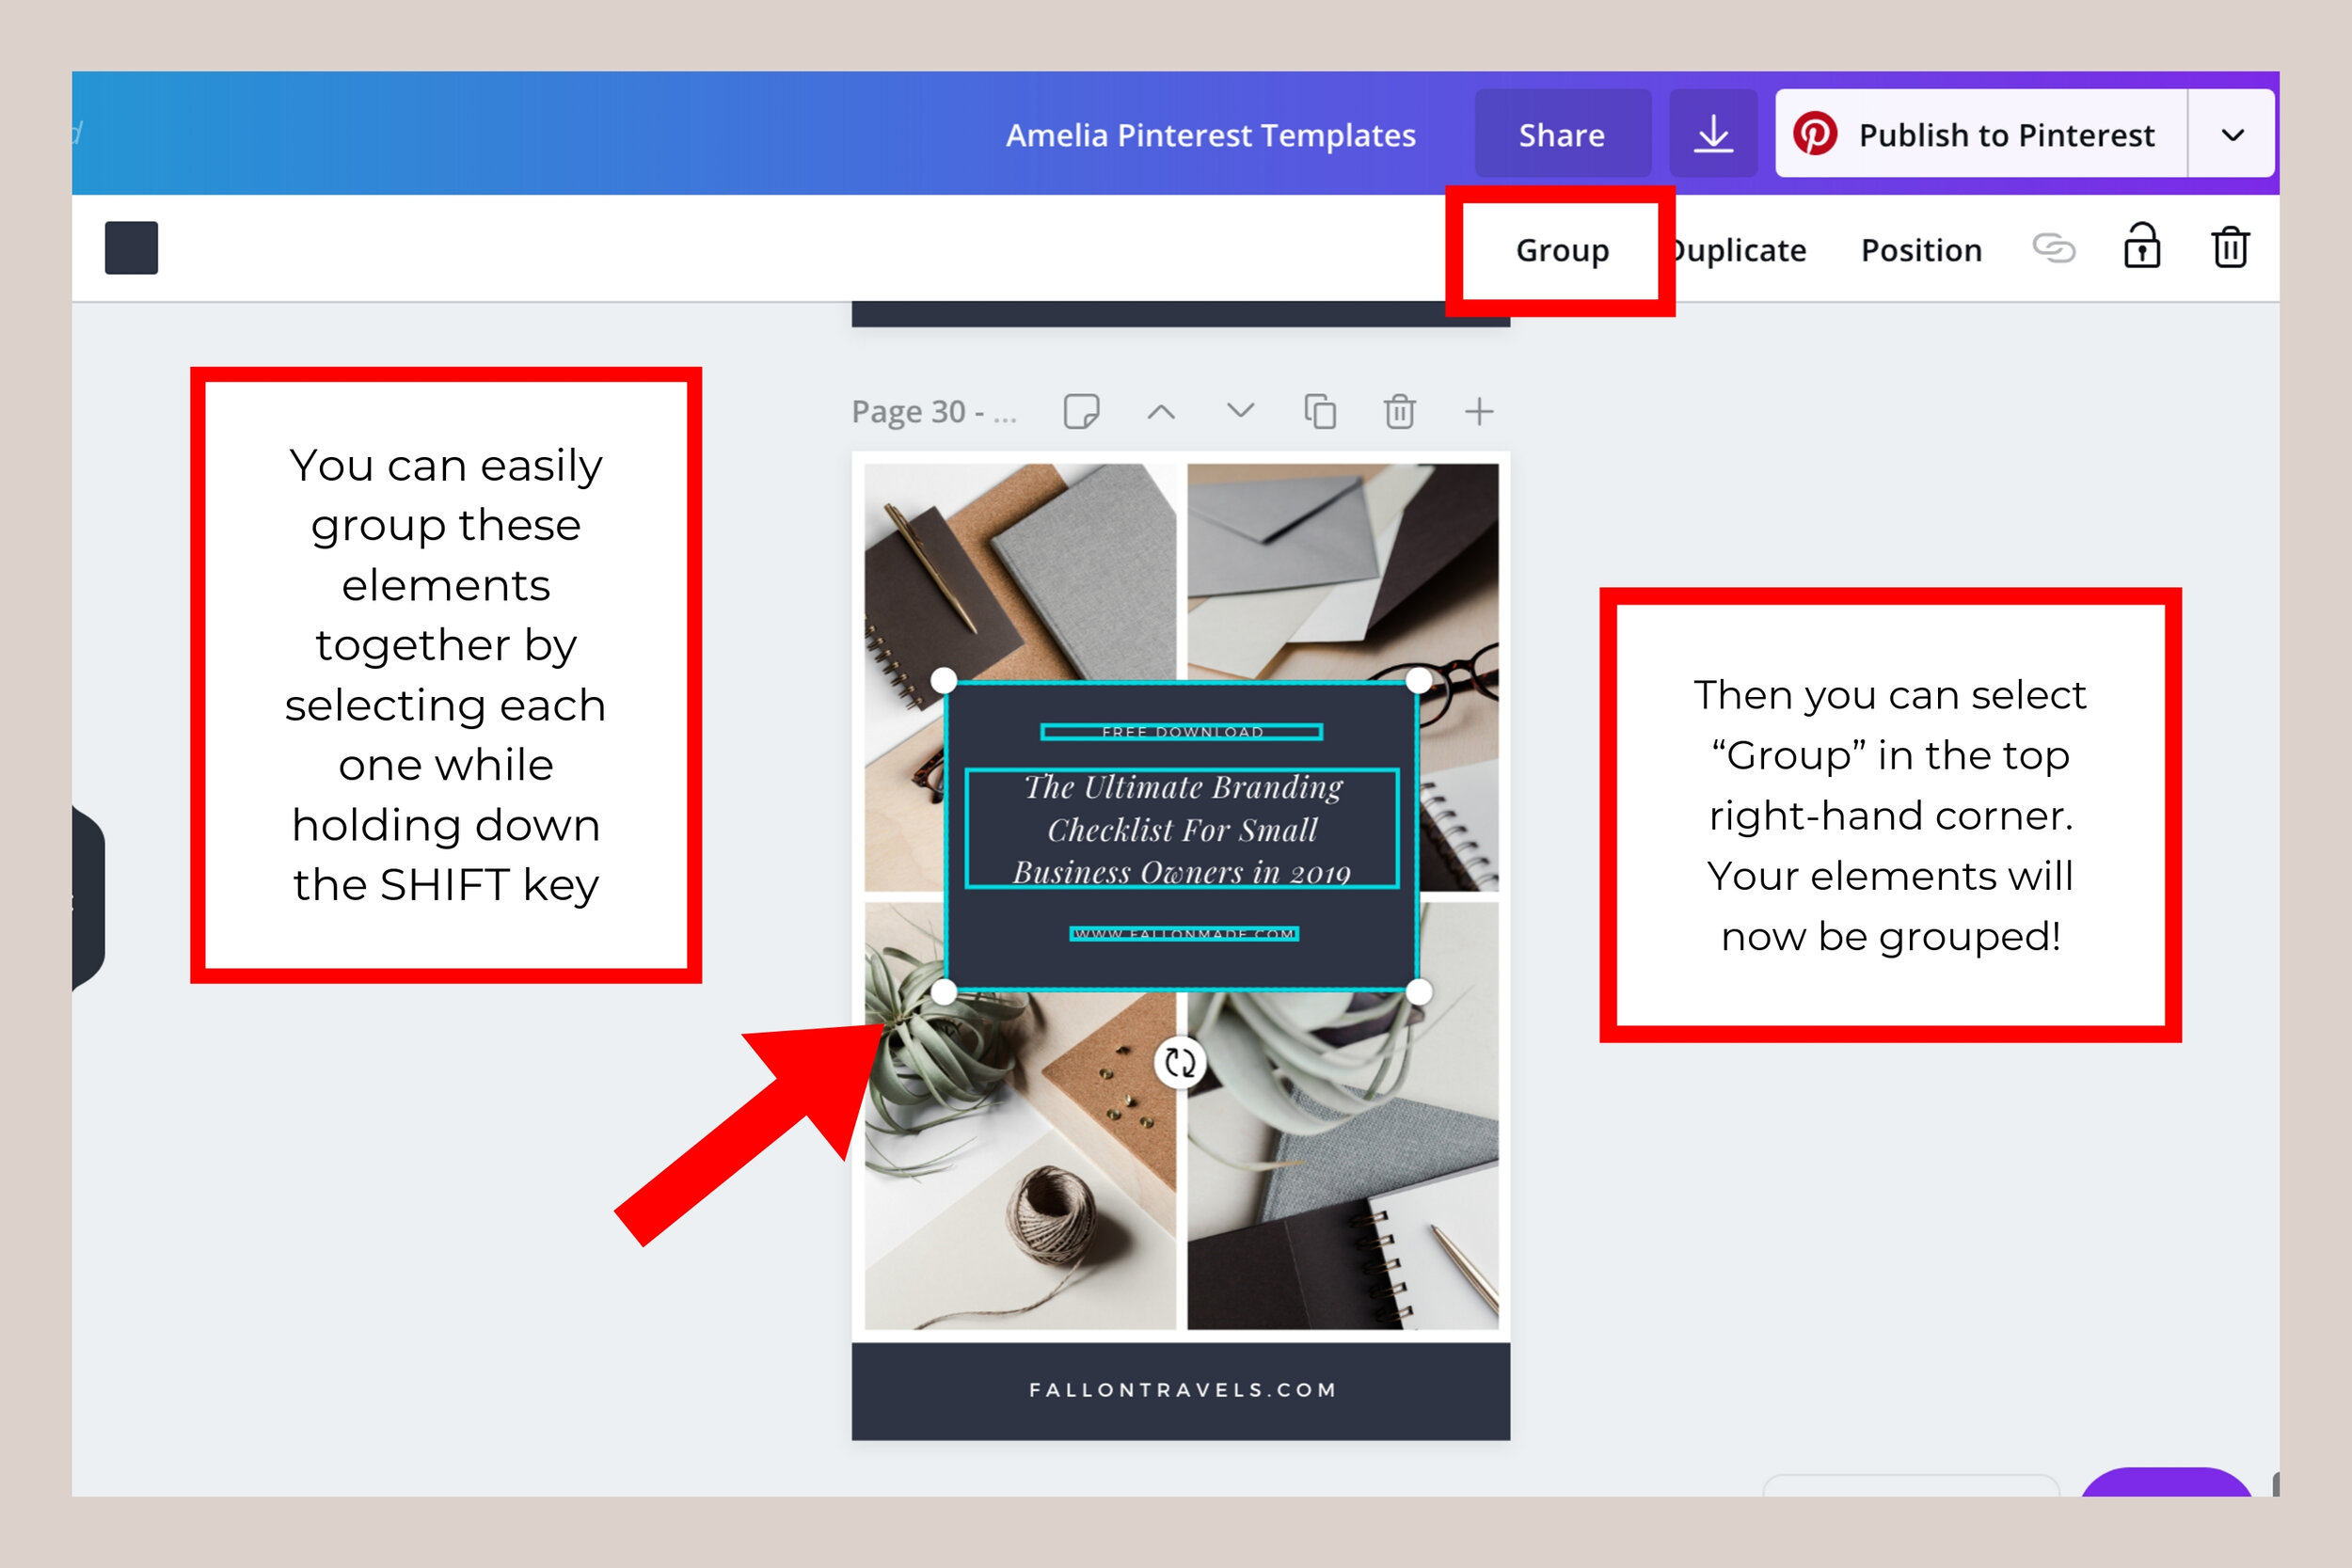
How to group elements:
Group design elements together by selecting each one while holding down the SHIFT key

Once all of the elements in your grouping are selected, you can click “Group” in the top right-hand corner. That’s it! :)
Canva Page Numbers
Duplicate, rearrange & delete pages
At the top of each page, you will see a tool bar - the first slot will show you what page you’re currently on. The actions you can take are as follows:
Add Notes: Section where you can add any notes about your design
Rearrange Template Order: Use up & Down arrows
Copy Page: Duplicates the template onto a new page
Delete Page: Deletes the page from your template list
Add New Page: Adds a blank page to your template list
Export Single Pages Only
To export a SINGLE PAGE rather than all of the templates, follow these steps:
Click “Download” in the top right-hand corner (down arrow button)
Select your file format under “File Type”
Click the “Select Pages” dropdown and choose the page number you would like to export
Click download
How to make an element transparent in Canva
Try giving your templates more variety by using the transparency feature in Canva! To change the transparency of an element, follow the steps below:
Click the “Transparency” button (square checkerboard button in top right-hand corner)
A slider will appear either slide or type in your preferred intensity for the effect
Full transparency will be at 0,
No transparency (solid color) will be at 100

Canva Keyboard Shortcuts
Listed below are some of my favorite, time-saving Canva Keyboard Shortcuts!
Copy an item: CMD + C or CTRL in windows
Paste an item: CMD + V or CTRL in windows
Undo an action: CMD/CTRL + Z
Redo an action: CMD/CTRL + SHIFT + Z
Constrain proportions: SHIFT + drag corners
Constrain proportions IN PLACE: ALT + SHIFT + drag corners (for example, try scaling out your image to make it larger. Using this shortcut will constrain the image proportions while also keeping it in the same spot on the document).
Add a text box: T
Uppercase letters: CMD + SHIFT + K or CTRL in windows
Group elements: CMD/CTRL + G
Ungroup elements: CMD/CTRL + G
Select all elements: CMD/CTRL + A
Move an element forward: CMD + ]
I hope this article provided you with some inspiration & tips on how to use Canva to create stunning design templates for your brand.
If you have any questions about Canva 2.0, please leave a comment below and I’ll get back with you ASAP, my friend! :)


