How to use Instagram Stories like a Pro Content Creator
Disclaimer: Hey there, friend! This article includes affiliate links & I would LOVE if you decided to use them. Affiliate links + referrals programs help creators and educators like me to fund the free content that we provide on our blogs. Thank you for your endless support!
Instagram stories have seemingly taken over the Gram these days… and it seems that more people watch stories than scrolling though their own feed!
The reason behind this? People crave raw, authentic content.
Gone are the days where you can gain a massive following simply by having a pretty Instagram feed. Your followers want to see the behind-the-scenes of your brand— they want you to take them along on your journey.
At the end of the day, your followers simply want to feel included. So bring them along for the ride with Instagram Stories!
Read below for some of my favorite tips, tricks & advice for creating the best IG stories out there!
Table of Contents

How to use Instagram Stories
New to Instagram Stories and don’t know where to begin? No need to fret— your girl is here to help!
My guide to Instagram Stories includes simple-to-follow instructions for creating your own IG Stories, along with best tips & tricks, advice and my personal favorite mobile apps to create eye-catching Instagram Stories.
Before diving into the fun stuff, lets go over a few beginner FAQs & general stats you may want to know about Instagram Stories!
You may be interested in: How to add multiple photos to Instagram Stories
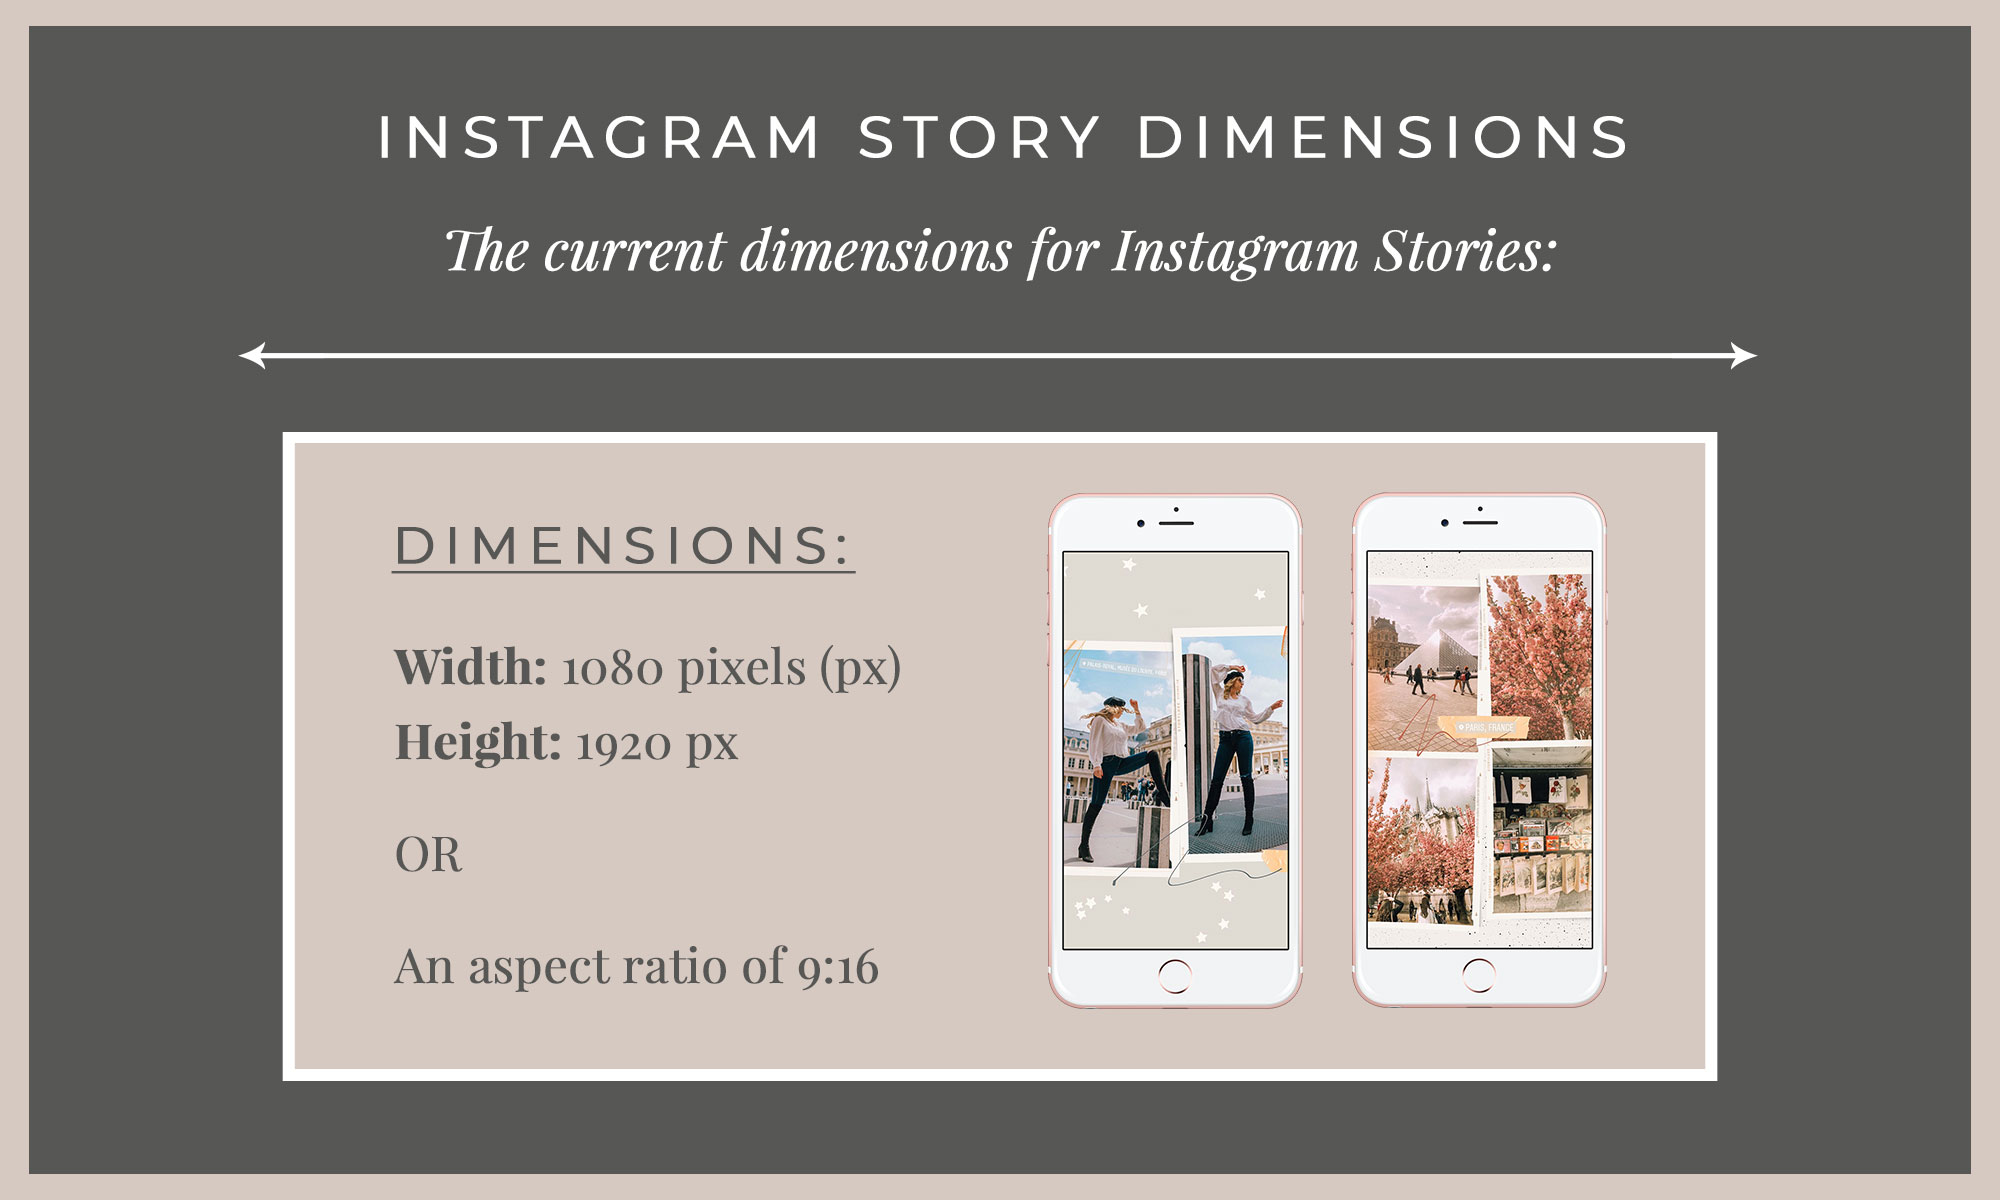
Instagram Story Dimensions
As of 2019, the current dimensions for Instagram Stories are 1080px (width) by 1920px (height), or an aspect ratio of 9:16.
How will my followers know if I posted a new Instagram Story?
When you posts a new story, your profile image will have a colorful ring display around it— incentivizing followers to give it a tap and check out your latest story!
How long do Instagram Stories last?
Instagram Story content will remain active on your Story for a full 24 hours. Once your Instagram Stories expire, you can add them to your Instagram Story Highlights. This will allow your followers to keep up with any past IG Stories they may have missed out on (more on this later).
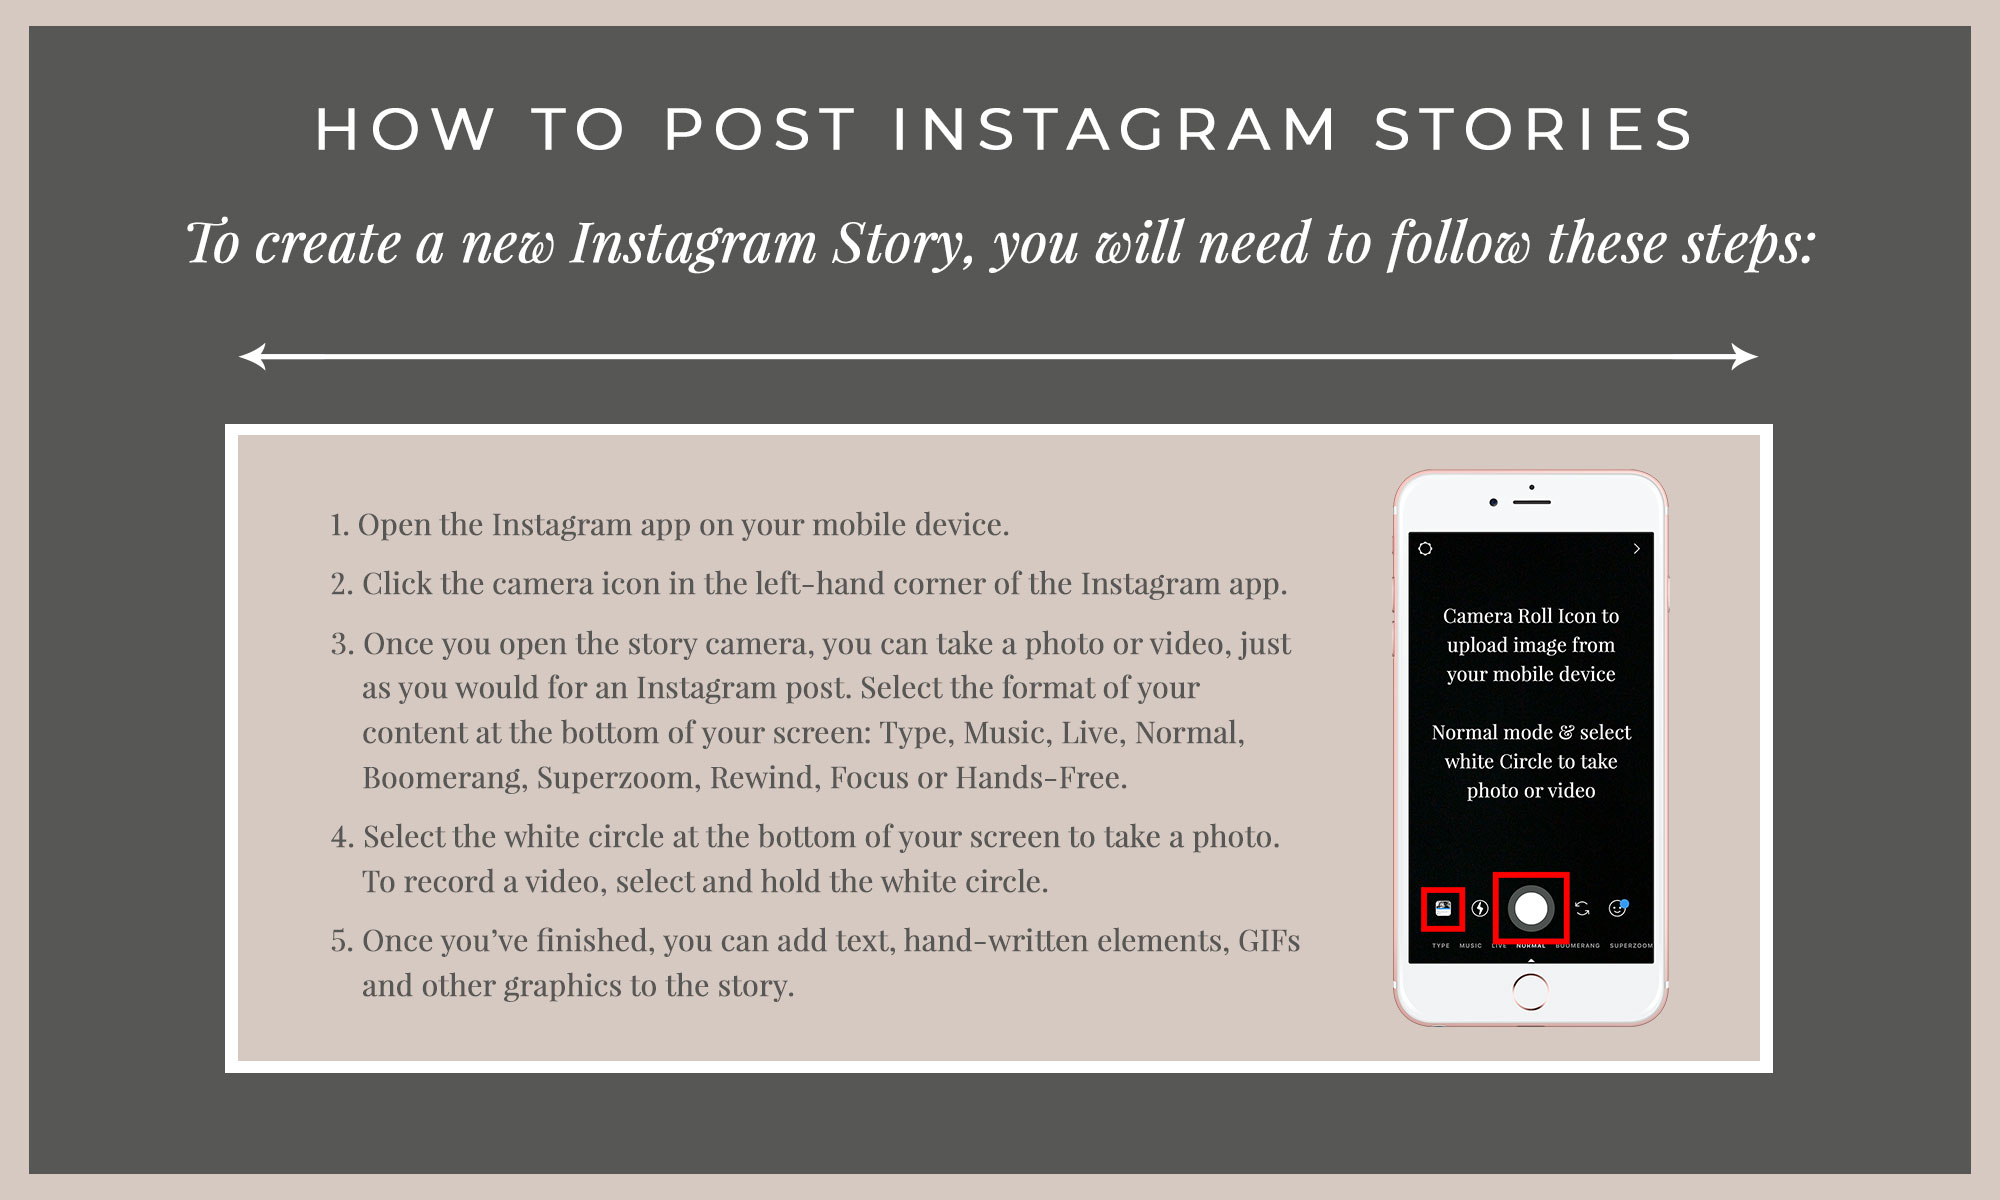
How to post a picture on Instagram Story
Posting a picture to Instagram Stories is quick & simple! To create a new Instagram Story, just follow these steps:
Open the Instagram app on your mobile device.
Click the camera icon in the left-hand corner of the Instagram app.
Once you open the story camera, you can take a photo or video, just as you would for an Instagram post. Select the format of your content— this will be located at the bottom of your screen. You can choose between the following content options: Type, Music, Live, Normal, Boomerang, Superzoom, Rewind, Focus or Hands-Free.
Select the white circle at the bottom of your screen to take a photo. To record a video, select and hold the white circle.
Once you’ve finished taking, recording or choosing your piece of content, you can add text, hand-written elements, GIFs and other graphics to the story.
You might be interested in: How to make a GIF in Photoshop (+ other alternatives to Photoshop)
IG Story Tip: Shoot your photo or video vertically— Instagram was designed to work best with vertical content! Horizontal content will be cut off and/or not take up quite as much room as you could with vertical content. And the more content you can create for your followers, the better. :)
Best apps for Instagram Stories
There are a number of great design and layout tools to help you create stand-out Instagram Stories. Read below for a few of my faves!
StoryLuxe
I’ve gotten quite a few questions recently about ‘how I make my Instagram Stories look so pretty’.
While I’m absolutely flattered, I have to admit that most of the designs I use for my IG Stories are actually created using the free iOS app— StoryLuxe!
This is without a doubt one of my favorite Instagram Story apps as of recent, and it’s super user-intuitive!
You’ll first want to choose an Instagram Story template from one of StoryLuxe’s seemingly endless layout options. Once selected, you can choose between a 4:5 or 9:16 aspect ratio (As mentioned previously, the ideal Instagram story dimensions are going to be a 9:16 aspect ratio).


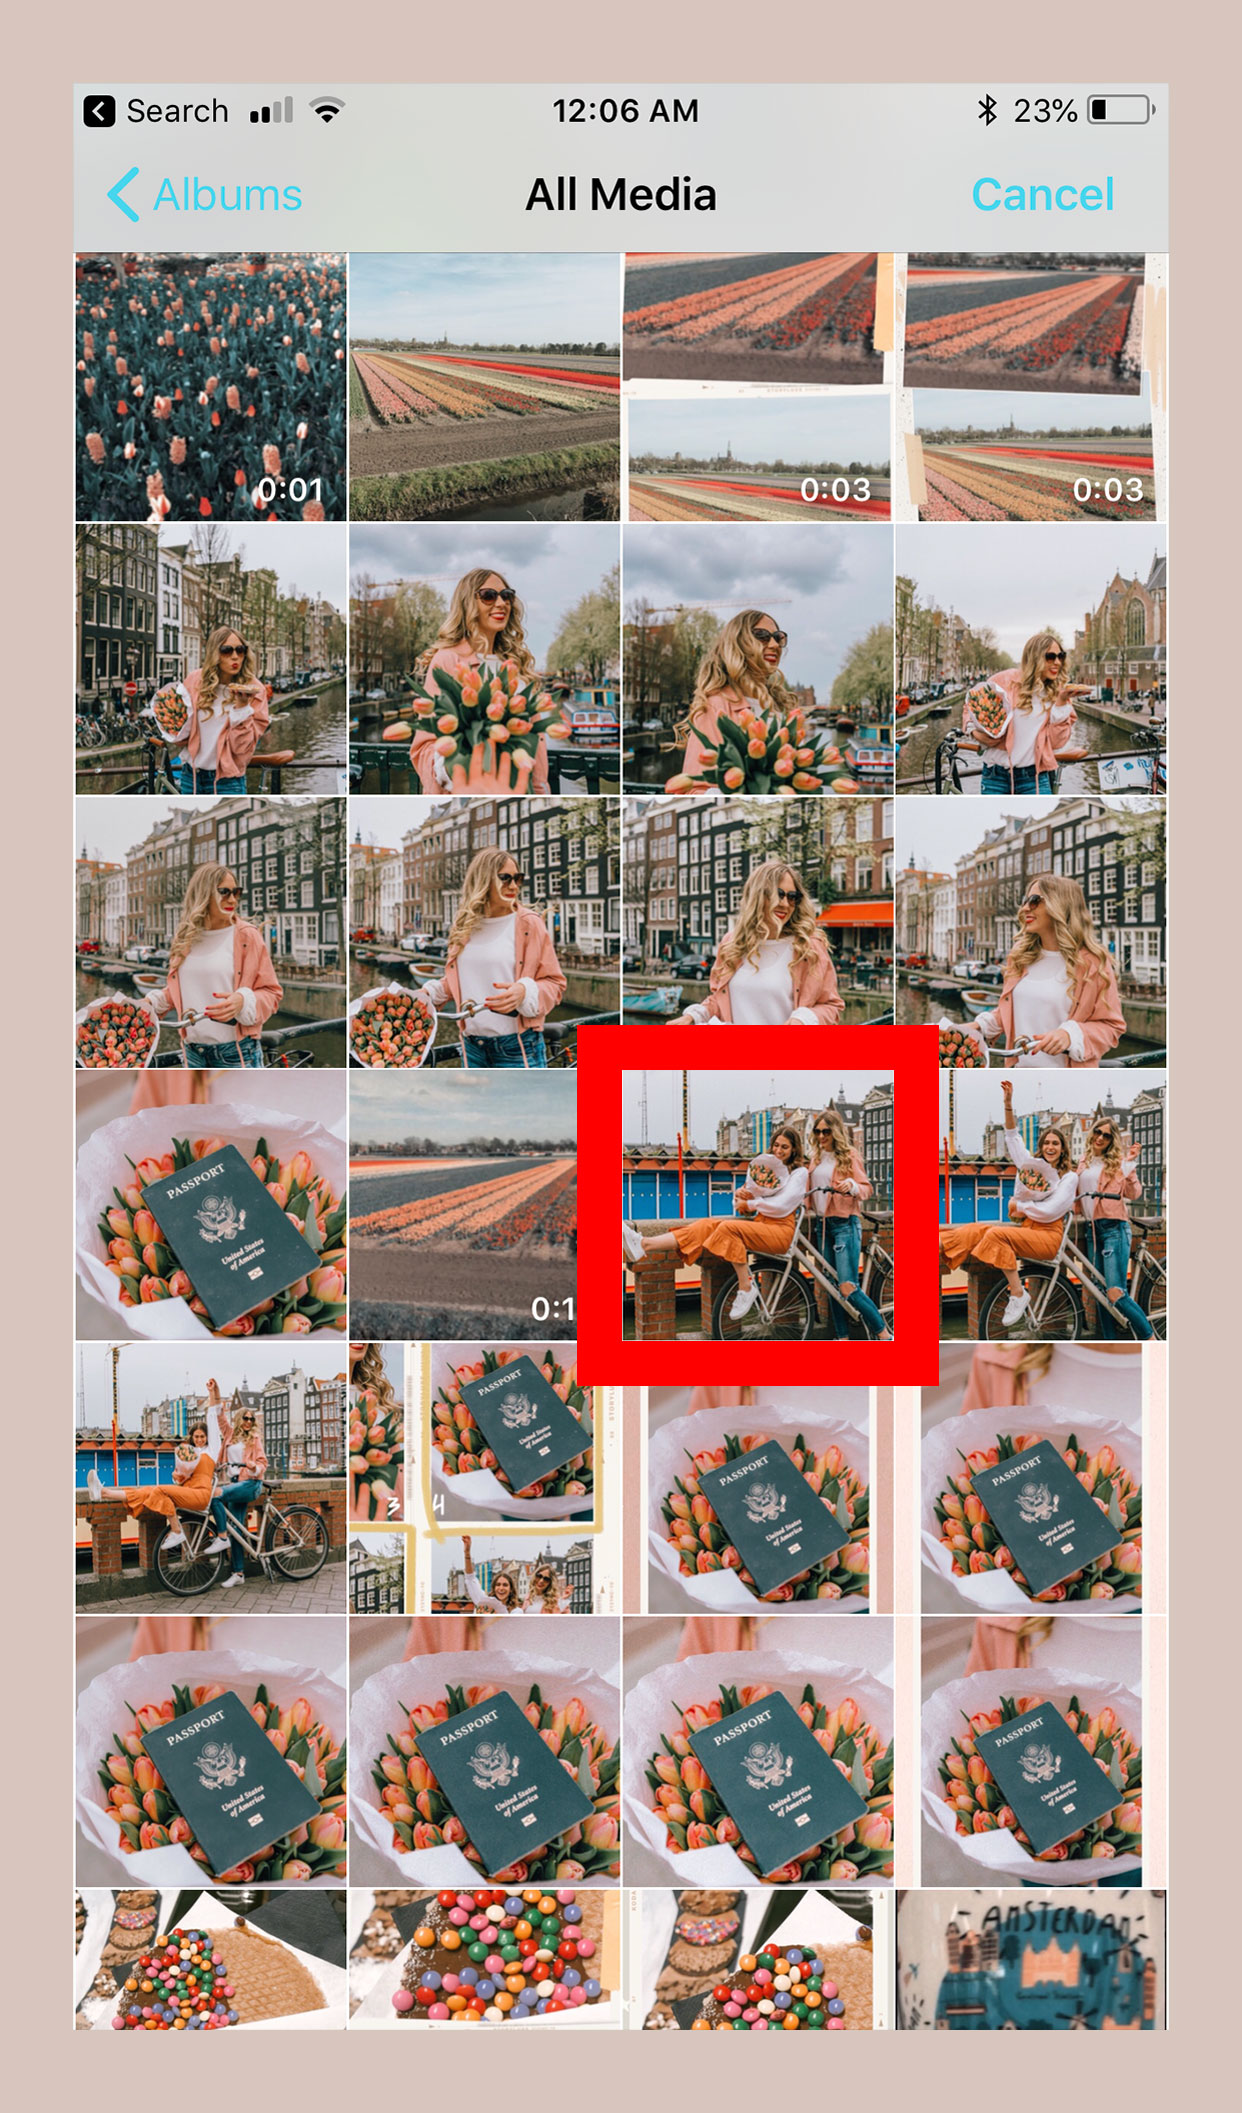
You can then choose between the ‘My Media’ or ‘Camera’ options.
Choose My Media if you would like to add content from your phone’s camera roll, or select Camera if you would like to take a photo for the story.

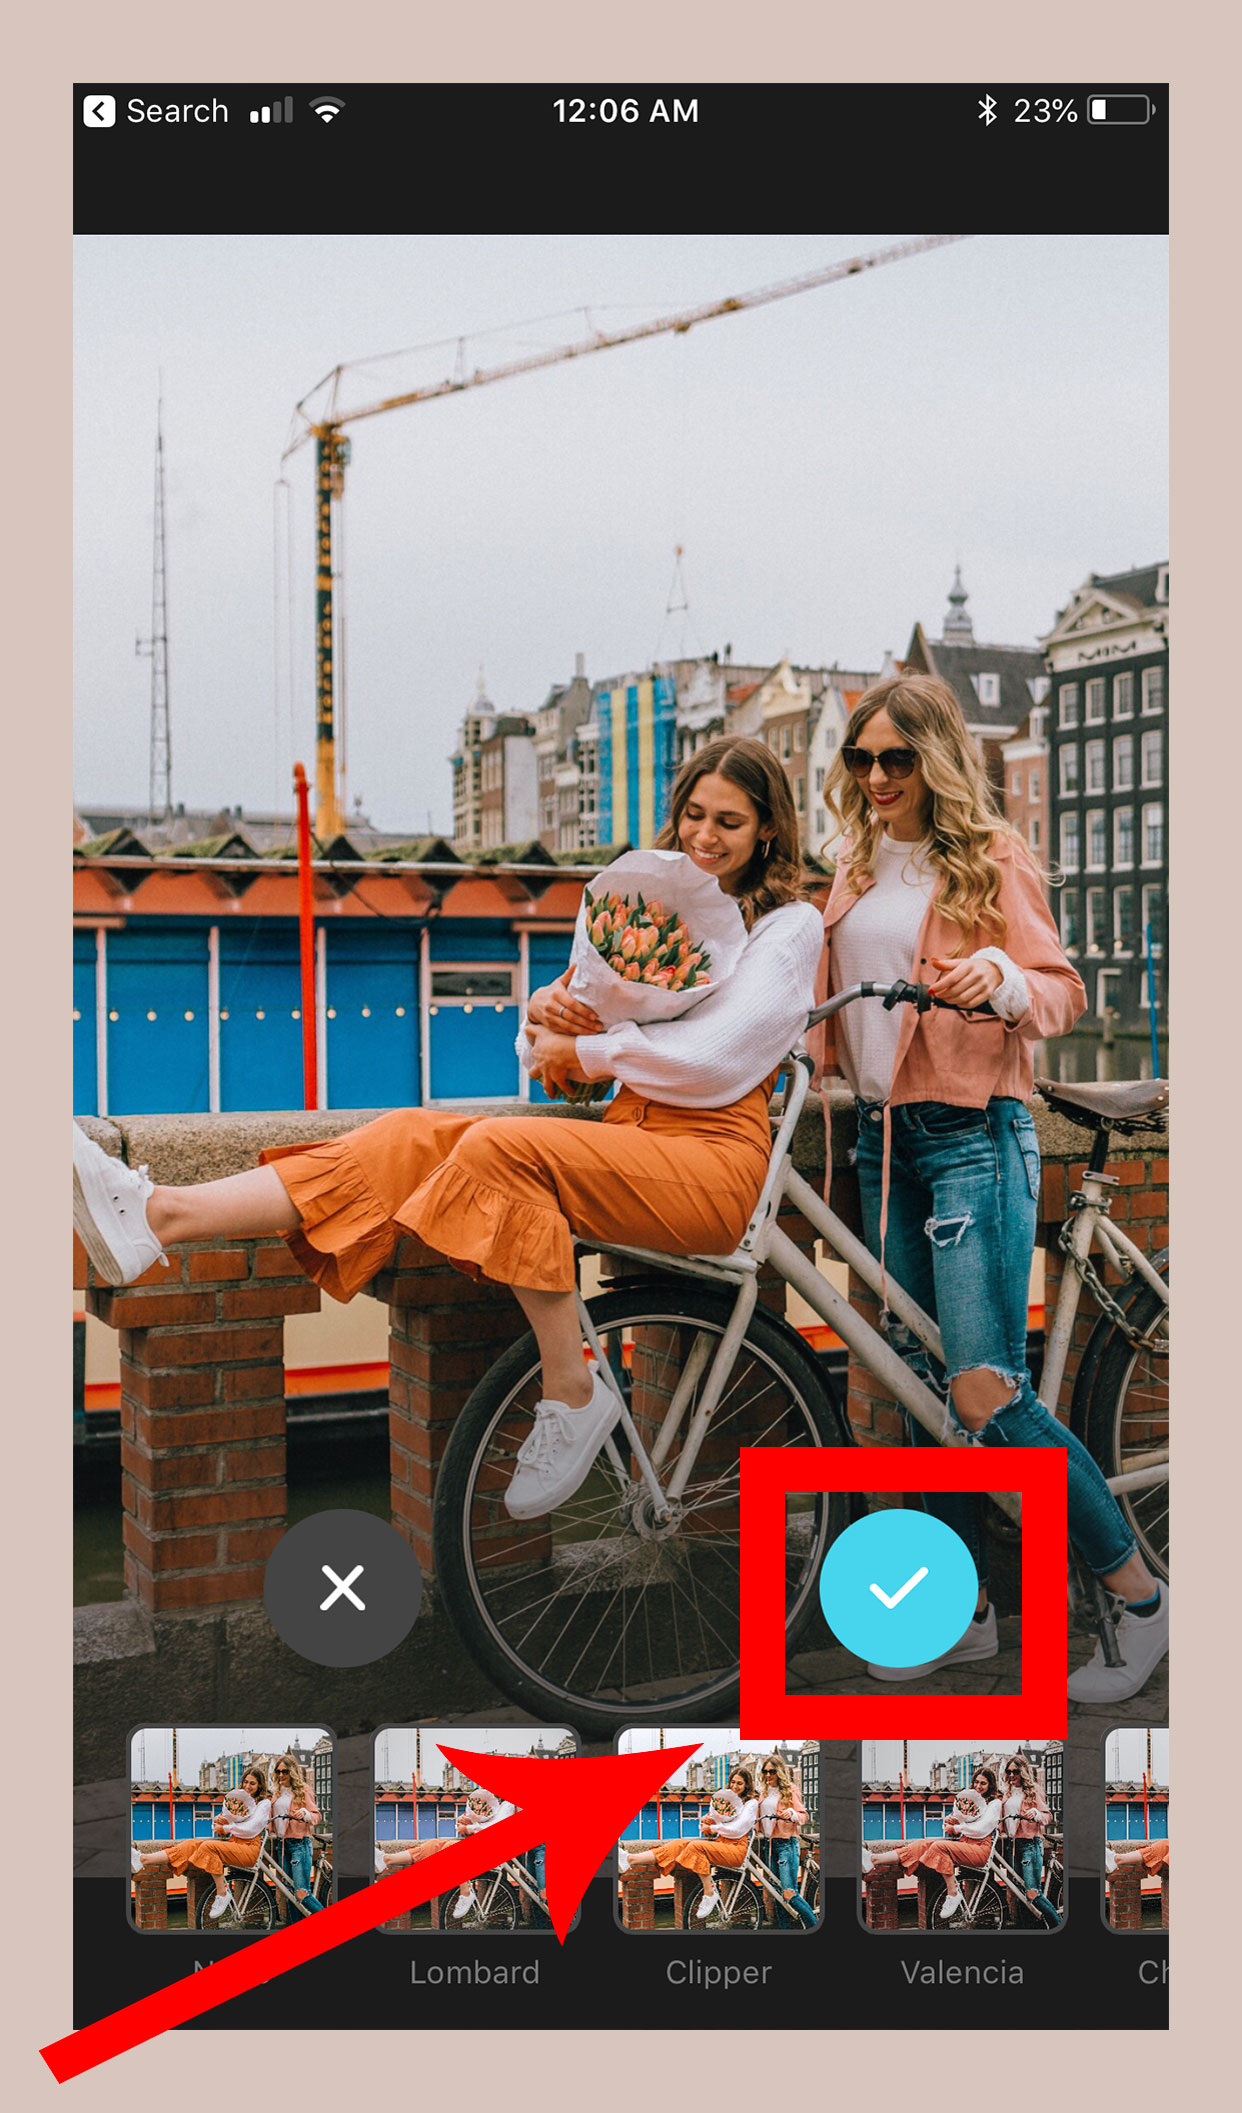
Select the image you would like to place in your Instagram template.
Once you have finalized your option, you can select the blue checkmark to continue with your layout.
StoryLuxe will then place the image in your chosen layout. You will then repeat this process if you’ve chosen an Instagram layout with multiple image slots.

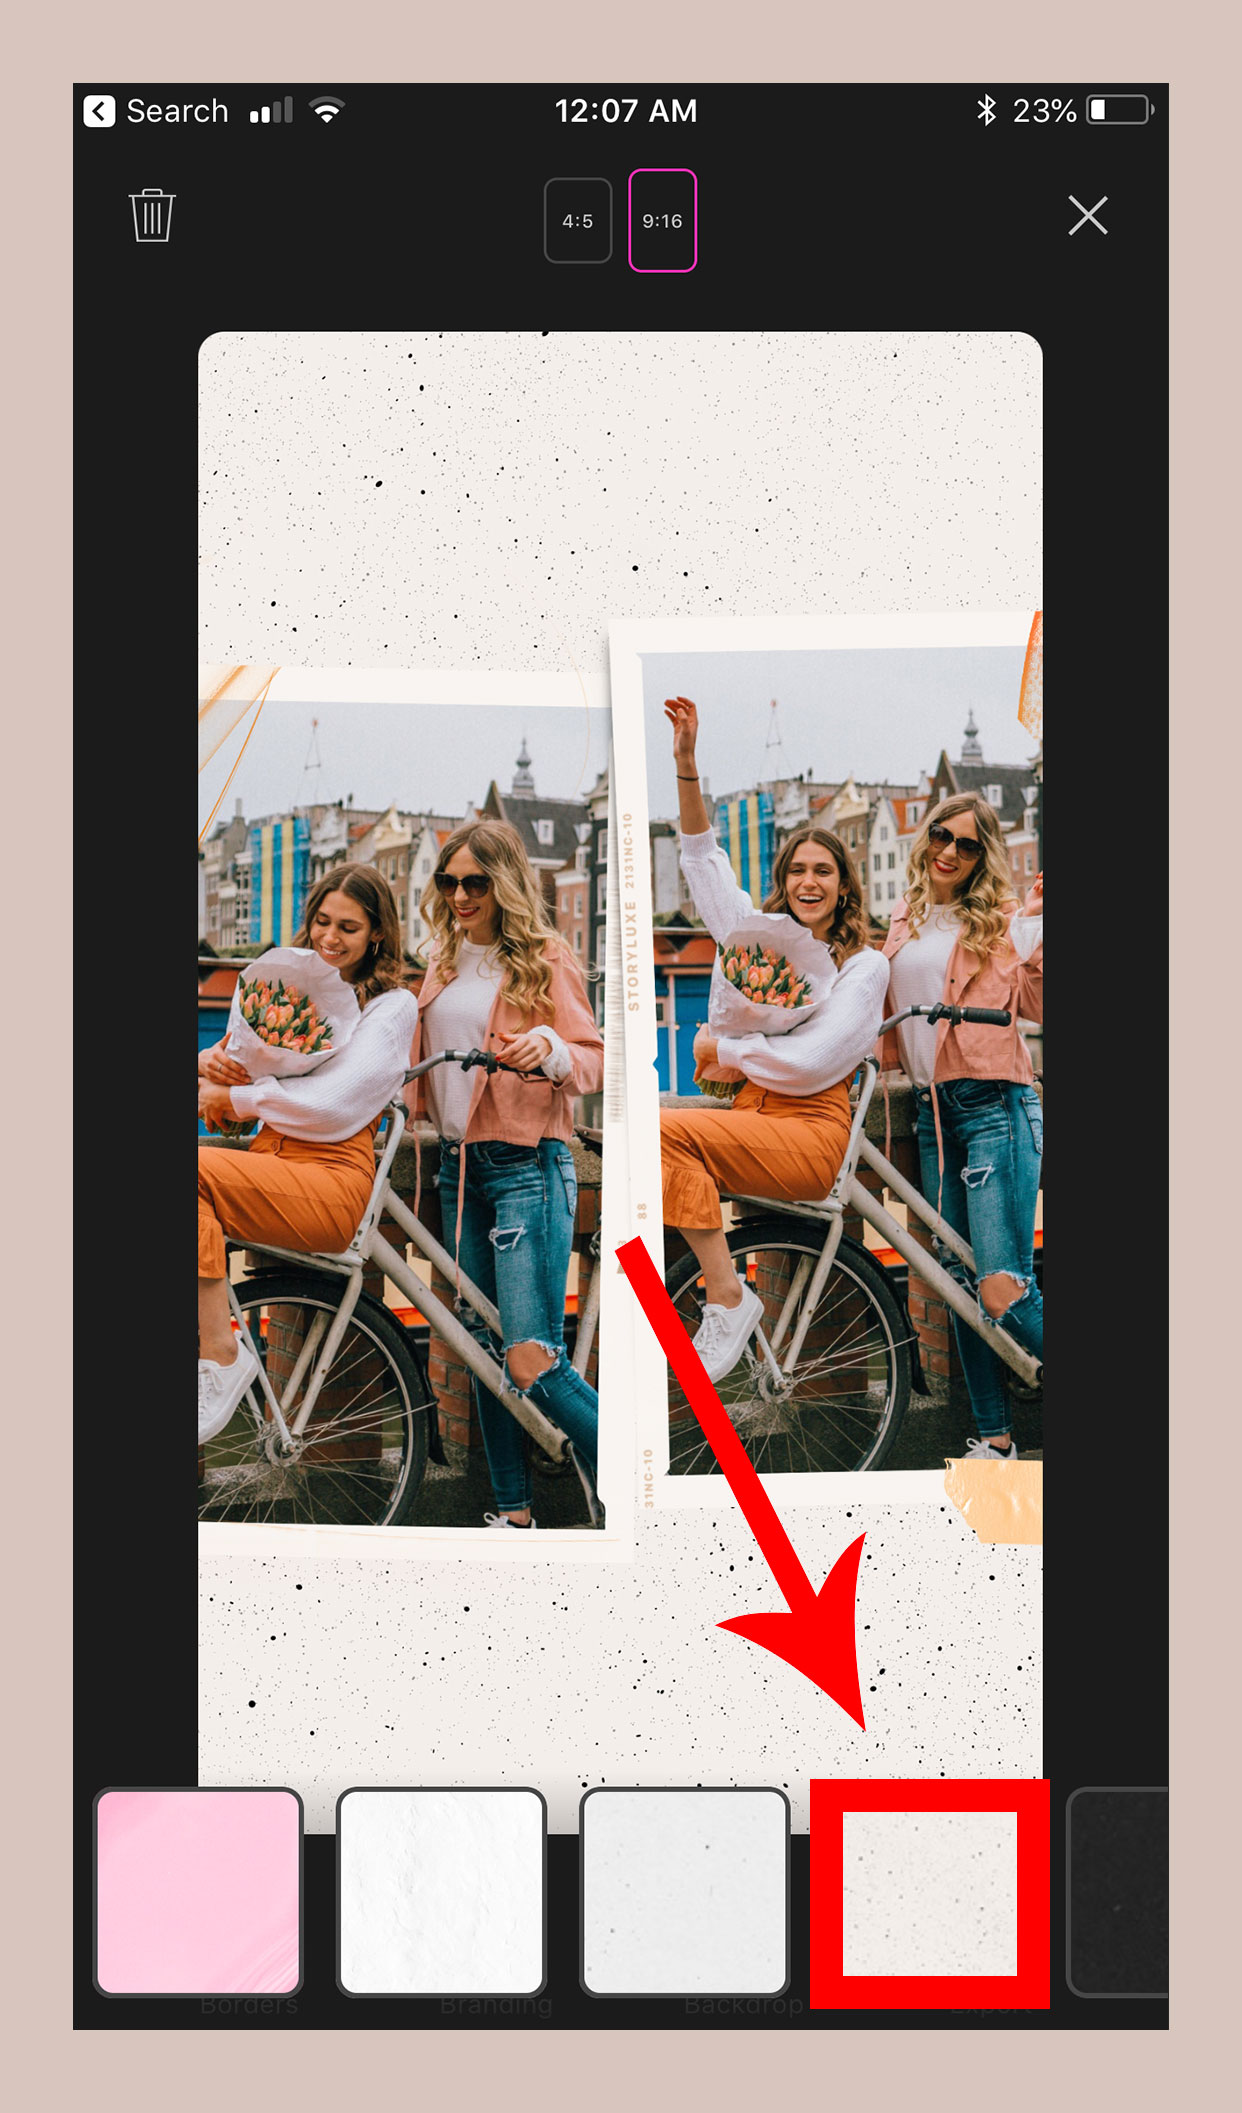
Once your image slots are filled, you can add a background to your Instagram Story layout.
Select Backdrop at the bottom of your screen.
Choose from one of StoryLuxe’s background options.

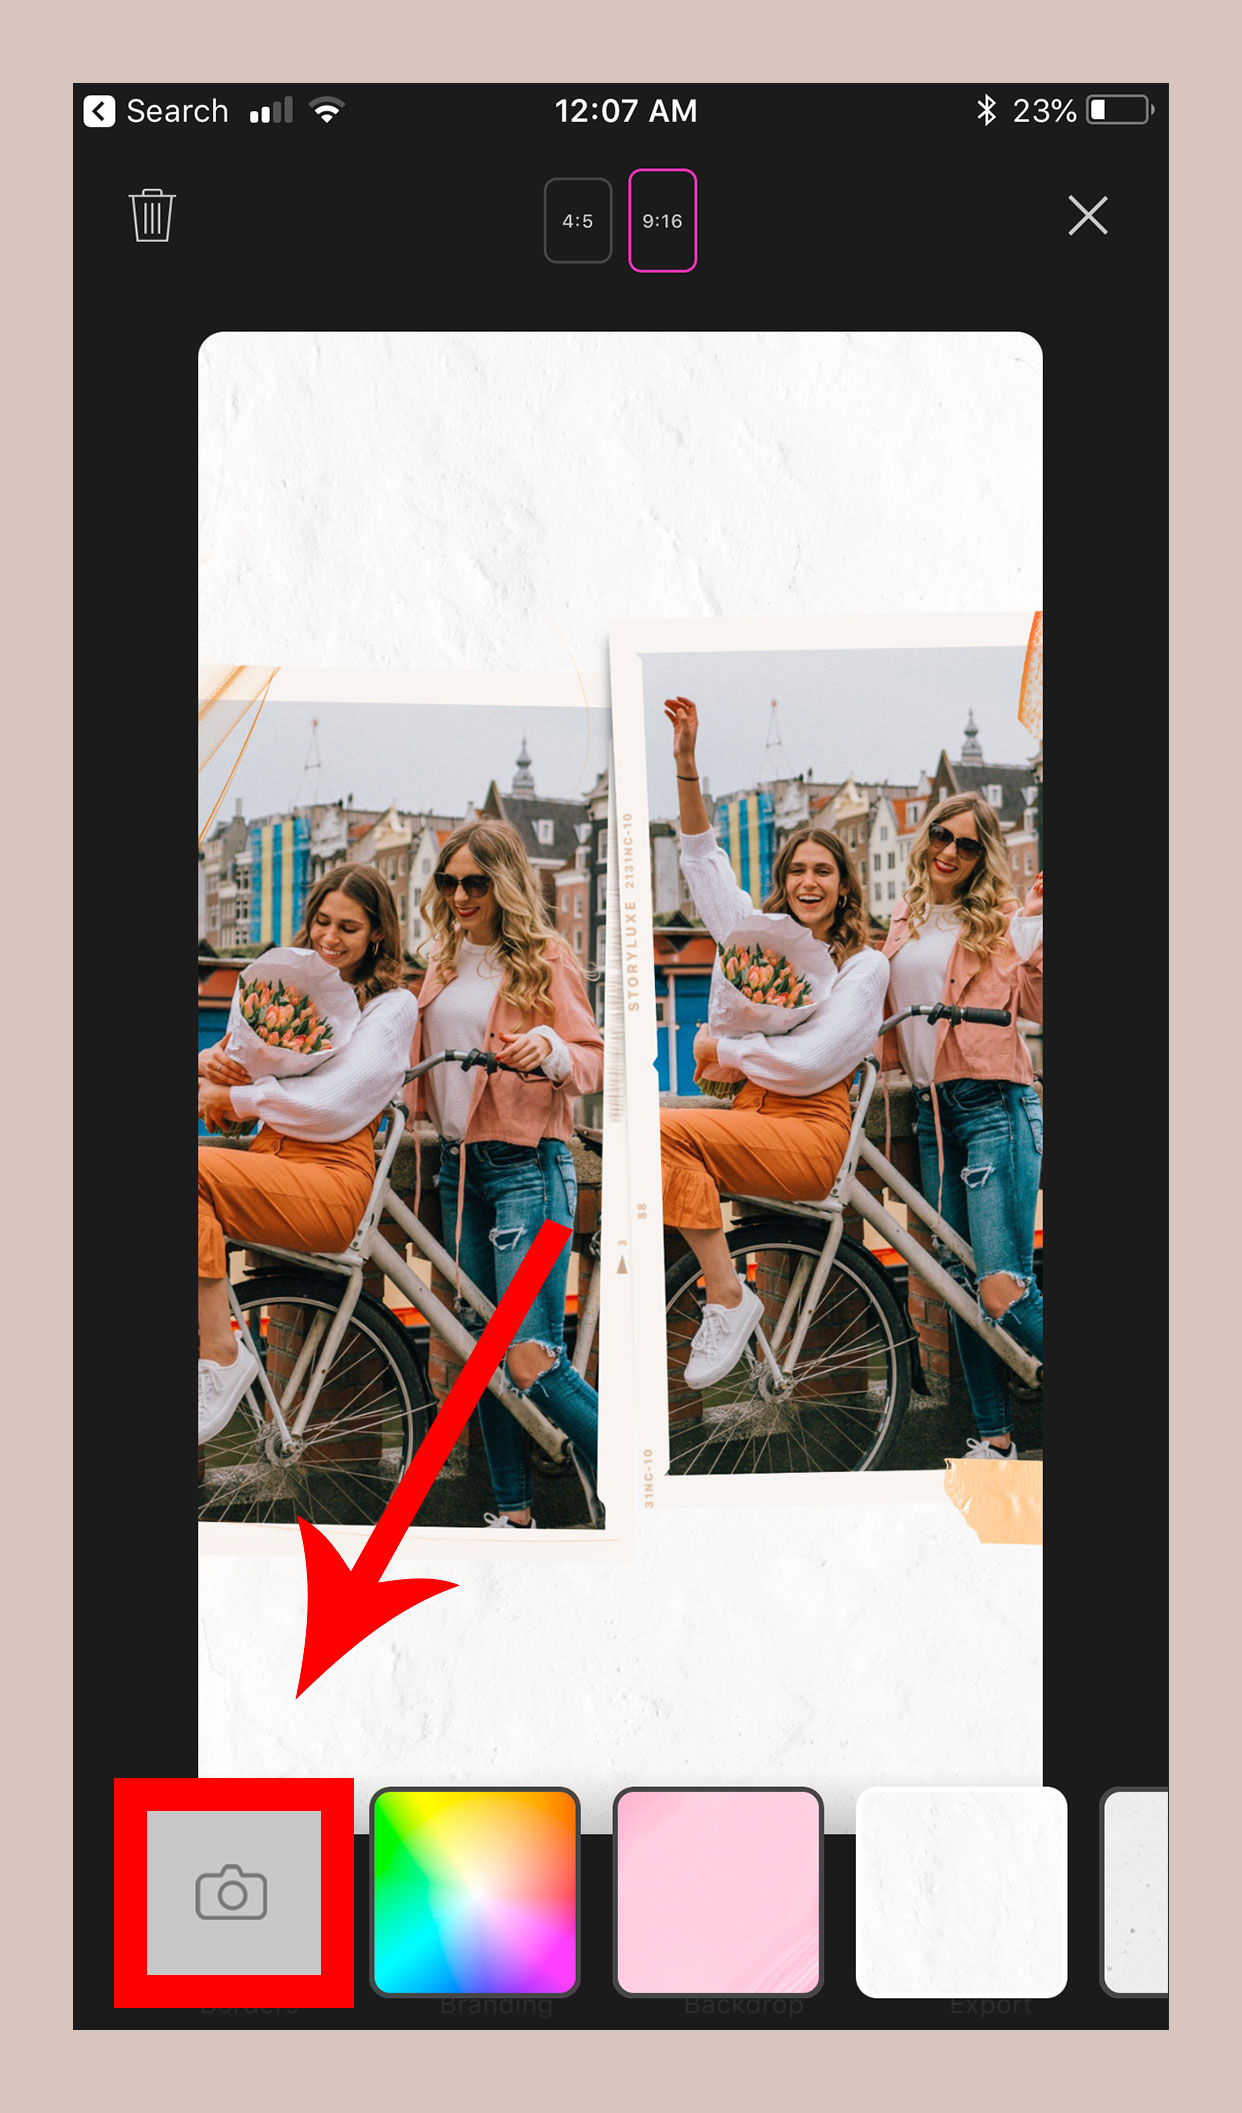
Alternatively, you can use your own photo/pattern/background as the backdrop for your layout. However, you do need to be subscribed to the premium version of StoryLuxe which costs $2.99/month. To add your own background image:
Select Backdrop at the bottom of your screen.
Choose the camera icon on the bottom left-hand corner of your screen.
Choose an image from any album in your camera roll.

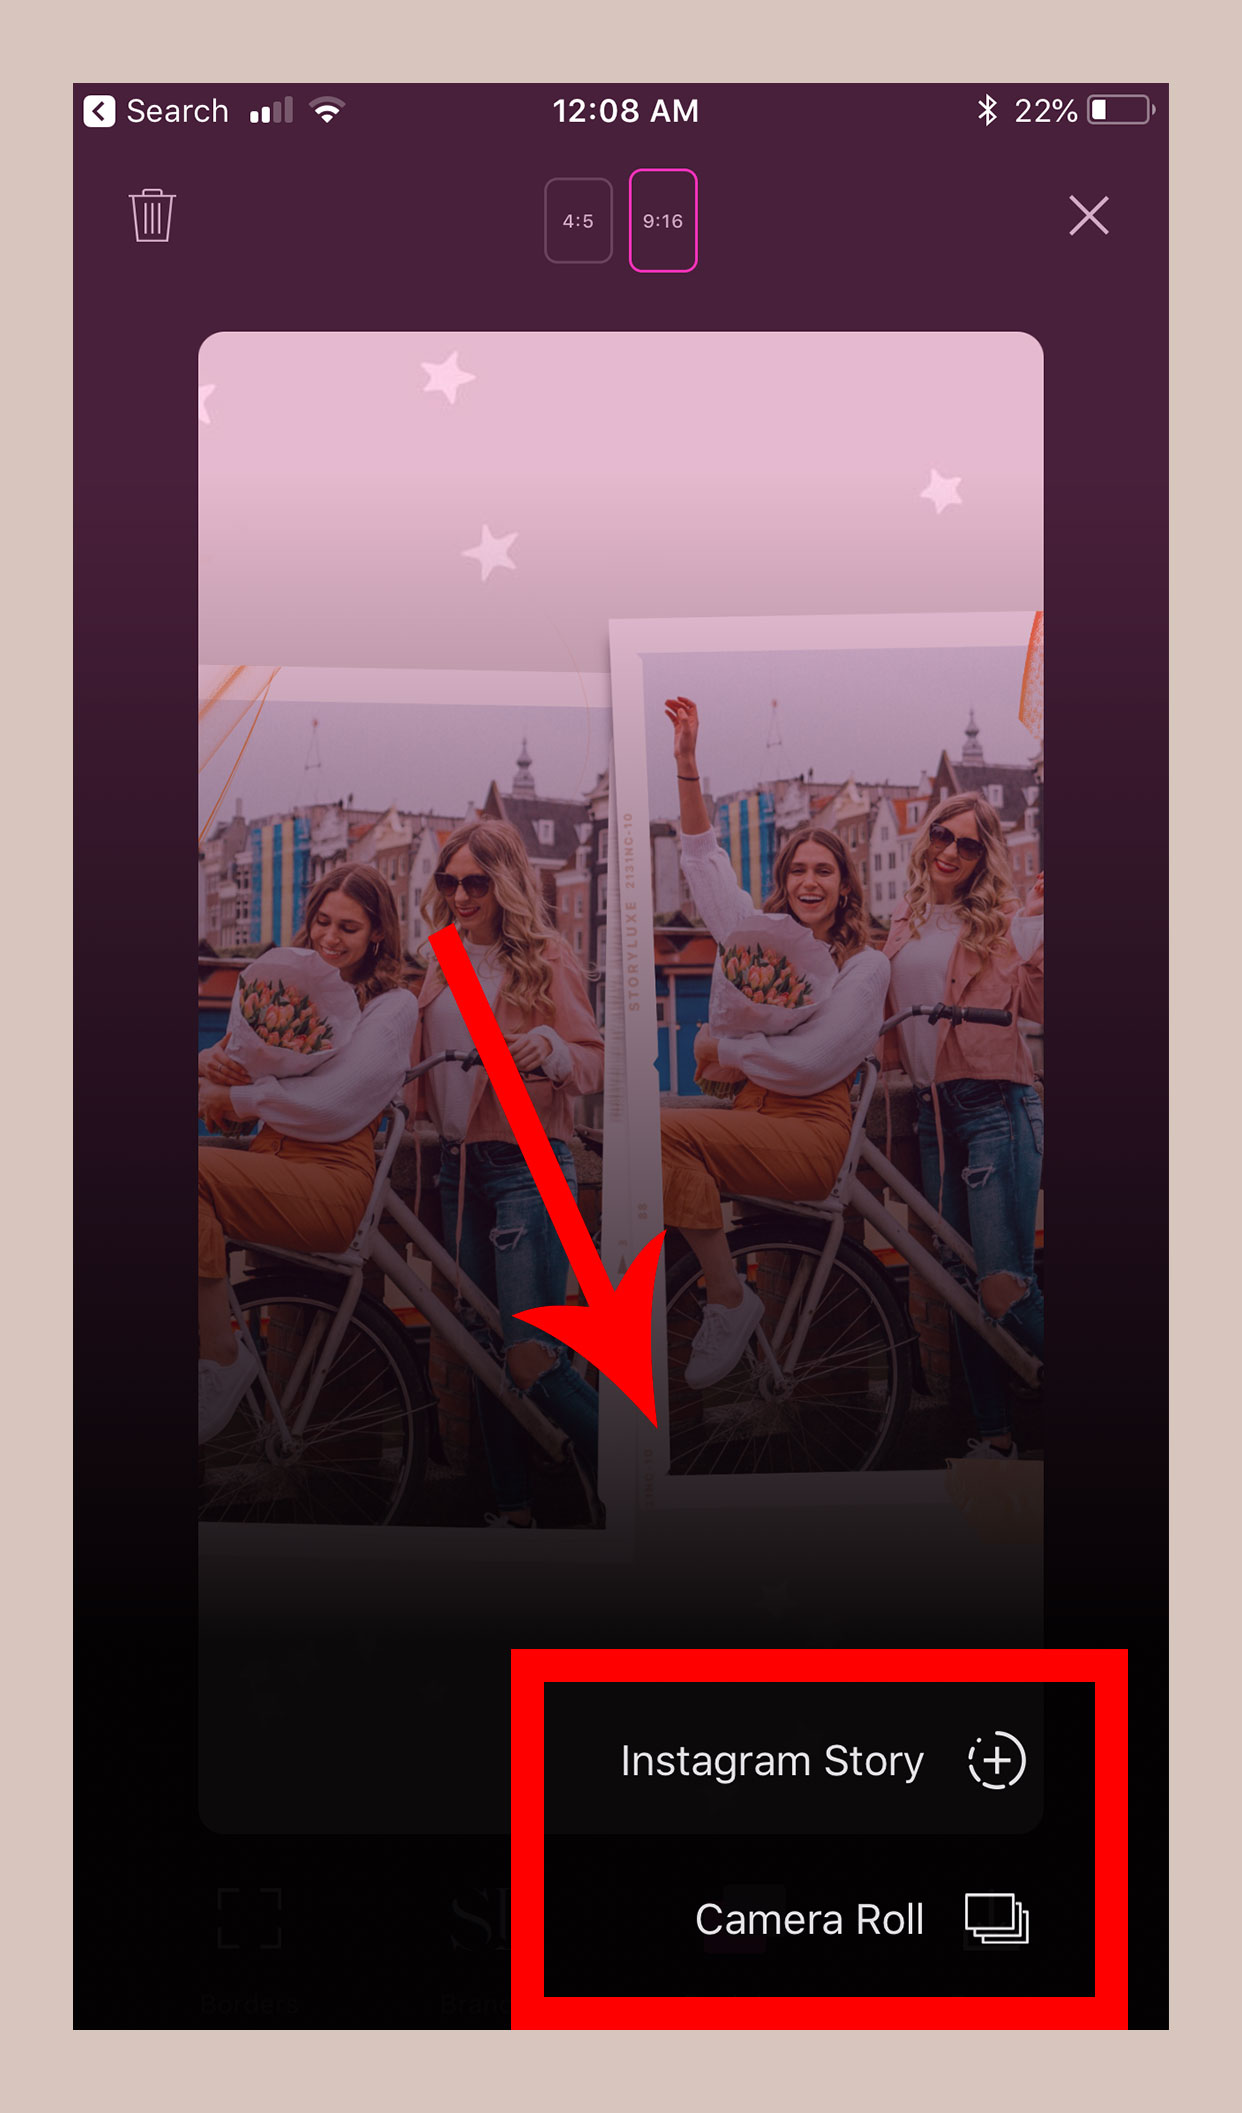
You can now export your template by selecting one of two options:
Export the layout directly to your Instagram Story
Export the layout to your Camera Roll
Andddd you’re done! Hooray for pretty (and free!) Instagram stories!
How to see who has viewed your Instagram Story
Story Analytics
Once you post your story, Instagram will offer some basic analytics and stats. You can see how many times each of your stories has been viewed, who has viewed it, and if you posted a poll or asked your followers a question — who answered. To view your story analytics:
Select the Instagram Story that you’d like the analytics of (you can do this by selecting the circle icon on your account profile).
Swipe up to view the list of Instagram accounts that have viewed each post in your current Story.
Privacy
The privacy settings on your Instagram account will control who is allowed to view your story.
For private Instagram accounts: Only your followers will be allowed to view your story.
For public Instagram accounts: Anyone on Instagram will be allowed to view your story.
Instagram hide your story feature
Alternatively, you can choose to hide your story from people that currently do follow you. To hide your story from individual accounts, you’ll need to follow these steps:
Go to your account profile and select the Menu icon in the top right-hand of your screen.
Click the Settings icon.
Select Privacy and Security > Story Controls.
Select Hide Story From.
Choose the Instagram accounts that you would like to hide your story from, then click Done (or select the checkmark icon). To unhide your story from an account, select the checkmark to unselect them.
Can people see how many times you view their Instagram Story?
No. As of the 2019, Instagram does not allow its users to see how many times someone’s viewed their Instagram Story… that would be kind of convenient (and creepy), though. :)
Instagram Story Swipe Up feature
The Instagram Story Swipe Up feature is a great way to promote YOUR products, collaborations & content on your account so you can share your hard work with your audience!
However, please note that as of 2019, you still need 10,000+ followers in order to use the swipe up feature. But if you are at 10K (you go, girlfrand!), you can go ahead and follow these steps:
Create a photo or video story.
Add the little link icon at the top of your screen.
You have the option to link an IGTV video or a web link. For this example, click Web Link.
Copy & paste or type in the link you want to add to your story.
Click “Preview Link” to make sure everything works.
Click “Done” in the top right-hand corner.
Voila! Now go bring in that cash money, baby. ;) Just kidding… kind of.
How to add Instagram Stickers to story posts
Instagram stickers are static (or animated) images that you can place on your IG stories to give them a little something special.
How to use Instagram Stories Stickers
Create a photo or video story.
Click the folded smiley face icon located in the top right-hand of the screen to pull up the stickers menu.
Select a sticker for your Instagram Story then pinch and drag it to change the size. You can then move/place the sticker anywhere on the screen. Once you’re finished, select the sticker until you see a PIN button appear in the bottom right-hand corner— click this.
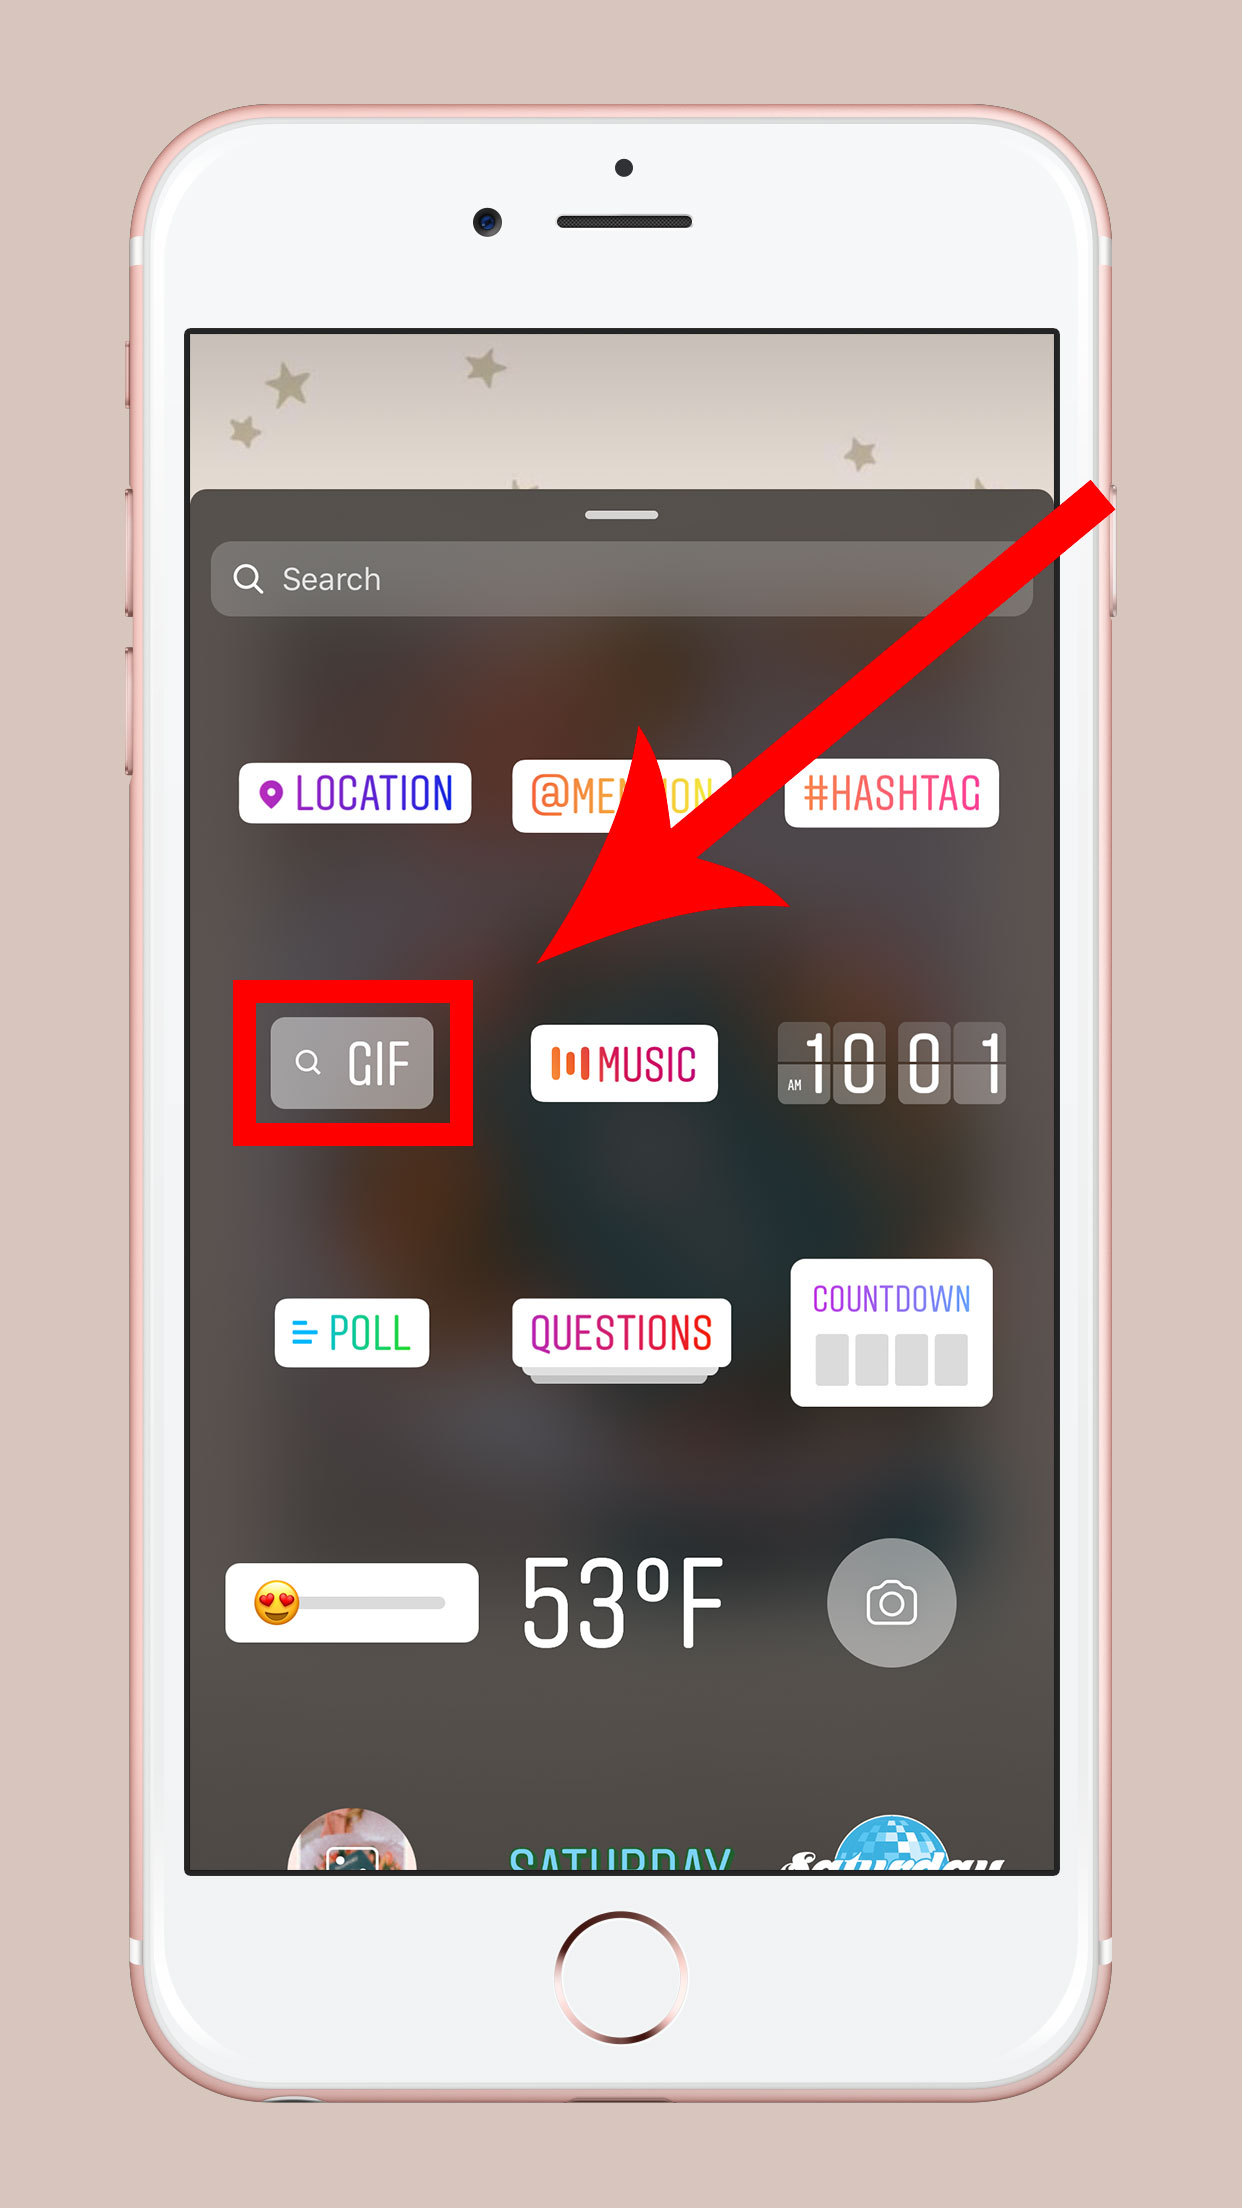
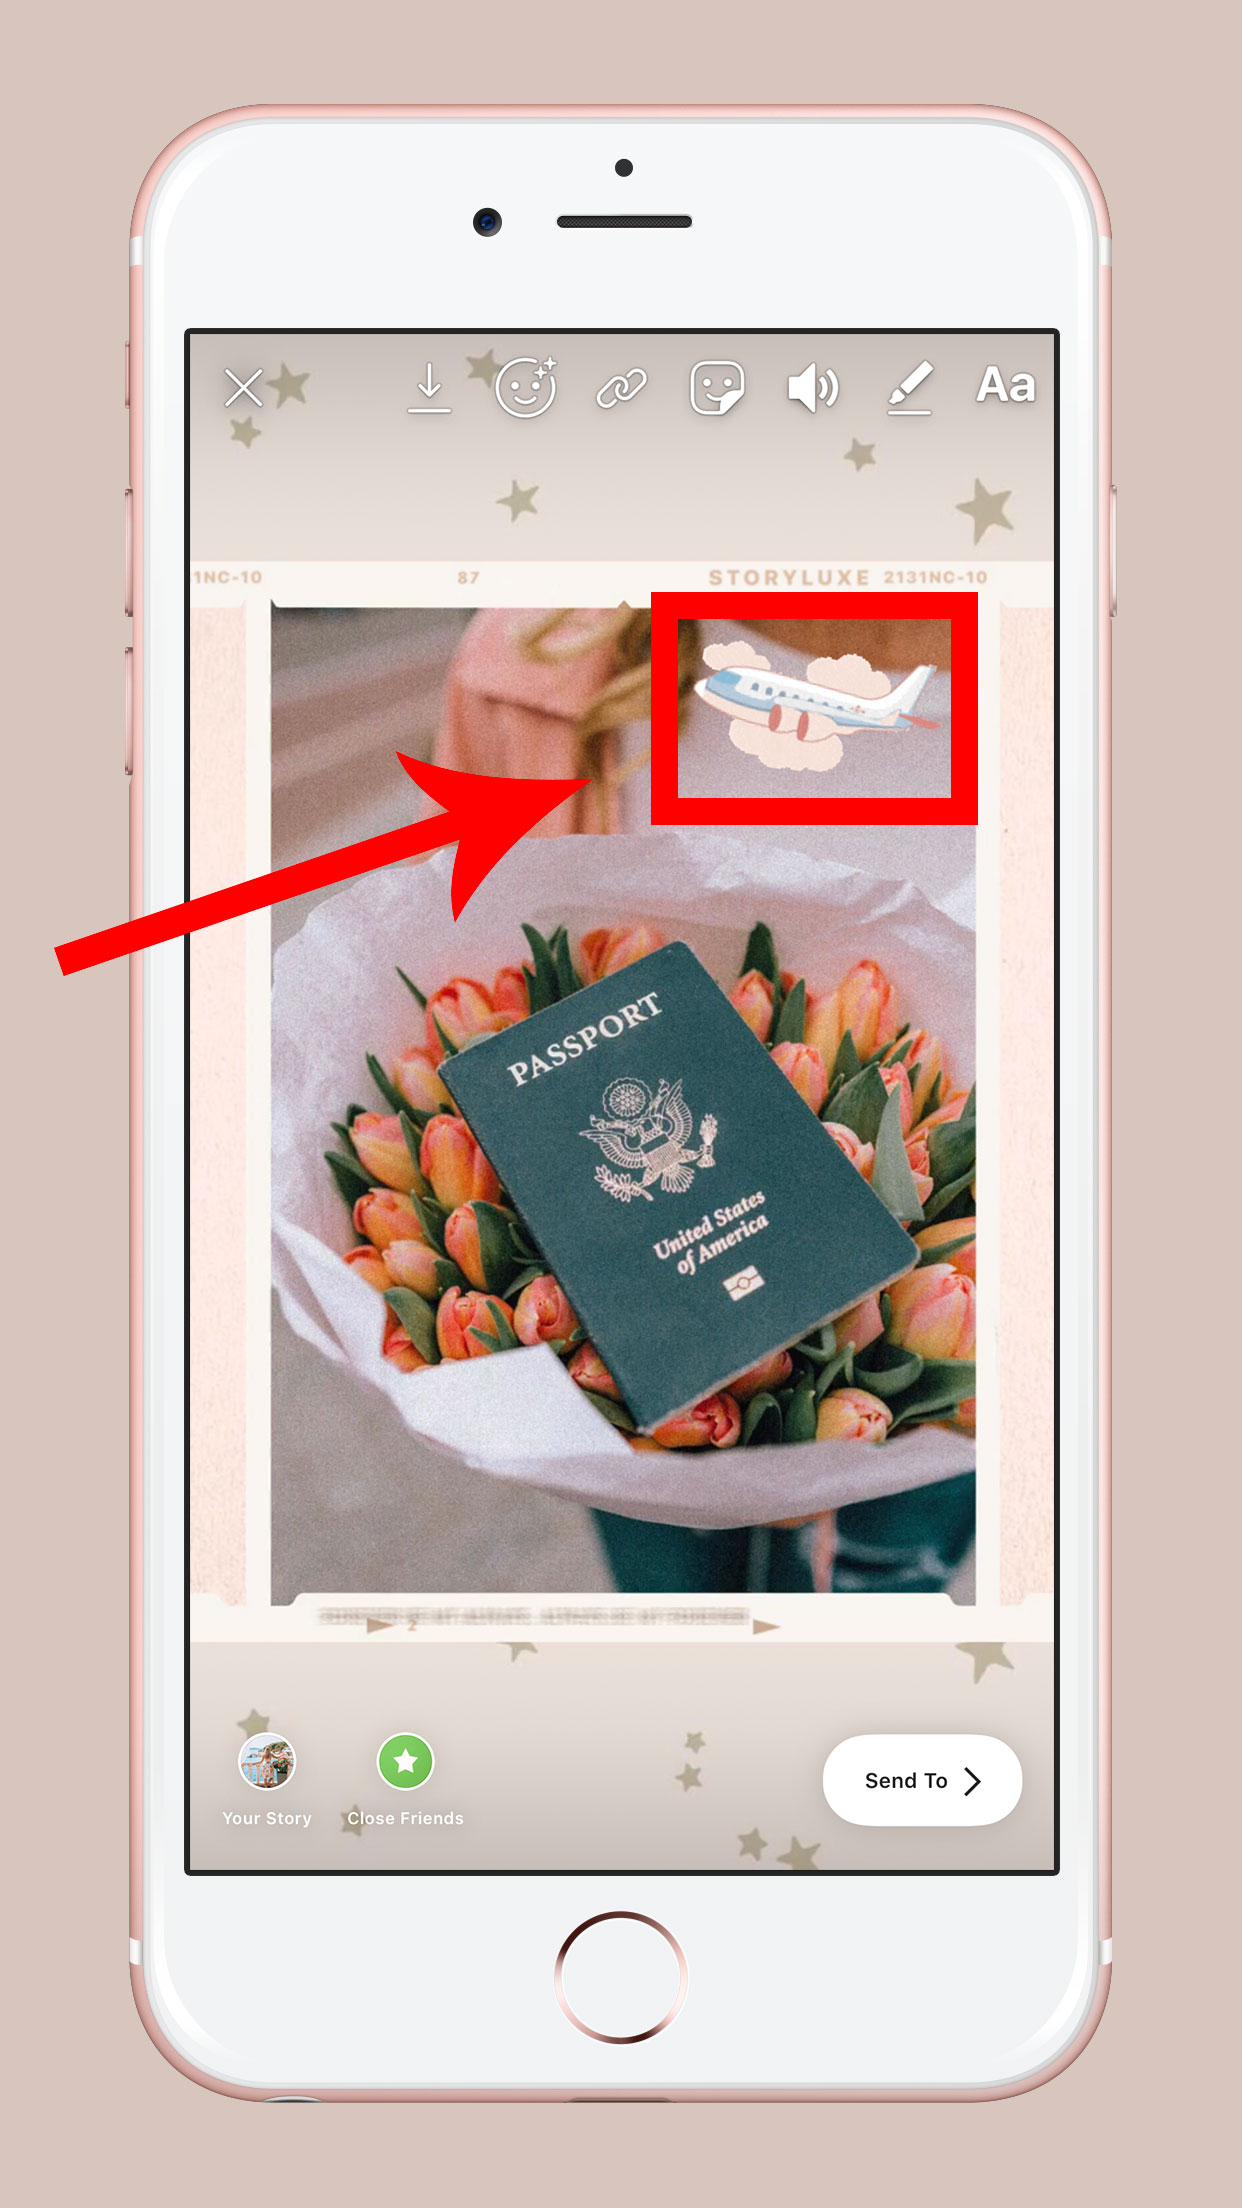
How to add GIFs to Instagram story posts
The release of animated GIFs to Instagram stories has made a big impact on users and encouraged some serious engagement on the Gram because they’re so much fun and simple to use! Gifs allow you to add some personality and flare to your IG story in just a few steps:
Create a photo or video story.
Select the folded smiley face icon located in the top right-hand of the screen.
Click the flashing GIFs button.

You can then select an option from the trending GIFs that appear on the front page.
Alternatively, you can type a keyword in the search bar to narrow down your results and locate a specific image/video for your content.
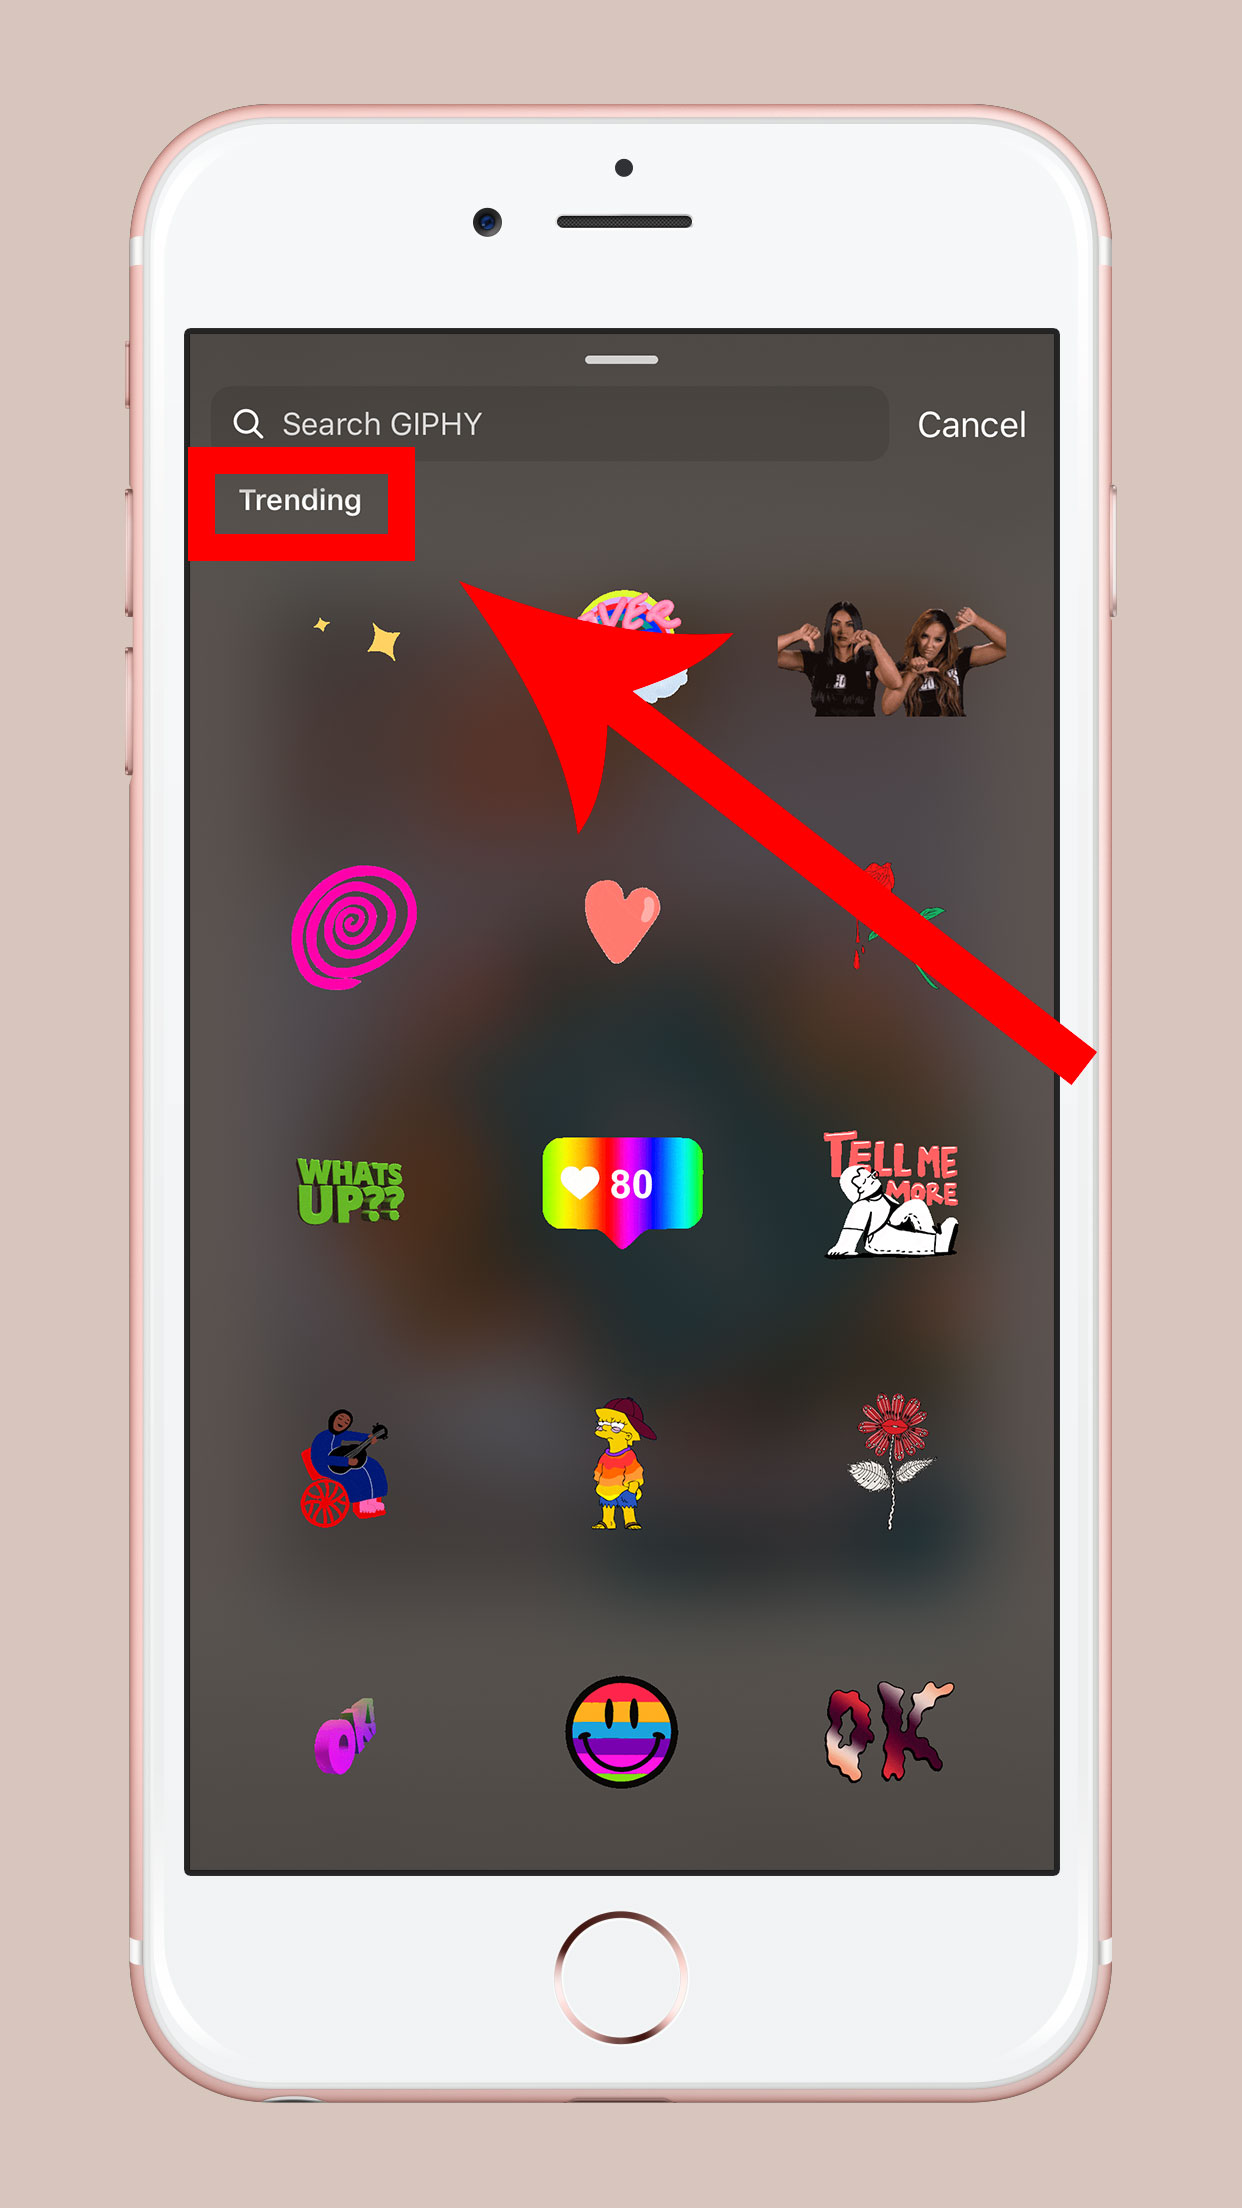

Once you have selected a GIF sticker for your Instagram Story, you can pinch and drag to change the size of the image. You can then place the GIF anywhere on your Instagram Story. Once you’ve finished, you can choose, “Send To” in the bottom right-hand corner and you’ll be good to go!
Save your best content to your Instagram Story Highlights
To create an Instagram Story Highlights album:
Go to your Instagram account by selecting the profile button in the bottom-right hand corner of the screen.
Select the ‘+’ (Highlight) icon in the Instagram Story Highlights section located below your IG bio.
Scroll through and select any Instagram Story that you’d like highlighted for your album — these will be located in your Archives (Instagram even offers some Suggested Highlights based on your content!)
Select ‘Next’ and choose a name for your album.
Select your cover image. On the left-hand side of your highlights, you will see an option to upload your own photo from your camera roll.
Once you’re finished, click ‘Add’ to add the Highlight album to your Instagram profile page.
Want to learn more about Instagram Highlights and snag some free goodies while you’re at it?! You might be interested in this blog post:
Instagram Highlights — The Only Guide You Need (+Free Highlight Covers!)
How to add your own location on Instagram Stories
Most cities around the world have their own unique Instagram Stories— these are curated by Instagram users who add a location tag to their IG stories. With location tags, you are able to reach a much larger audience with your Story posts and, in turn, receive a higher amount of engagement for your posts. To add a location to your Instagram Stories:
Create a photo or video story.
Click the folded smiley face icon located in the top right-hand of the screen to pull up the stickers menu.
Tap the “location” sticker, which will be located near the top of your menu options.
Nearby locations will now appear, along with a search bar to help filter a specific location.
You’ll now be able to choose the location you want to add for your post.
You can tap on the location sticker to make any necessary customizations— change the color scheme or resize it to your liking!
How to add a hashtag to your Instagram Stories
Instagram hashtags are a great way to promote more engagement on your account AND get more eyes on your content! To add a hashtag to your Instagram Story, follow these steps:
Create a photo or video story.
Select the Aa icon, which is located in the top right-hand corner of your screen. You will then see a cursor/text form appear towards the center of your screen.
Adjust the font, size, and color of your text.
Type in the ‘#’ hashtag symbol, then begin to write your hashtag without spaces. Instagram should detect your hashtag (as long as you are connected to wifi), and will display the public hashtag(s) you are searching for. Click the hashtag once it pops up, and you’ll be good to go!
Hashtag Tip: Just like with Instagram posts, you are allowed a maximum of 30 hashtags per story post. However, creating that many hashtags on your IG story will look a bit spammy, and the engagement levels begin to drop off after 5-10 story hashtags. So just add a few of your most relevant hashtags to get some extra eyes on your beautiful content!
How to post a video on Instagram Story
Video content is king in the Instagram game — I mean, am I right or am I right?!
So it’s important to stay on your A-game to stay ahead of the curve! Check out my tips & tricks below to find out how I create video content for my Instagram stories.
How to post video on instagram story with the 8mm vintage app
I’ve had quite a few followers ask me about my vintage-style video stories recently, so I thought I’d let you in on my little secret!
I use the 8mm iPhone app, and boy has this been a game changer for my IG stories. It costs $2.99, but let me rest assure you that this small price is definitely worth your pretty pennies!
This app can honestly make anything look beautiful (I’m completely serious… it could make a video of a garbage can look cool & trendy).
Once you download the app, you’ll have a number of style options to choose from (while I’ll outline below). If you want to see a visual guide of the different setting options, simply select the info button (indicated by an ‘i’ on the app’s main recording screen). The settings include:
Reels/Clips: This is the area where your recent video clips will be stored.
Front Camera: This setting will flip your camera around and give you the perfect selfie video you’ve been needing!
Flash: This will turn your flash on.
Sound Options: Selecting this button will turn your audio on/off.
Change Lens: Swiping this setting will give you a number of vintage effect overlays.
Record: This setting will record your video.
Change Film: This will give you your main editing style (see below for all styles included).
Frame Jitter: This will give you a number of subtle vintage overlays to choose from.

Choose from a number of editing styles (note that you can change the ‘frame jitter’ for each style to create different grain/speckled-vintage overlays):
Two-Color (orange/teal tones; this is the style I use for all of my Instagram video stories)
2 Strip (Orange/green tones)
3-X (Black & white tones)
Siena (Vintage/ brown tones)
1920 (Black & white tones)
70s (yellow, antique tones; this is a close-second for my fave video editing style— it produces the antique style without washing out the details)
Sakura (pink tones)
XPro (Navy blue/yellow-green tones)
Noir (Pure black & white tones)
60s (Pink/yellow-green)
Pela (Orange/yellow tones)
Indigo (Pure blue/navy tones)
Tuscan (Vintage/ brown tones)
Not only can you choose the editing style for your videos, you can also place additional vintage layers on top of your video clip.
To place additional subtle, vintage layers on your videos, simply click through the ‘Frame Jitter’ button— this will display different effect layers for you to choose from.
While there aren’t official names for these layers, some of the styles include:
Subtle grainy overlay
Subtle speckle-vintage overlay
To begin recording your video with the 8mm mobile app:
Open up the 8mm app.
Make sure you have chosen your preferred editing style (see above)
Optional: Add any additional vintage overlays (see above)
Start recording your video by selecting the red record button towards the bottom of your screen (you do not need to hold the button down while recording).
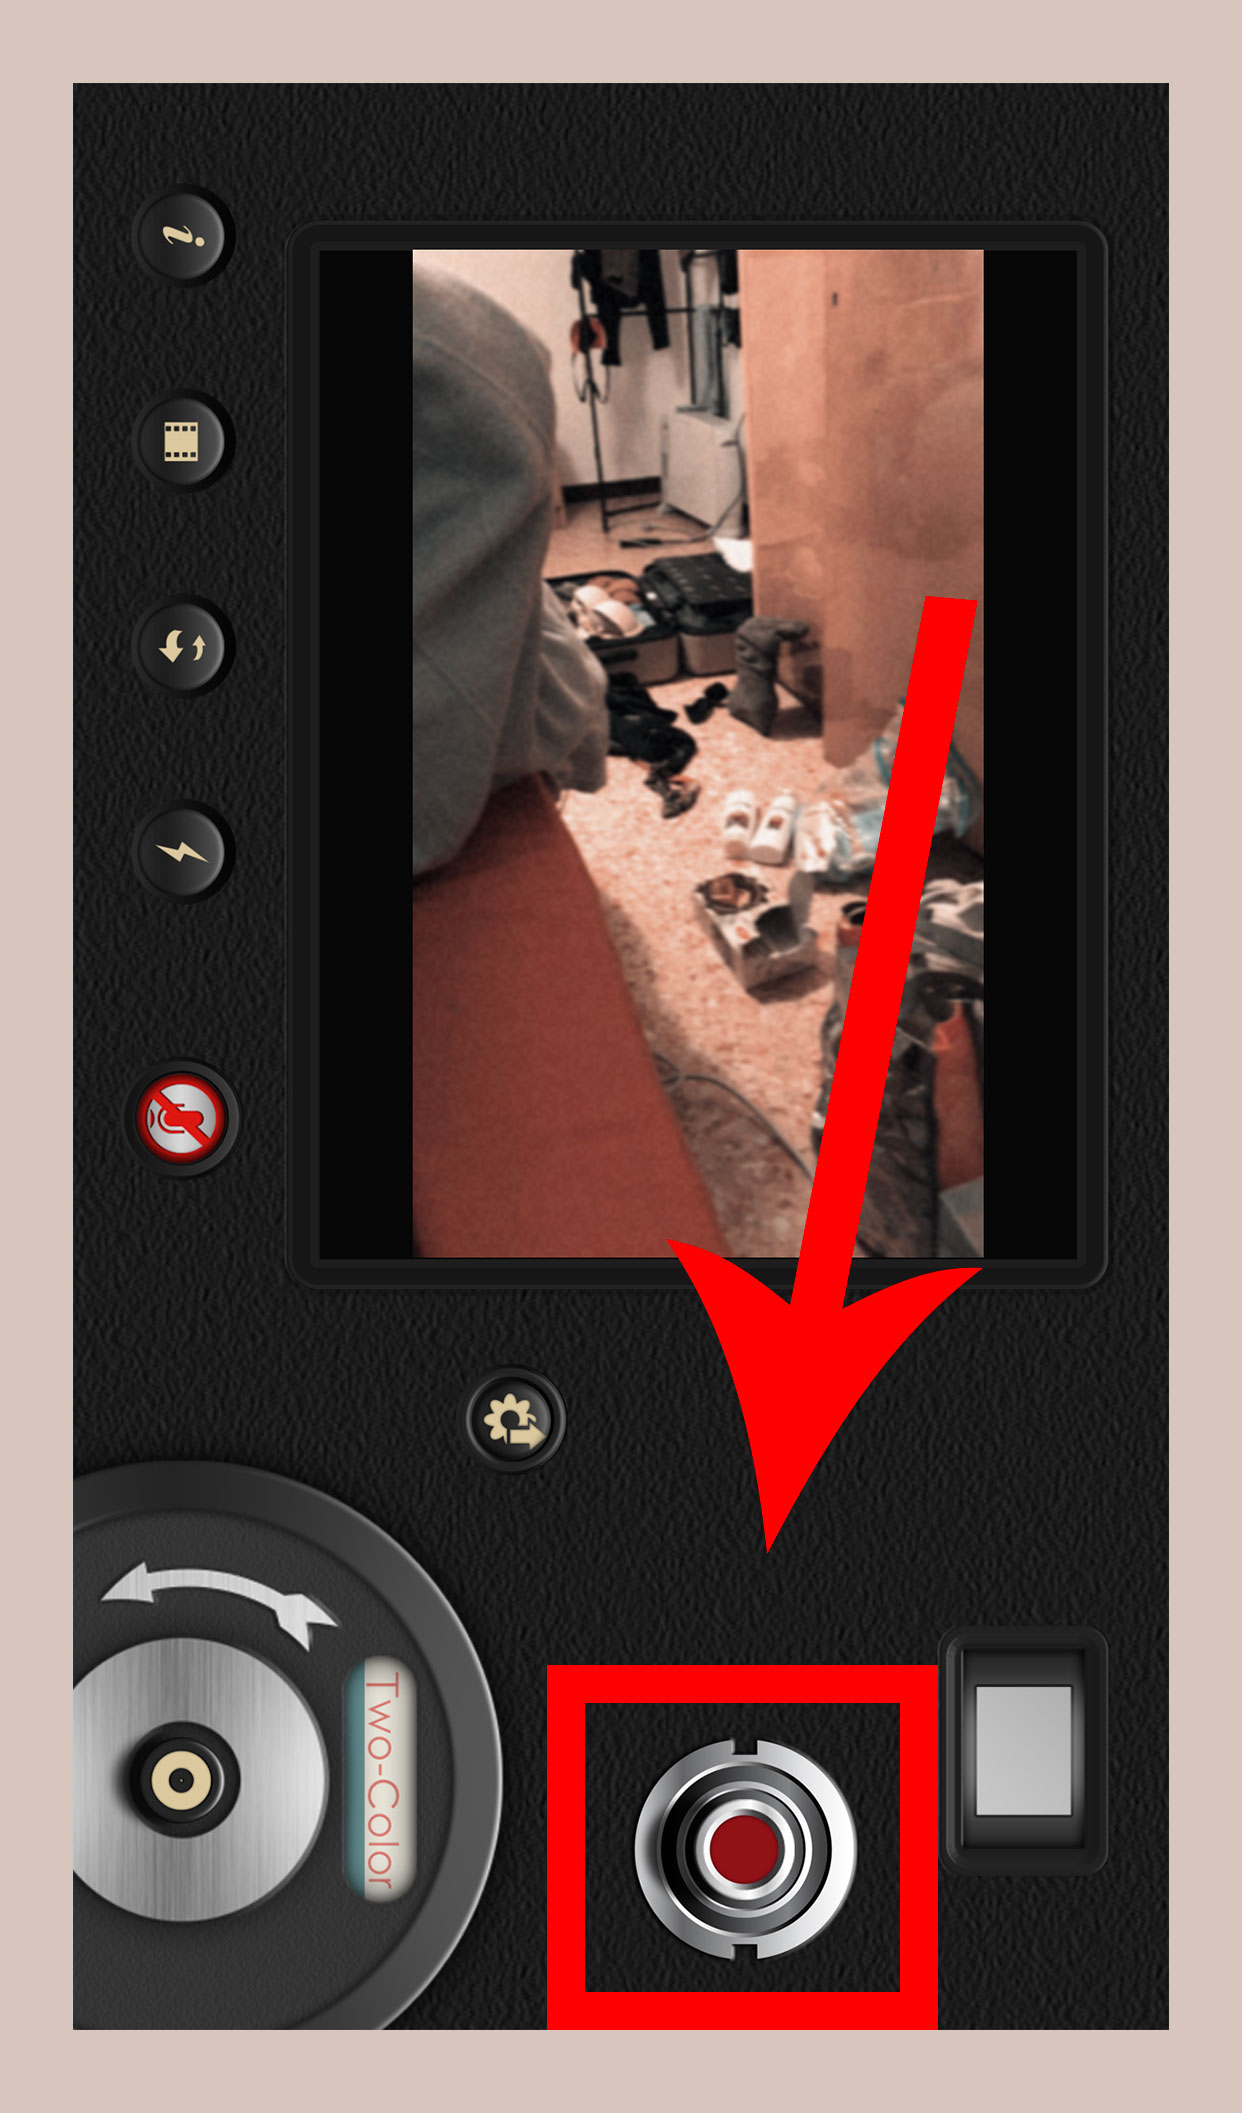
Note: It’s important to double check that the timer displays on your screen while recording— the app can be a bit testy at times and will occasionally do it’s own thing… so just make sure you’re actually documenting those precious memories!
How to add a poll to your Instagram Stories
The Instagram Stories Poll feature allows you to get interactive with your audience by asking them to vote on one of two poll questions. It’s a great way to engage with your followers and have a little fun too!
To add a poll to your Instagram Stories:
Create a photo or video story.
Click the folded smiley face icon located in the top right-hand of the screen to pull up the stickers menu.
Select the “poll” sticker, which will be located near the top of your menu options.
You can now write a poll question to your followers in the field that says, “Ask a question…”. You can also customize the YES | NO field options.
Post it to your story and let your followers vote for the winner.
After someone has voted in the poll, they can keep up with the winning answer by checking back on your story poll!
How to re-share Instagram posts on your story
Instagram allows you to re-share other Instagram posts to your own story. It’s a win-win scenario because it adds variety to your Instagram story content AND it can help you build relationships/network with other IG accounts in your niche! To re-share Instagram posts on your story:
Open the Instagram post that you would like to re-share.
Tap the arrow button located below the photo.
A pop-up menu will appear— select the ‘Add to Story’ option.
Instagram Stories ideas for brands
Behind-the-scenes content
Take your followers with you on your journey and give them a more authentic look into your business/brand.
People love seeing the raw content that isn’t featured on your Instagram feed— so include them in your day-to-day routine by utilizing Instagram Stories!
Takeovers
Instagram ‘takeovers’ are a fun way for brands and Influencers to create a mutually beneficial partnership/relationship with one another.
This strategy is a win-win for those looking to reach new audiences by cross-promoting on a different platform.
Hope this Ultimate Guide to Instagram Stories was helpful!
If you have any questions or concerns, feel free to drop a comment below— I would love to help ya out in any way I can! :)