How to shoot in manual mode: Photography Cheat Sheet to Camera Settings
Disclaimer: This article includes affiliate links & I would LOVE if you decided to use them. Affiliate links + referrals programs help creators and educators like me to fund the free content that we provide on our blogs. Thank you for your endless support! XO
If you feel intimidated by the words “manual mode”, please know that you are NOT alone.
I was terrified to face the camera settings learning curve when I first began my photography journey. In fact— I avoided it like the plague for an entire year before finally doing something about it. I would always think, “What’s the big deal, anyway? Automatic settings are working just fine for me. Why should I even spend time learning manual mode?”
Well, I was wrong— very, very wrong. The quality of my Instagram photos has shifted DRAMATICALLY since making the switch from automatic settings to manual mode.
BUT there’s a whole lot of noise out there in the online world— am I right or am I right?! And it always seems impossible to get a non-techy explanation of all this photography lingo…
So this article is perfect for you if you’ve been thinking:
This photography jargon is too confusing for me...
How the heck am I supposed to learn all this stuff? Where do I even start?
ISO, shutter speed, aperture... girlllll, what language are you even speaking?
Okay, let’s all just take one quick breath in... and exhale slowly. YOU’VE GOT THIS, promise. Don’t let the “photography experts” make you feel like you can’t operate a camera...
Below, you can find my NO BS guide on how to shoot in manual mode so you can finally learn how to navigate your photography camera settings like the true professional photographer/ content creator I know you are. ;)
Feel free to skip to any specific section using the links below. :)
Table of Contents
Why shoot in Manual Mode?
Here’s the thing— you don’t know what you don’t know.
Maybe you have no idea why you’re even supposed to shoot in manual mode.. but your photographer friend Sally said you need to figure it out ASAP if you want top-notch photos. So now you’re here..
Well good news for you— I’m nicer & more helpful than your friend Sally. :)
Lets put it this way. By using manual camera settings, we can have complete control over the way our images turn out. And more specifically, we can control how much LIGHT we let into our camera:
If we have too much light entering the camera, our photo will end up being overexposed (meaning way too bright).
If we don’t have enough light entering the camera, our photo will be underexposed (meaning too dark).
And we need to have a properly exposed photo if we want that perfect photo for Instagram, duh! And thats exactly what we can achieve by shooting with manual settings— instead of letting our camera dictate how much light comes in, we get to call the shots on everything.. including how Instagram-worthy our photo turns out. ;)
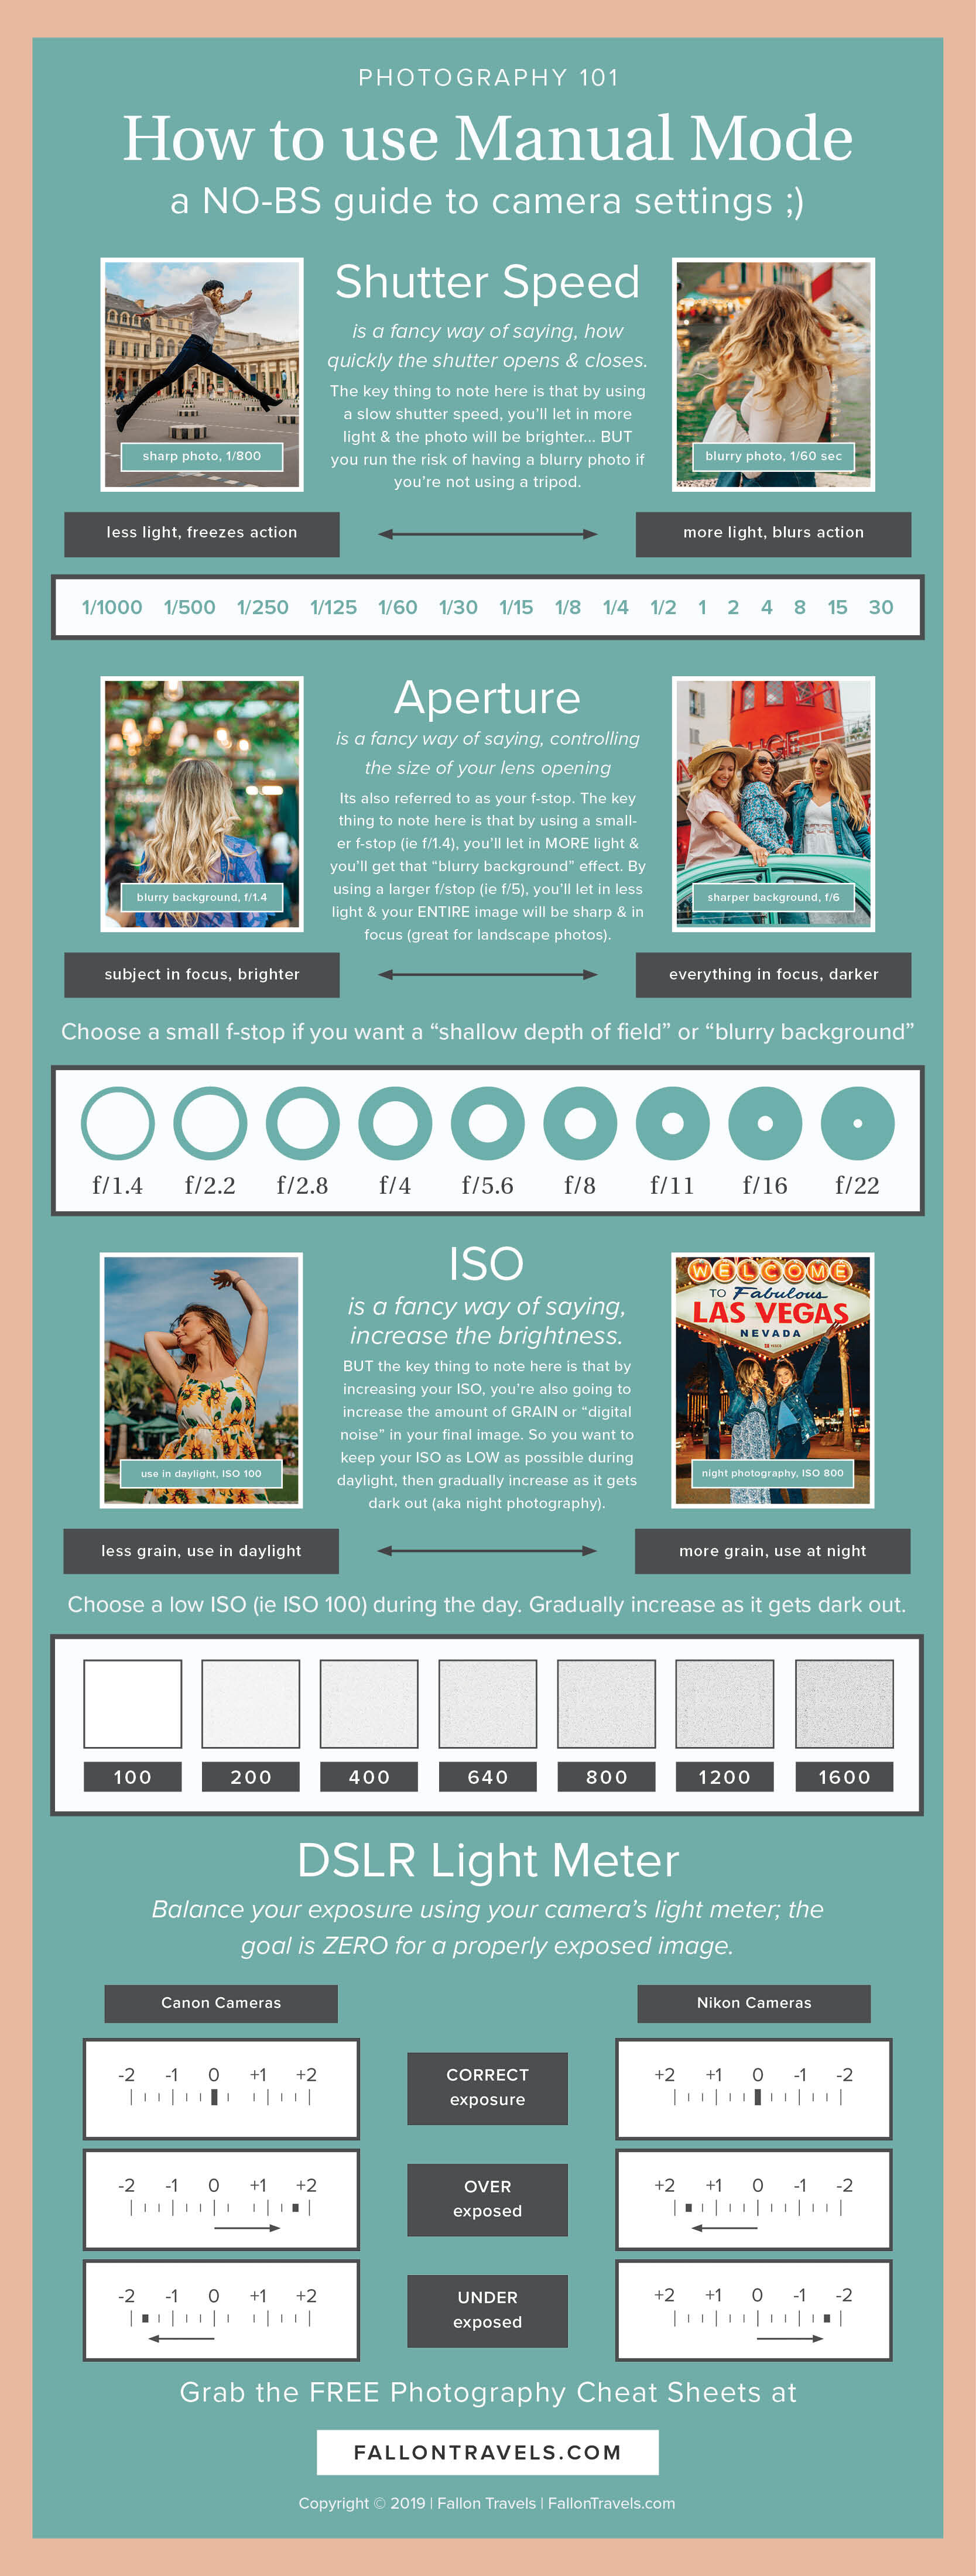
The Exposure Triangle
One thing we should always aim for with photography is to get our image properly exposed— and there are 3 essential settings we need to focus on to get the proper exposure:
Shutter speed
Aperture
ISO
I’ll go in way more detail on each setting individually… but its important to note that our overall goal is to get these 3 in balance until our image is properly exposed. And we can do this via the light meter on our camera’s viewfinder (see below).
Balance Exposure with the DSLR Light Meter
All cameras have a light meter; this is the little number line displayed on top of the camera body or in the viewfinder. The meter won’t display immediately, but it’ll appear as soon as you half-press the shutter button to focus in on your subject.
Here’s what it’ll look like for both Canon & Nikon users:
Canon: -2…1…0…1…2+
Nikon: +2…1…0…1…-2
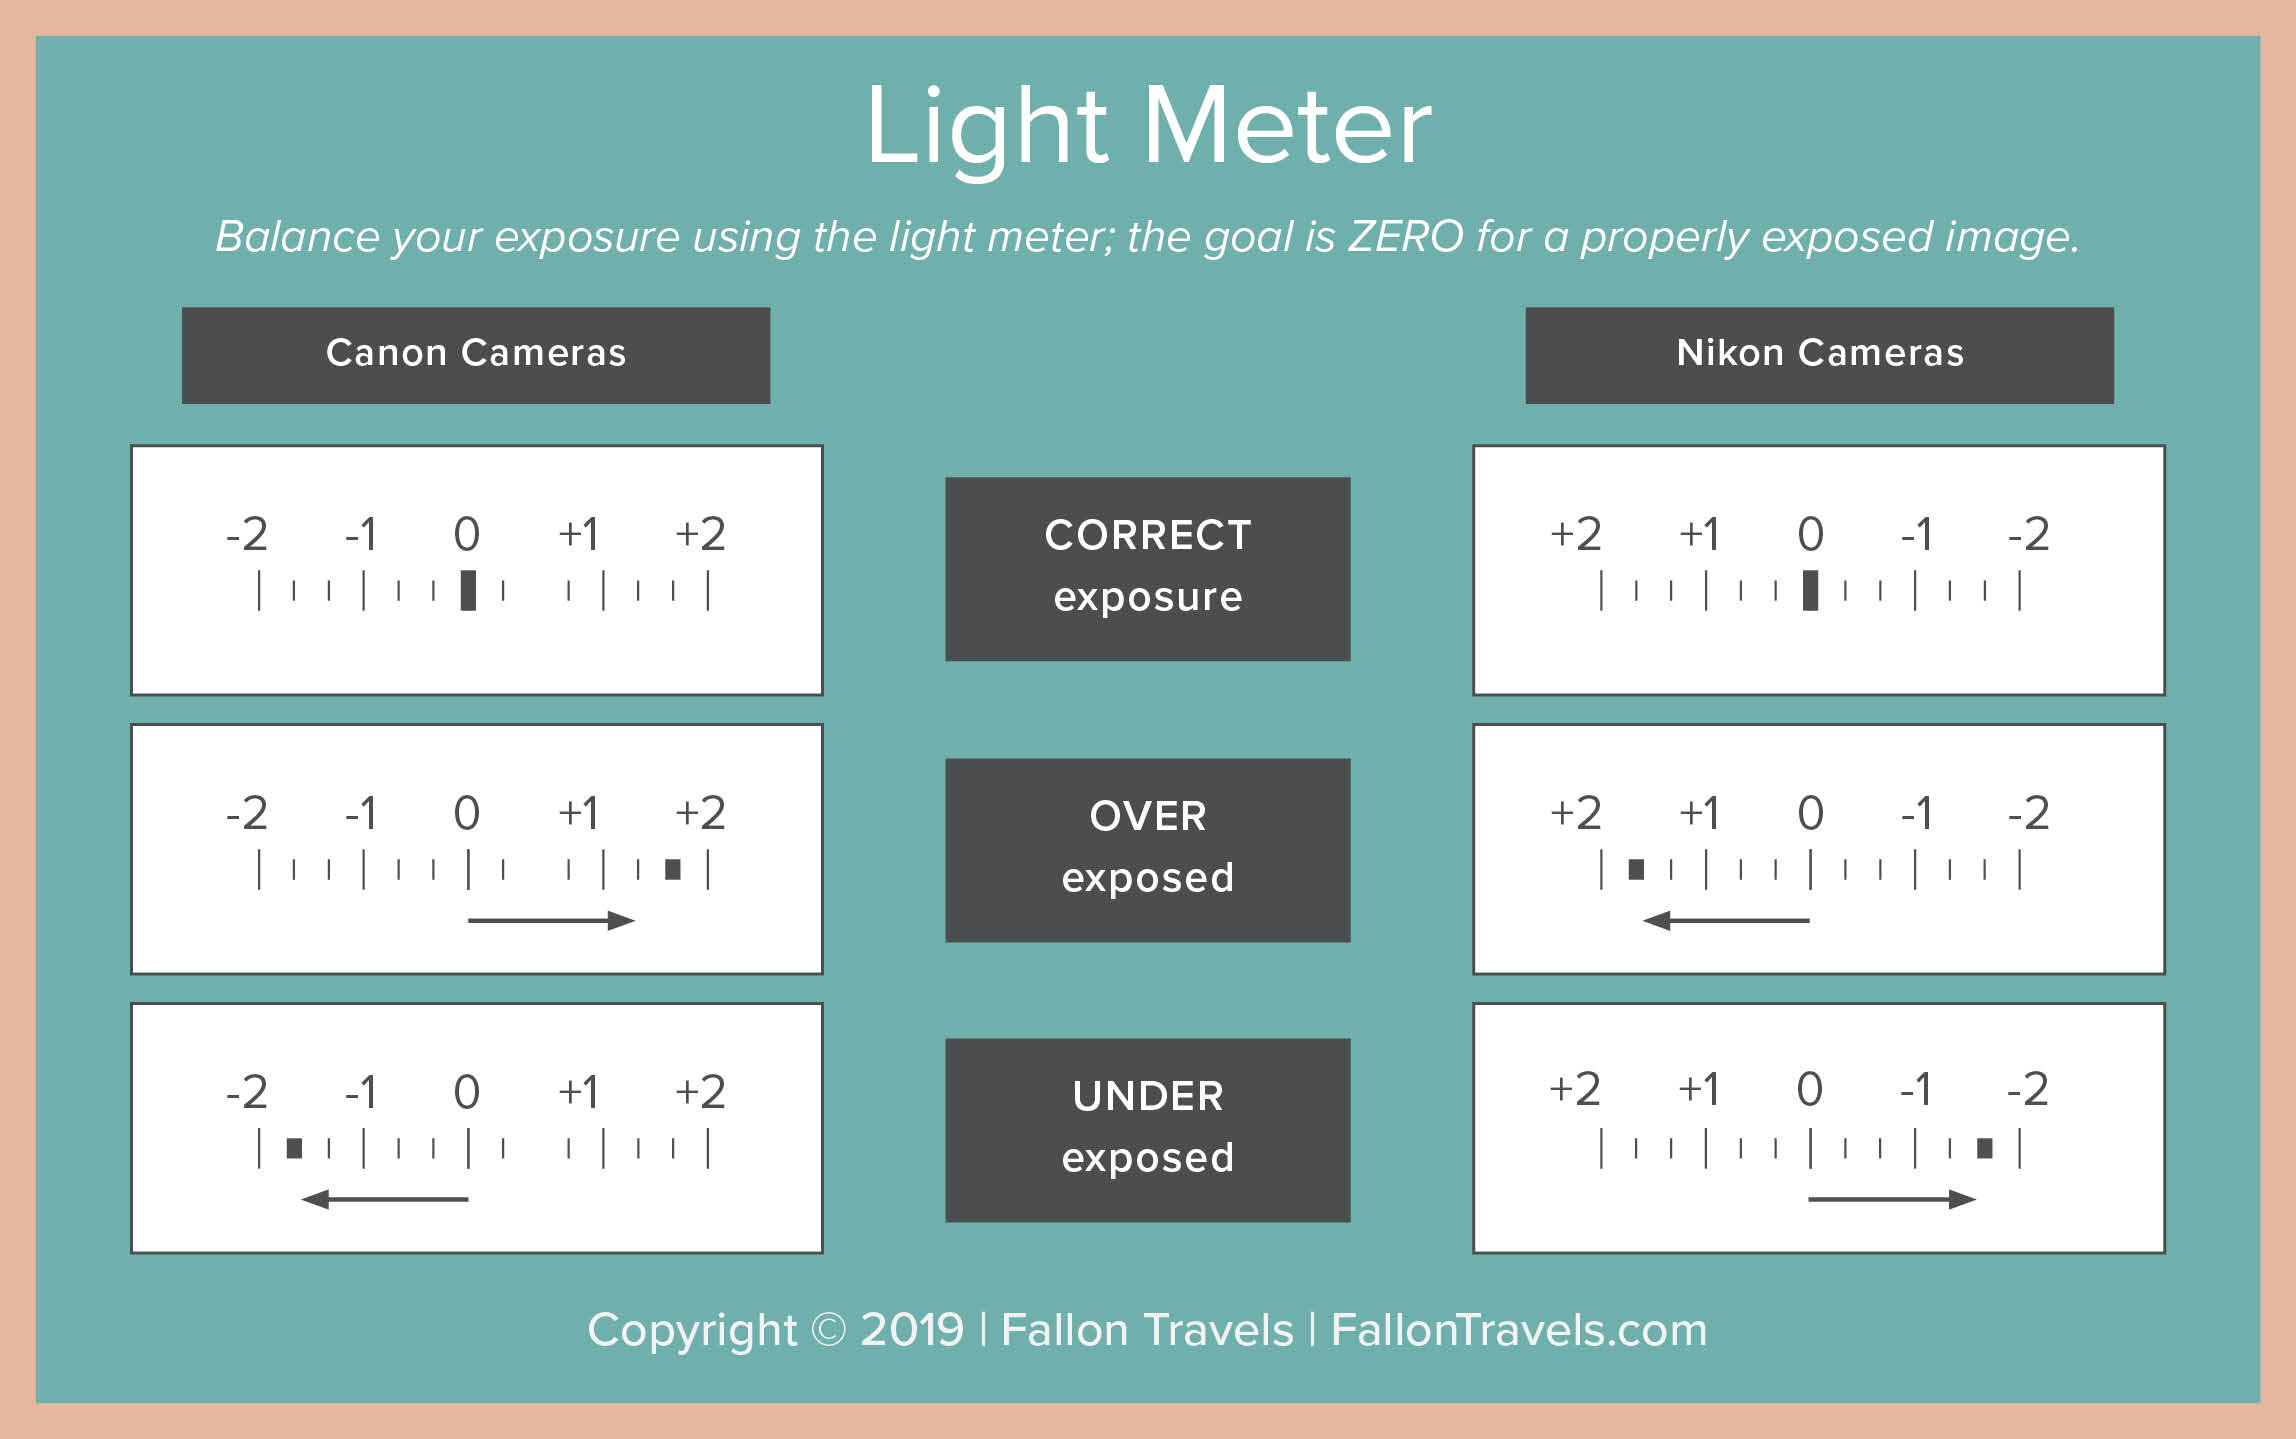
The light meter is basically an indicator that tells us where our exposure is in relation to the 0.
If we’re to the left of 0, our photo will be underexposed (not bright enough). If we’re to the right of 0, our photo will be overexposed (too bright). The overall goal is to be right at the center (0).. this means that our image will be “properly exposed”.
Personally, I always aim to be sliiiiiightly to the left of 0, not right at the center. Its much easier to correct for a slightly underexposed image than it is an overexposed image. Thats just me personally though! I know many people like super bright edits so they go more to the right. Just aim to not be toooo far off 0 or you might not be able to save the photo at all!
What is the Shutter Speed Setting?
Shutter speed is the speed at which your camera shutter opens & closes (think: how fast the shutter *clicks* to take your photo). By manually controlling for shutter speed, we can regulate how quickly light enters the camera & how much movement (or motion blur) is captured in our final image.
The actual shutter speed value itself is denoted by fractions of a second. For example:
1 sec would be considered a “slow” shutter speed
1/2000 sec would be considered a “fast” shutter speed

The best way to think of shutter speed is through its ability to freeze or blur motion in your photo:
The longer your shutter remains open (aka using a slow shutter speed like 1 sec), the more light & movement will be captured in your image. Andddd that means your photos can end up super blurry if you’re shooting handheld & not with a tripod.
The less time a shutter remains open (aka using a fast shutter speed like 1/2000 sec), the less light & movement will be captured in your image. But thats where it can sound a bit confusing: when I say “less movement will be captured”, its actually a good thing. It means that I can freeze a subject in motion perfectly and our photo won’t turn out blurry.
So you know all those cool hair-flip pictures or creative action shots where every single detail is perfectly in focus & you’re just sitting there thinking, “how the heck is this photo even possible?”.
Ya… been there, wondered that.
The secret? Using a fast shutter speed. By using a fast shutter speed (lets say 1/700 sec) you can capture SO much motion in your photos.
Lets just break it down for a sec with a couple examples. *I’m going to assume that we’re using a low ISO & aperture of f/2.5 for both (we’ll get into ISO & Aperture later).*
1. So lets just say you’re outside taking a photo of someone flipping their hair (in daylight hours). You’re using a SLOW shutter speed (i.e. 1/60 sec). Would you be able to capture the action?

No… the photo would unfortunately turn out blurry.
*For the record… that photo was actually taken as the sun was setting. It was starting to rain & was difficult to think on the spot. In hindsight, we should have just increased our ISO (again, we’ll get to ISO later…)
But mistakes happen! Don’t be hard on yourself.*
2. Okay, this time, lets say you’re taking a photo of someone flipping their hair (in daylight hours), but this time you’re using a FAST shutter speed (i.e. 1/800 sec). Would you be able to capture the action?

Yes, your photo would most likely turn out nice & crisp!
Using a fast shutter speed
Here’s another practical example of using a fast shutter speed. When my cousin Kasey (she’s the real Instagram photo queen) joined me in my Europe travels this past March, we were testing out #AllTheThings to get those perfect Instagram shots: different camera settings, lighting situations & shooting environments.
One thing we consistently aimed for with our photoshoots, however, was capturing movement — whether it be through shaking our hair back & forth, doing leaps in the air (all those years in dance finally paid off!) or simply standing in place with moving cars whizzing by in the background. And by using a fast shutter speed, we were able to capture some really cool effects in our images! If we had used a slow shutter speed for these, we wouldn’t have been able to freeze the motion like we did.
I included a few of our Paris photos below for reference — the shutter speed values on these ranged from 1/800 to 1/2500 sec.


Using a slow shutter speed
Using a slow shutter speed wouldn’t be very effective for sports or action photography where the main goal is to capture (or “freeze”) your subject’s movement.
Using a slow shutter speed can, however, create a beautiful effect for night photography — one of my high school friends, Ernie Carr, has great examples of these effects on his Instagram photography account which showcases crispy, Disney images (and a TON of the images are taken at night).
P.S., I promise I’m not being biased here but Ernie is SERIOUSLY talented and shares SO much knowledge on his Insta account— I highly suggest checking him out for photography tips, inspiration… or just to stare at his amazing content in awe.
Again, its important to note that a slower shutter speed will be more sensitive to camera movements (aka motion blur caused by holding the camera in hand).
This can, however, be prevented easily through the use of a sturdy tripod! Here’s a few of the best budget tripods I recommend:


Best Shutter Speed Settings
There’s no right or wrong answer here… but it is helpful to keep a general set of rules for your camera settings (which can always be modified based on your shooting environment).
My personal rule for shutter speed is to never go below 1/100 of a second if I’m holding the camera in my hand (but we all make mistakes, especialllllly if we’re in a rush).
Other than that, here’s a few common shutter speeds for different situations:
Basic street photography: 1/250 sec, 1/500 sec
Landscape photography (without tripod): 1/200 sec
Landscape photography (with a tripod): 1 sec
Night photography: 1/4 sec, 1/8 sec or even something drastic like 15-20 seconds (but again, you’ll need a tripod for this).
Shutter Speed Cheat Sheet
When we use a slow shutter speed (ie. 1 sec), we increase the brightness
BUT in doing so, we also run the risk of having a BLURRY PHOTO (if a tripod isn’t used)
When we use a fast shutter speed (ie. 1/2000 sec), we decrease the brightness
BUT we’re able to capture quick movement in our photos like someone running, water dripping, someone flipping their hair etc.

What is the Aperture camera setting?
The more technical Aperture Definition
If you want the technical jargon, aperture is the diameter of the entrance pupil of the lens through which light travels into the camera. And focal ratio is a measurement of the size of the aperture, often referred to as “f-stop”.
……excuse me, what?
Fallon’s Aperture Definition
Alright let me explain that a little better…
Aperture is basically a setting which dictates how much light you’re letting into your camera when you open & close your lens. Let me repeat— your lens. Thats the key thing to note here— aperture is alllll about the lens you’re shooting with. And its important to understand that:
A larger aperture (or opening of the lens) will let MORE light into the camera (making our photo brighter).
A smaller aperture (or closing of the lens) will let LESS light into the camera (making our photo darker)
F-stop goes hand-in-hand with aperture.. and is super important to understand as well. The f-stop is a measurement (aka the actual number) which is indicated as a mark on our lens. These values typically range from f/1.2 to f/22.

Again, the f-stop is all going to depend on the LENS you’re shooting with. If you’re shooting with the kit lens that came with your camera (which is totalllly fine), you might be a little limited in changing your f/stop. If you’ve researched & invested in a professional lens, you might have more flexibility.
I’ll give you a personal example to lay this out: I’m currently shooting (most) of my photos with a Canon 35mm f/1.4 lens Technicalllllly… this would be described as having a “maximum aperture of 1.4”. But thats where things get a little confusing:
A larger (or “maximum”) aperture is going to be indicated by a SMALLER NUMBER (I.e. f/1.4)
A smaller aperture is going to be indicated by a LARGER NUMBER (I.e. f/22).
This basically means that I have a little more flexibility with my lens because it can open up all the way to f/1.4.
But I swear… its not nearly as confusing when you actually put it into practice! The same advice sticks for any of the camera settings tips/advice in this article. Everything really starts to come together once you actually test it out & see what works!
How to get depth of field or blurry background
Maybe even more important to you...
When we change our aperture (or f-stop) using manual settings, we’re also affecting the depth of field... AKA that “blurry background” effect everyone loves so much.
This is where having a low f/stop comes in handy:
By decreasing the f-stop, we’ll create a shallow depth of field— this means that less of our overall image will be in focus. Instead, the focus will be centered in on one subject (like in the photo below). You might want this effect for portraits or close-up, detail shots.

ISO: 200, Aperture: f/1.4, Shutter Speed: 1/200
By increasing the f-stop, we’ll create a deeper depth of field— this means that more of our overall image will be in focus. You might want this effect for landscape shots or any photos where you need to get the FULL image in focus rather than just one subject.

ISO: 100, Aperture: f/6, Shutter Speed: 1/125
Aperture Cheat Sheet & Key Takeaways
Aperture (or f-stop) is the size of the hole in your lens that allows light to enter your camera. By controlling for this setting manually, we can:
Open the lens to make our photo brighter (using a smaller f/stop such as f/1.4)
Close the lens to make our photo darker (using a larger f/stop such as f/8)
So by using a smaller f/stop (ie f/1.4), you’ll let in MORE light & get that “blurry background” effect (great for portrait photos). By using a larger f/stop (ie. f/8), you’ll let in LESS light & your ENTIRE image will be sharp & in focus (great for landscape photos).

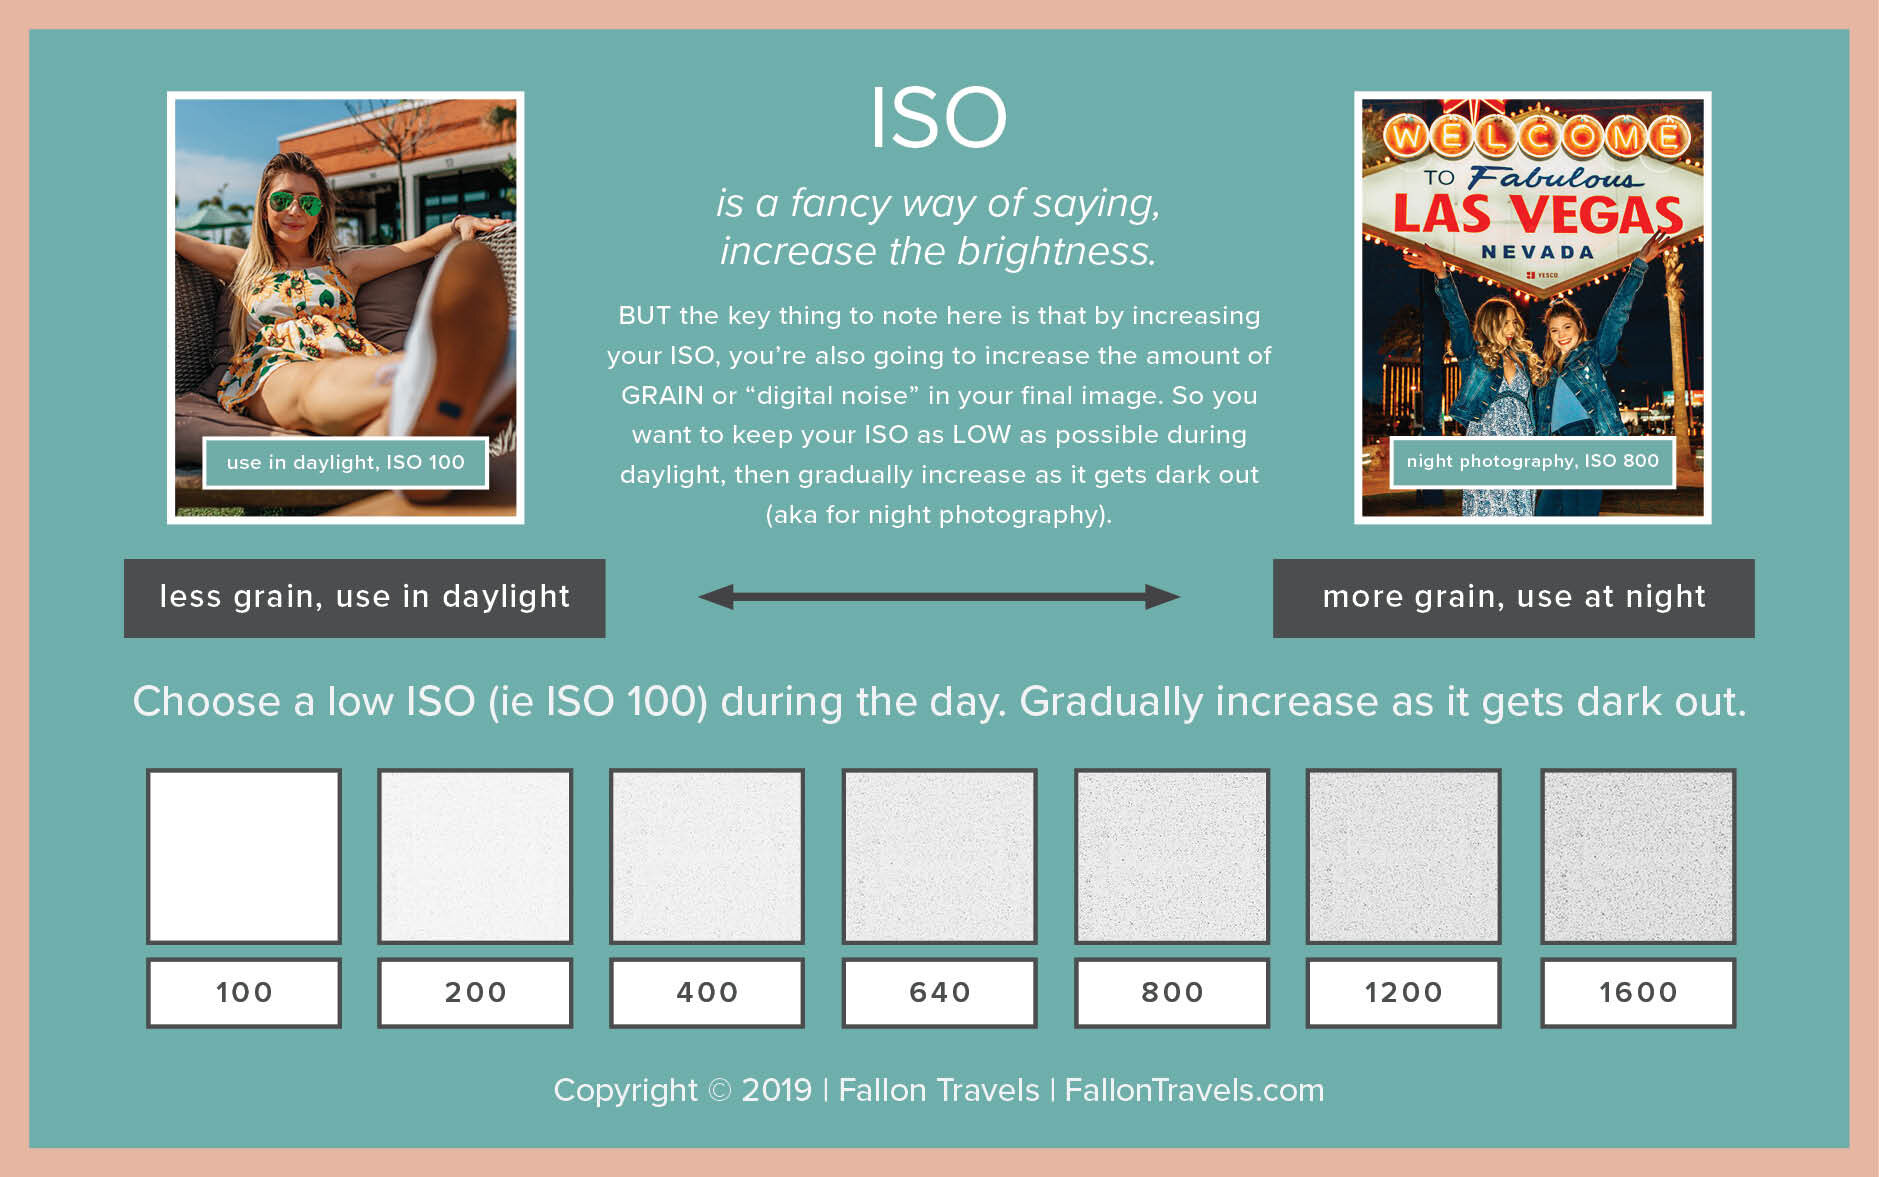
What is the ISO camera setting?
The more technical ISO Definition
If we’re getting technical here.. ISO (which is governed by the International Organization for Standardization is the sensitivity of a camera’s sensor to light; it allows more light to be captured without sacrificing other camera settings in order to get your exposure, or light meter, in balance (I.e. by decreasing shutter speed or increasing aperture).
Fallon’s ISO Definition
ISO is just a fancy way of saying “increasing the brightness”. BUT the key thing to note here is that by increasing your ISO, you’re also going to increase the amount of GRAIN or “digital noise” in your final image.
Andddd let’s be honest, that’s not exactly the best look. Even if you’re into the whole “grainy, vintage style” that’s so trendy these days (which is pulled off very well by NYC-based Instagram Influencer & photographer Tezza Barton you’ll just wanna take note: this is NOT the same kind of grain.
Those vintage-style Instagram photos have “artificial grain” added to them using the grain slider in Adobe Lightroom. So, lets clear things up. The grain you see in your image after increasing the ISO is not going to provide you with a trendy, vintage look.
That’s why I like to think of ISO as the absolute last resort in changing manual camera settings — and your goal should be to keep this value as LOW as possible. To give you a little more context… ISO is measured along a scale, with common values ranging from 100 to 1600. See below for reference:

Best ISO Camera Settings
Personally, I avoid my ISO setting like the plague and will almost always keep it at 100 until it becomes dark outside. *But with that being said.. this rule has gotten me in some trouble in the past & I’m now being more careful about increasing my ISO when necessary.*
In general... my rule is to keep my ISO setting on 100 unless:
The photoshoot takes place indoors
I’m shooting night photography
The lighting changes drastically (ie. transition from “golden hour” to nighttime, skies get cloudy, etc).
In those cases, you’ll want to gradually increase the ISO value until your exposure is balanced out.
ISO Cheat Sheet & Key Takeaways
When we increase ISO, we increase the brightness
BUT in doing so, we also increase the amount of digital noise or GRAIN in our final image
Keep ISO as LOW as possible during DAYLIGHT hours (ie. ISO 100) and increase gradually when it starts to get dark out
Putting Manual Mode in Practice
Alright— lets just use this quick example to break down all the settings we’ve learned so far.
The photo below was taken at a restaurant in Germany back in 2017 before I knew anything about photography. I’m talking nothing, zip, nada — fully automatic camera settings were used and I was shooting in JPEG format (I’ll cover RAW vs JPEG in a separate blog post).
I was fortunately able to work with these settings in Lightroom and get the final edit looking decent.

However, if we take a closer look at the histogram in Lightroom, we can see that our ISO for this image was set at 2000.
And while the effects may not look very drastic from this perspective, if we zoom in…

We can see a wholeeeeee lot of grain/ noise goin’ on in this image — and not the “vintage/film” style grain thats so popular, either.

So what are some ways this high ISO could have been avoided?
Well, while I can’t see the DSLR light meter that was used to balance out our exposure, there are a few assumptions that can be made from our settings in the LR histogram.
For starters— its important to note that our ISO would definitely have to be higher than our general rule of 100. How do we know this?
Our image was shot indoors, which typically means we’re working with a dark shooting environment and we’ll therefore need to increase our ISO past 100.
Despite the already high ISO, our shutter speed wasn’t exactly ideal at 1/60 sec. This means that the restaurant lighting was most likely difficult to work with (which is why the camera automatically chose those settings)… and our options in the exposure triangle were limited without using a tripod.
So to avoid this high ISO without sacrificing shutter speed, I would have decreased the f/stop from its current value at f/3.5.
While you won’t always have this option (it depends on the lens you’re working with), I know that the lens I was using here had a maximum aperture of f/1.8.
So I would have first lowered the f-stop from f/3.5 to f/1.8 — this would have resulted in a stronger focus on the 2 glasses and a more shallow depth of field/ blurry background. But more importantly, it would have given us more room to make adjustments to our shutter speed and ISO values. Because a lower f-stop means a you’ll be letting MORE light into your camera!
I could then adjust my shutter speed. The rule I always (try to) follow is to never select a shutter speed slower than 1/100 sec unless I’m using a tripod — this helps avoid motion blur caused by handheld photography. I would therefore increase the shutter speed from 1/60 sec to 1/100 sec.
I would then simply decrease the ISO until the light meter was balanced out at zero and our image was properly exposed.
Final Manual Photography Tips
I think its safe to say that I filled this post with a whole lot of information. So if you made it allllll the way down here, then I have no doubt you’ll become an amazing content creator in no time! You’re passionate and willing to learn & grow in your craft— thats what really matters. :)
But with that being said, having a general set of rules can definitely help speed up the process! Here’s a few of my personal rules— by no means feel obligated to use these; see what works best for your style & roll with it!
My rules for manual settings:
Set ISO at 100 (and gradually increase when it starts getting dark out)
Make sure that shutter speed is never slower than 1/100 sec. For example, 1/125 sec would be fine, but 1/20 sec would not be fine & your photo would end up blurry if handheld. Which leads me to my next point..
If your shutter speed does have to dip below 1/100 sec, make sure you’re using a sturdy tripod!
Aperture/f-stop varies. First, it’ll depend on the lens you’re shooting with (a lot of lenses aren’t even capable of going lower than f/4). But it honestly depends on your personal photography style as well. I struggle with aperture at times because I love the unique effects it can create… but I also like my photos to make bold statements and have enough contrast/detail (which can fade out with a low f-stop). However, in general, my aperture will range from f/2 to f/4, usually sticking somewhere around f/2.5.
Keep Practicing & learning!
Just remember, if this doesn’t all “click” instantly… its TOTALLY okay! This stuff takes a long time to master & it truly does just take practice, practice & more practice.
I am not a professional photographer by any means (and would never claim to be) and I have days where I seriously struggle with this stuff too! The thing is, each of the settings can sound relatively simple on paper… until you start facing external factors that you have zero control over (i.e super dark, cloudy skies).
And you’re faced with an even bigger challenge when time is of the essence. You can’t just whip out the perfect settings on command & call it a day (I wish). It will take some time to get your settings aligned based on the photoshoot location… and some trial/error shots. I can’t even begin to tell you how many times I’ve taken photos for friends & family who didn’t have a photography background… only to be met with impatient or confused stares when I was taking too long adjusting my settings.
But with that being said, you will get faster with practice! So just keep learnin’ new things (I am seriously always in learning mode) and get out there to see what works/doesn’t!

Hope you found this guide to be helpful in your transition from automatic camera settings to manual mode! The learning curve may seem daunting now, but I promise it will all pay off once you’re taking beautiful photos like the Instagram pro I know you are. ;)
Buttttt with that being said, if you are still struggling with photography & need some guidance— please leave a comment below and I’d love to try and help you out. Even if you just wanna ask me about one of your photos & ask why it turned out the way it did.. I would be more than happy to offer a few tips.
Make sure to share this article on Pinterest if you found it helpful. And feel free to send any photos my way that you’ve taken after reading this article— I’d loveeee to see your work!
I cannot WAIT to see what you create. :)
If you liked this post, you may be interested in: A Beginners Guide to Manual Mode


Manual Mode Cheat Sheet Infographic