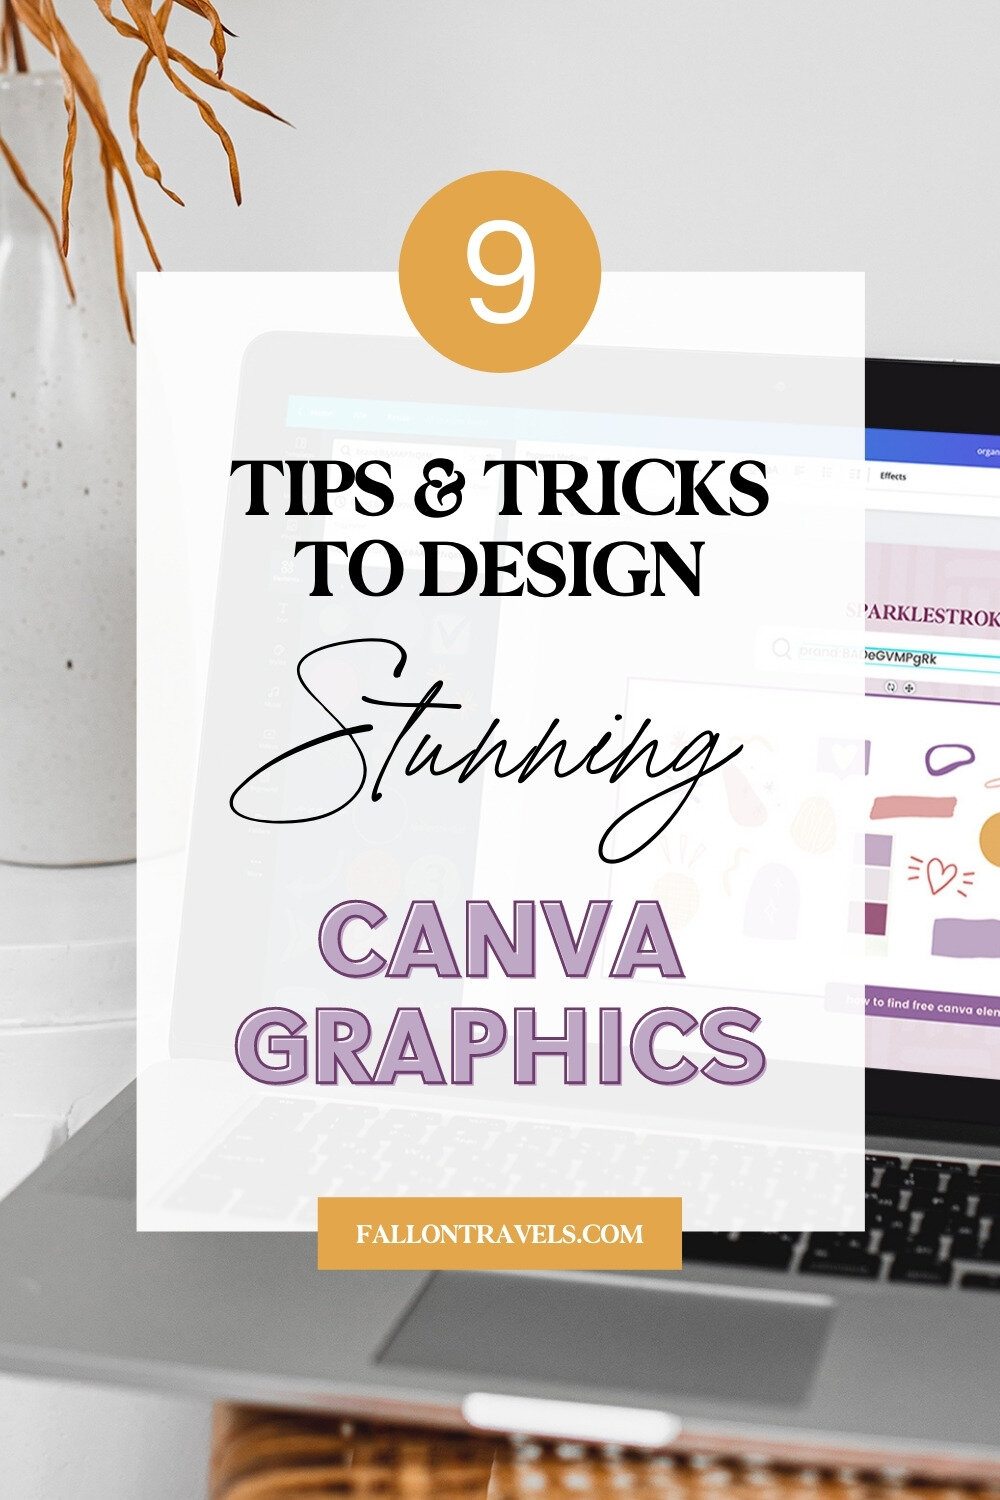
9 must-know Canva Tips and Tricks to 10x your Design Workflow
Disclaimer: Hey there, friend! This article includes affiliate links for Canva (a design tool I use, love & swear by) and I would love if you decided to use them. Affiliate links help creators like me to fund the free content that we provide on our blogs. Thank you for your endless support!
These days, I’m all about working smarter, not harder in my online biz (can I get an amen?!).
And so, after bouncing back & forth for way too long between Photoshop, InDesign and Canva, I finally decided it was time to fully commit to just one design program for all my online biz graphics.
And Canva it was.
**gasp**
Ya, I know what you’re thinking. “Come on Fal… you’re not a real designer if you’re using Canva…”
Well, I actually am. And with the release of Canva 2.0 & Canva Pro came some insane features that allow me to 10x my content creation & design workflow— features that make it a serious no-brainer to cut all former ties with complicated design programs.
So with all that said— below, you’ll find my must-know Canva tips, tricks & design hacks to 10x your content creation workflow so you can get back to what matters in your online business!
Aaaand so all the haters out there finally realize that Canva isn’t just an app for amateur bloggers & designers. ;)
Quick side note before we begin…
… most of the features included in this article are for Canva Pro users only (sorry to all my peeps on the free plan!).
But I come bearing good news, promise… ;)
If you click that little image below, you can take Canva Pro for a spin, completely free for 30 days!
BTW that’s an affiliate link up there! My margarita fund really appreciates you. ;)
Kidding… ok, let’s get this party started.
In this post, you’ll learn the following Canva Tips:
Use Canva Magic Resize to resize images in one-click and repurpose content across platforms
Use Canva Brand Kit to keep your branding & design graphics consistent
Use the Alt + drag shortcut to scale elements proportionally
Must-know Canva Keyboard Shortcuts to cut those clicks in half… seriously!
Add comments in Canva to keep important graphic info all in one place
Remove background from image in Canva (yes, there’s a difference!)
How to copy from one design to another in Canva
And yes— I did include more than 9 tips (oops). I created the title before the article itself and didn’t want to change the number (lol).
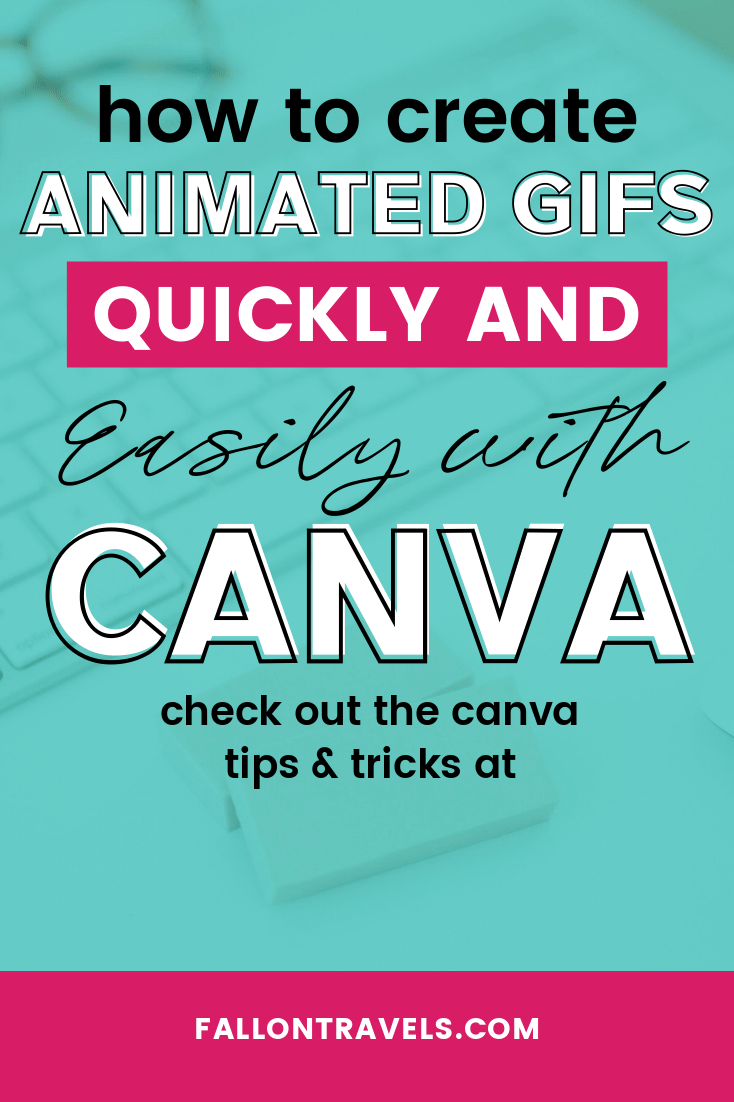
Use Canva Animator to create animated GIFs
OK I have to admit— I had never actually used the Canva Animator before creating this post (whoops!).
I had designed plenty of GIF animations with Photoshop, but for some reason I didn’t even realize how many GIF/video features Canva had released with their Pro plan.
So I tested the Animator out and let me tell you— I’m completely hooked!
I do have to tell you, though… there were a few issues I ran into in terms of GIF file size. When you go to export your GIF, you have the following options:
Fade
Pan
Block
Rise
Breathe
Slide
Simple
The “simple” GIF animation had no moving elements, aside from the arrow sticker (pictured below), and I had no issue with the export. The file size came out to around 220kb.
But when I exported the same GIF using the “Block” animation option, the file size was huge (I’m talking around 800kb).
So here’s what I did— I exported the GIF like normal…
Then I used EZGif.com’s GIF Optimizer to compress the file. I cut a few of the frames out using the “Remove every third frame” option.
Then I used the “Lossy GIF” option & changed the compression to 80…
… and I was able to get it down to around 250kb— not bad!

Canva Magic Resize
So, Canva Magic Resize is basically the best thing since sliced bread…
…because if you’ve ever designed a graphic template before (which I’m sure you have), you know just how much time is wasted when you have to re-create designs to fit different platforms.
And luckily, Canva Pro solves that problem for us with the Magic Resize feature!
In a nutshell, the tool lets you resize your graphics in bulk to fit multiple, pre-set formats (see below for a visual reference!).
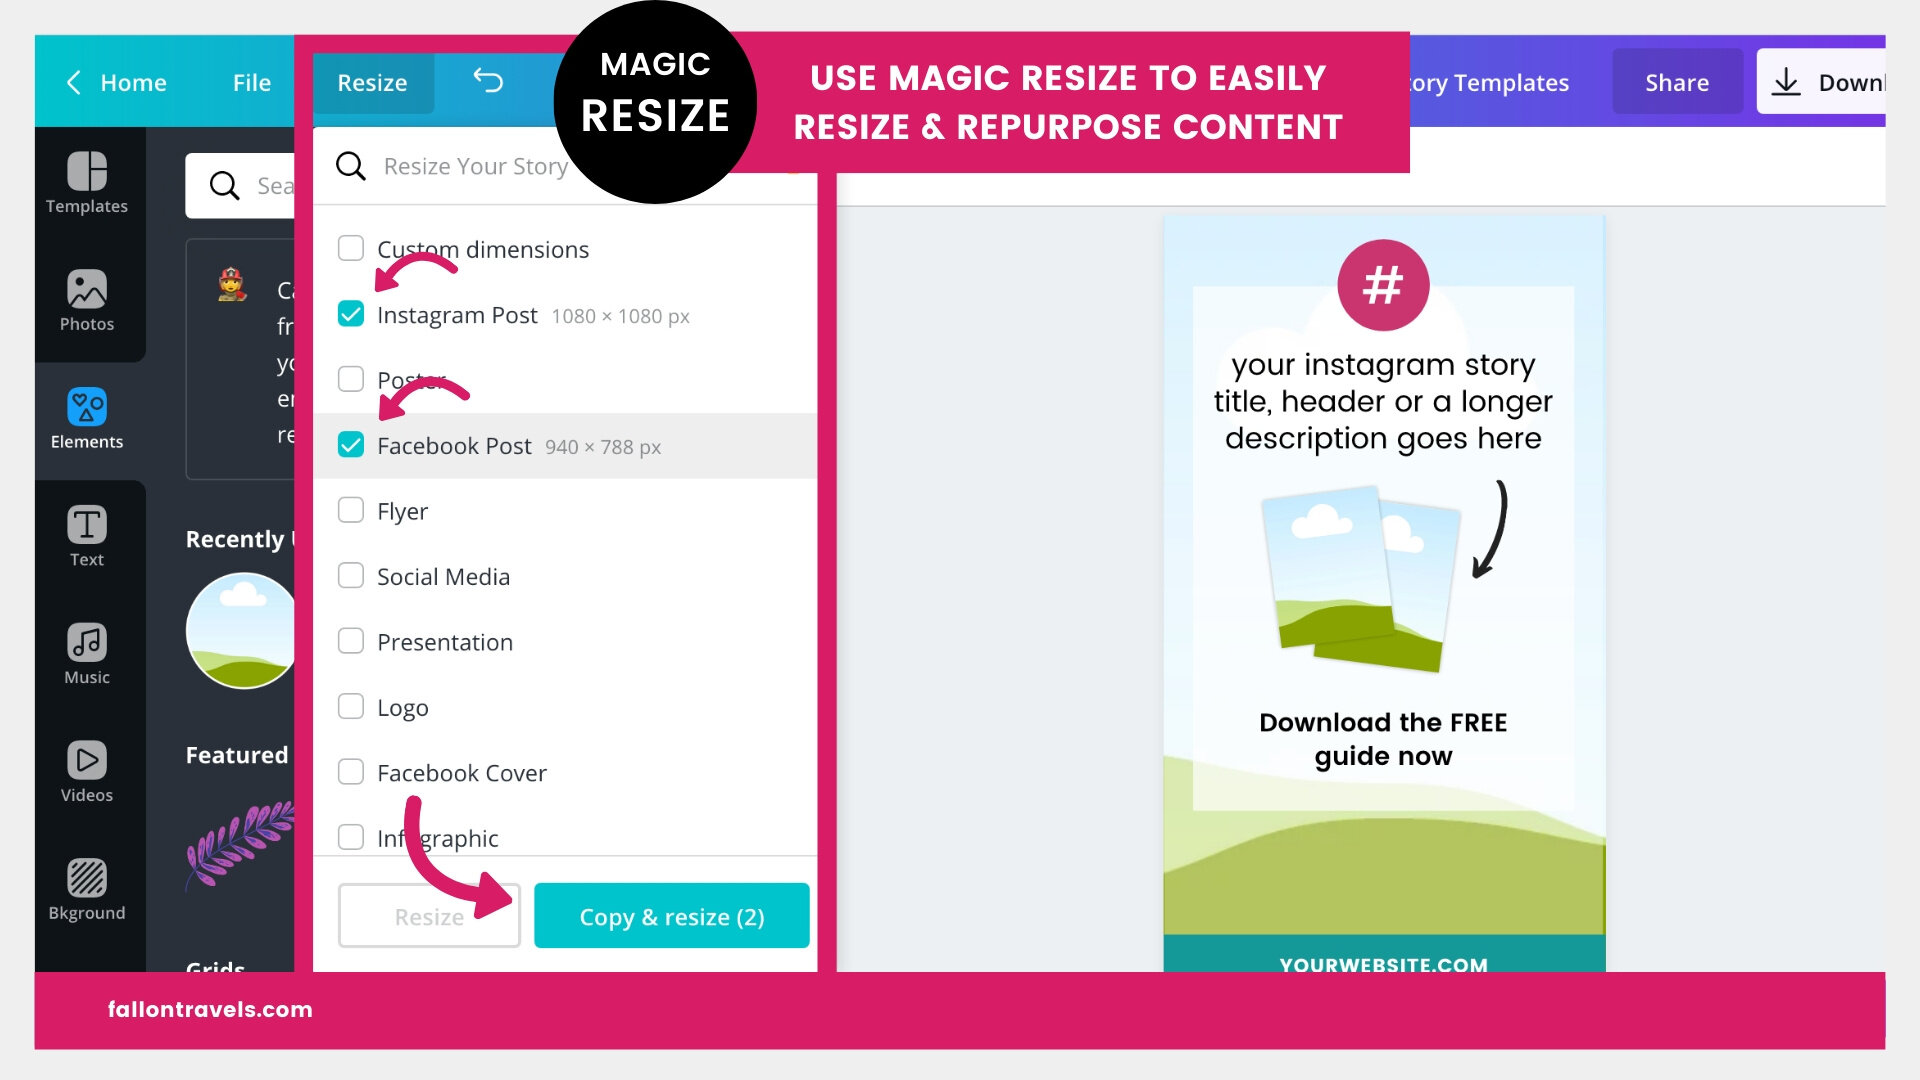
This means that you’ll never have to spend hours searching for up-to-date social media aspect ratios ever again (phew!)…
… and it also means that you can resize templates to fit all your fave platforms with just one simple click! #ThankYouCanva
Canva Brand Kit
While templates are an amazing starting point… you definitely want them customized to match YOUR brand.
And by using the new Canva brand kit feature… you can save SO much time in your design process. You’ll be able to easily access your color swatches, Canva fonts & brand imagery in a giffy.

See how convenient it is?! You can access this amazing little feature right on the home page of your Canva (Pro) account!
I love the Brand Kit because it allows you to stay consistent with your design graphics at all times (yep— even if you’re outsourcing work to a designer!).
Alt + drag to scale proportionally
OK, so I know I have a section on Canva keyboard shortcuts…
… but I thought this one in particular deserved it’s own little home, because I seriously use it that much in my design process.
So, just like with the Adobe programs, you can hold the ALT key and drag your design elements out to scale them proportionally.
You can either use the side handles, or corner handles to scale elements…

… but since visuals make everything better, just check out my little GIF below to see the shortcut for yourself!

Note that you can also just drag out on one of the element corners & you’ll still keep it’s proportions…
…the element just won’t scale out from the center like it does in the GIF above.
Use Canva Keyboard Shortcuts
While I honestly have a TON of keyboard shortcuts up my sleeve, I’ll save the long list for a separate post & give you the ones I use most often:
Add a line to your document: Click the “L” key
Add a rectangle to your document: Click the “R” key
Transform text to Uppercase: Shift + cmd/ctrl + “K” key
Bold text: cmd/ctrl + “B” key
Duplicate elements: cmd/ctrl + “D” key
Group Elements: cmd/ctrl + “G” key
Ungroup Elements: shift + cmd/ctrl + “G” key
Select all items on layer: cmd/ctrl + “A” key
Zoom in: cmd/ctrl + “+” key
Zoom out: cmd/ctrl + “-” key
Send element forward: cmd/ctrl + “]”
Send element backward: cmd/ctrl + “[“
PS— Want some visual references? Check out my all-time favorite Canva Keyboard Shortcuts to save time on your DIY biz graphics!
Add comments in Canva to keep important graphic info in one place
This is actually one of the most useful Canva Pro features for disorganized humans like myself...
… the ability to add comments on design templates and keep important brand graphic info all in one place!
It’s actually super useful for anyone using the Canva Team features… because you can write notes to another team member and provide feedback easily without having to go back & forth between messages.
Here’s one example of how I use the feature to speed up my workflow…

I like to add comments to keep track of graphic quality info, so that when it’s time to export my design templates… I have the info ready & know exactly what quality to set the template at to keep my images optimized for SEO.
Because, as most bloggers know, heavy file sizes can quickly & easily destroy your site speed.
As a rule of thumb, you should aim to keep website graphics below 200kb. I usually stretch things a little to get higher image quality and aim for 300 (what can I say, I’m a rule breaker…).
Either way, I love that Canva allows me to keep track of all this file info in one place!
All you have to do is click any element on the design & you’ll see a little comment bubble pop up…
… you can then add a comment for yourself, or mention a team member in the comment!
Make/export a transparent background in Canva
I know I probably sound like a broken record here… but just note that the transparent background feature is only available for Canva Pro users…
… but if you wanna try out Canva Pro free for 30 days & get access to all the amazing features in this article… I certainly won’t try and stop you. :)

OK moving on.
For the transparent background feature to work, you’ll need to remove any background image/color from your design template, or set the current background color to white.
PS… just click the delete button or click the trash icon in the editor to delete the background.
Step 1: Click the Download (or Publish) option in the top right-hand corner of your editor (located next to the share button).
Step 2: You’ll see a “File type” dropdown menu. Click the option that says “PNG”
Step 3: Now make sure to check off “Transparent background”, otherwise the design will export with a white background
Step 4: Click download, and your design will be ready to show off to the world!
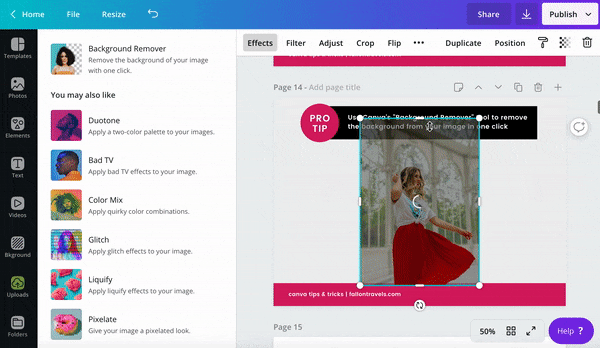
Remove background from image in Canva
If you’ve ever tried to figure out how to remove the background from a photo in Photoshop, Word or Powerpoint… then you already know that it’s not exactly a “straightforward” process.
And the scene usually ends with you pulling your hair out because you just spent hours trying to get it right… and it still somehow looks like a #HotMessExpress. :/ (Yep, been there too).
But good news— Canva Pro just swooped in & saved the day…
…with a ONE-click solution to background image removal.

Yep— you heard that right. Listed below, I’ve included the incredibly simple steps to remove the background from an image in Canva quickly and easily— no Photoshop required!
Step 1: Create a template in any size (doesn’t matter what size…)
Step 2: Upload an image to Canva (Upload tab is on the left-hand side)
Step 3: Click the uploaded image and it will be added to your page
Step 4: Click the image, and choose “Effects” in the editor at the top
Step 5: Click Background Remover (it’s the first option)

And your background will magically be erased in one-click. :)
Feel free to use this scary collage I created of myself to use as inspiration…

…imagine a world with multiple Fallon’s. Terrifying thought, I know.
How to copy from one design to another in Canva
In Canva, it’s much easier to just copy from one design to another than start from scratch each time (which sounds like a total nightmare in my opinion!).
To make a copy of your design template, just click this little icon as pictured below…
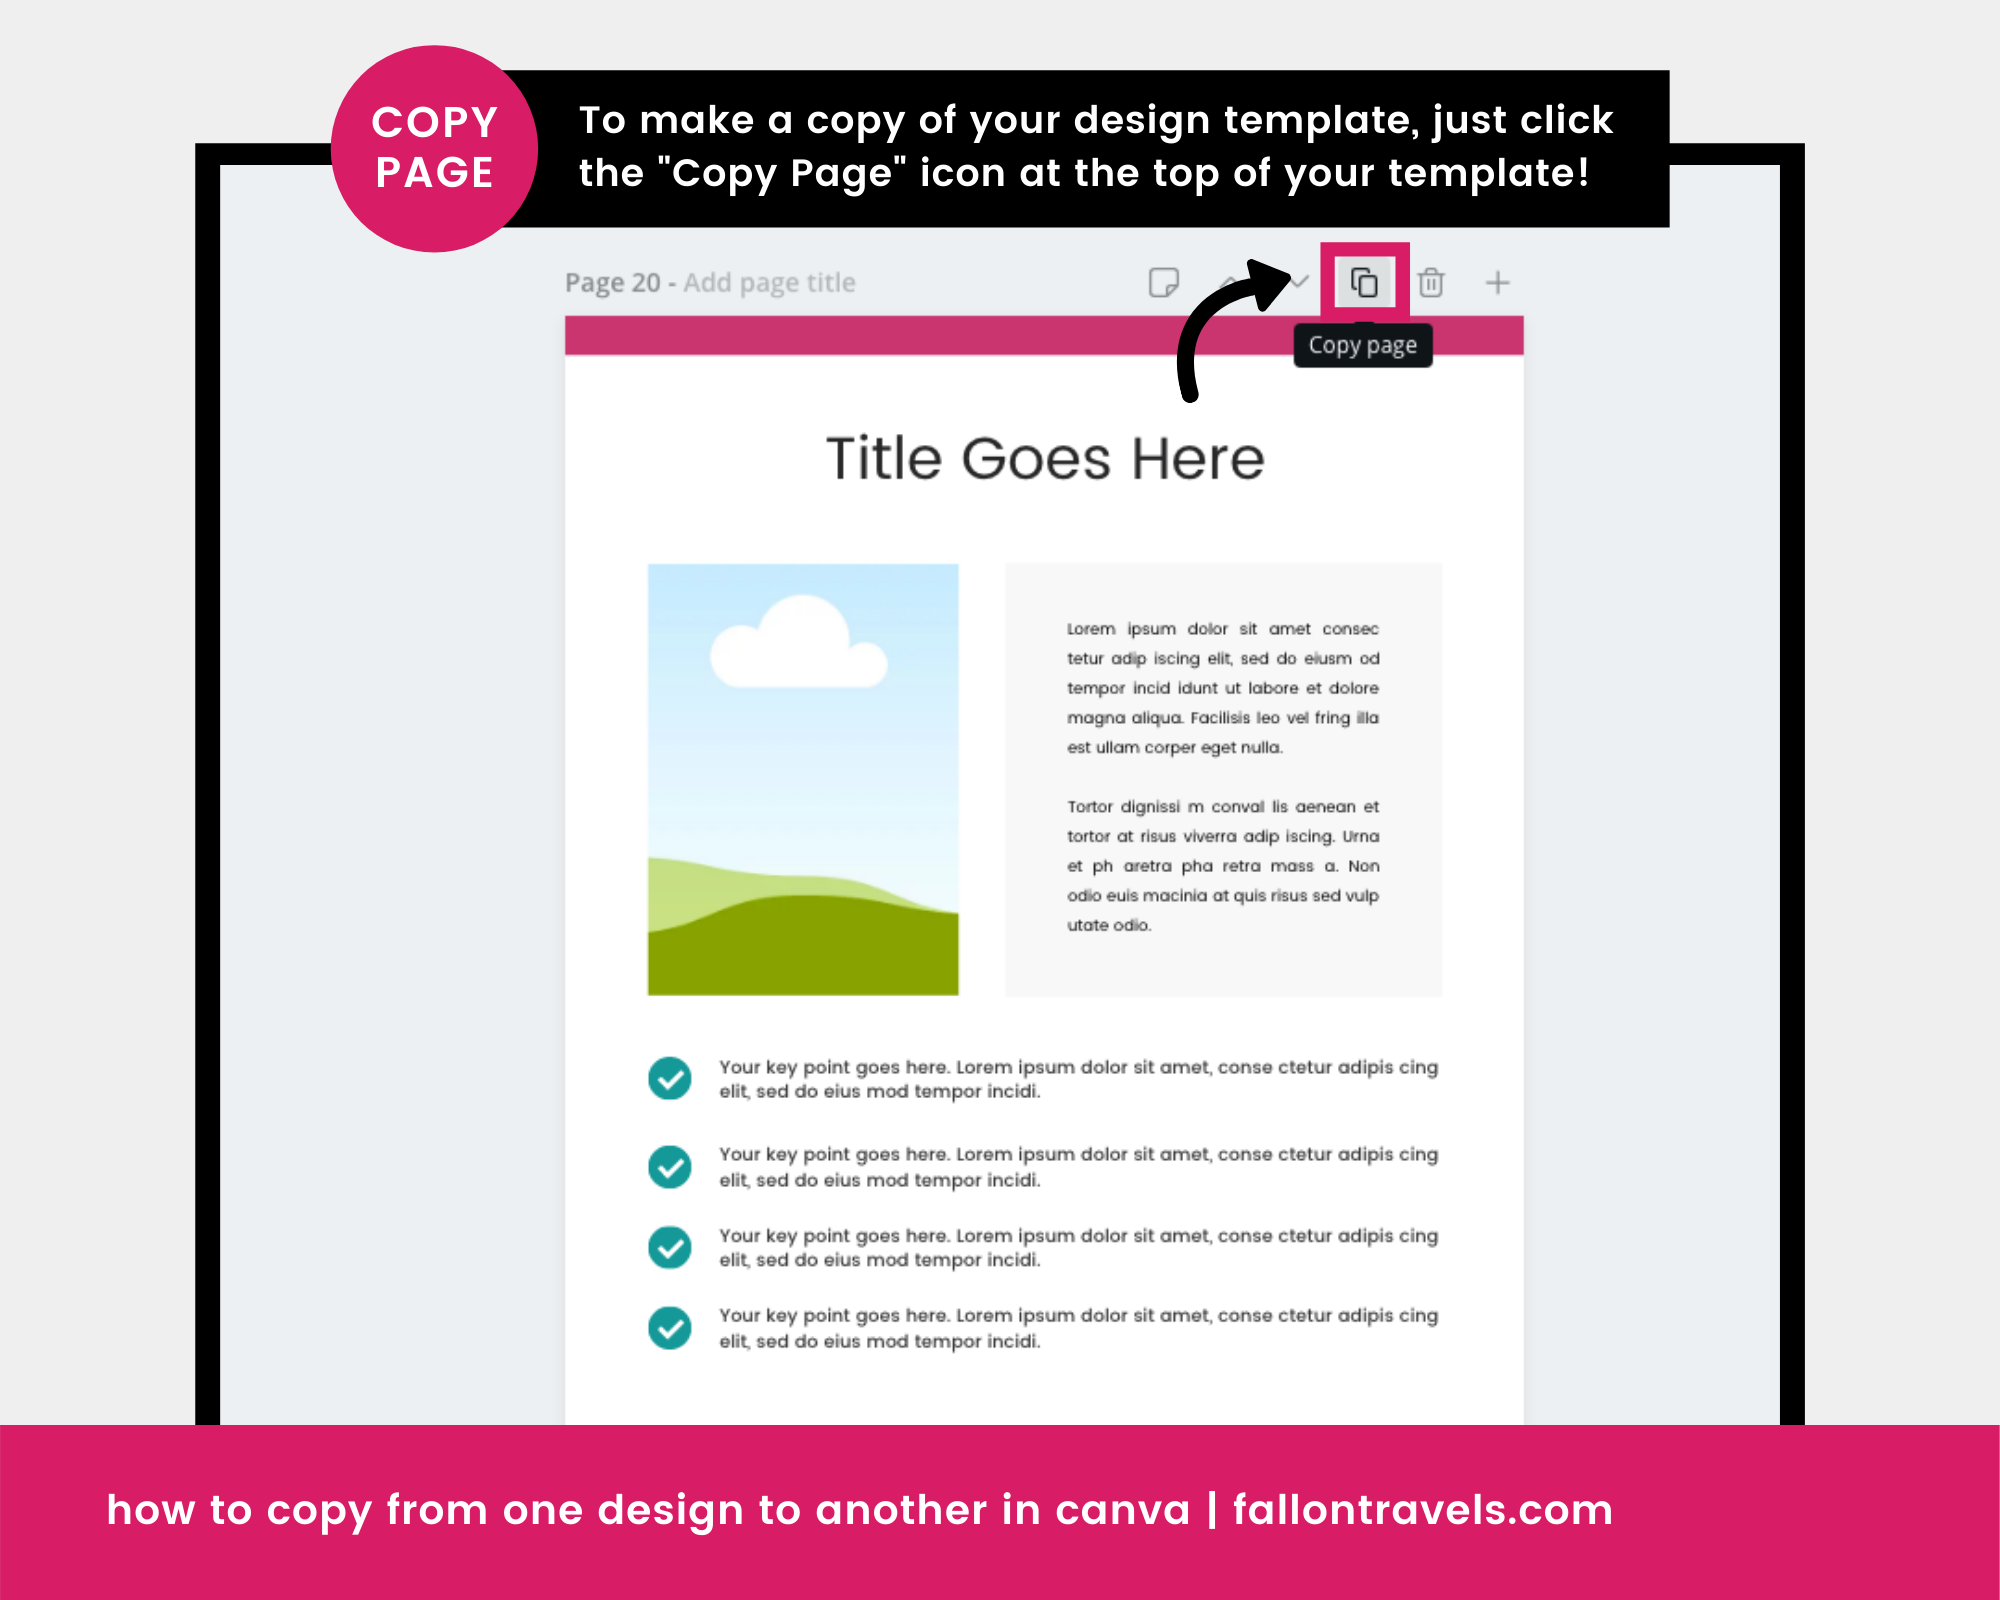
…. and your template will now be copied into a brand spankin’ new template so you don’t have to start from scratch ever again (whoop whoop!).
You can of course just copy and paste the individual elements as well if you want the layout to look slightly different from the previous.
PS, I know that copy & paste are the keyboard shortcuts most people do already know… but just in case:
Copy elements: cmd/ctrl + “C”
Paste elements: cmd/ctrl + “V”
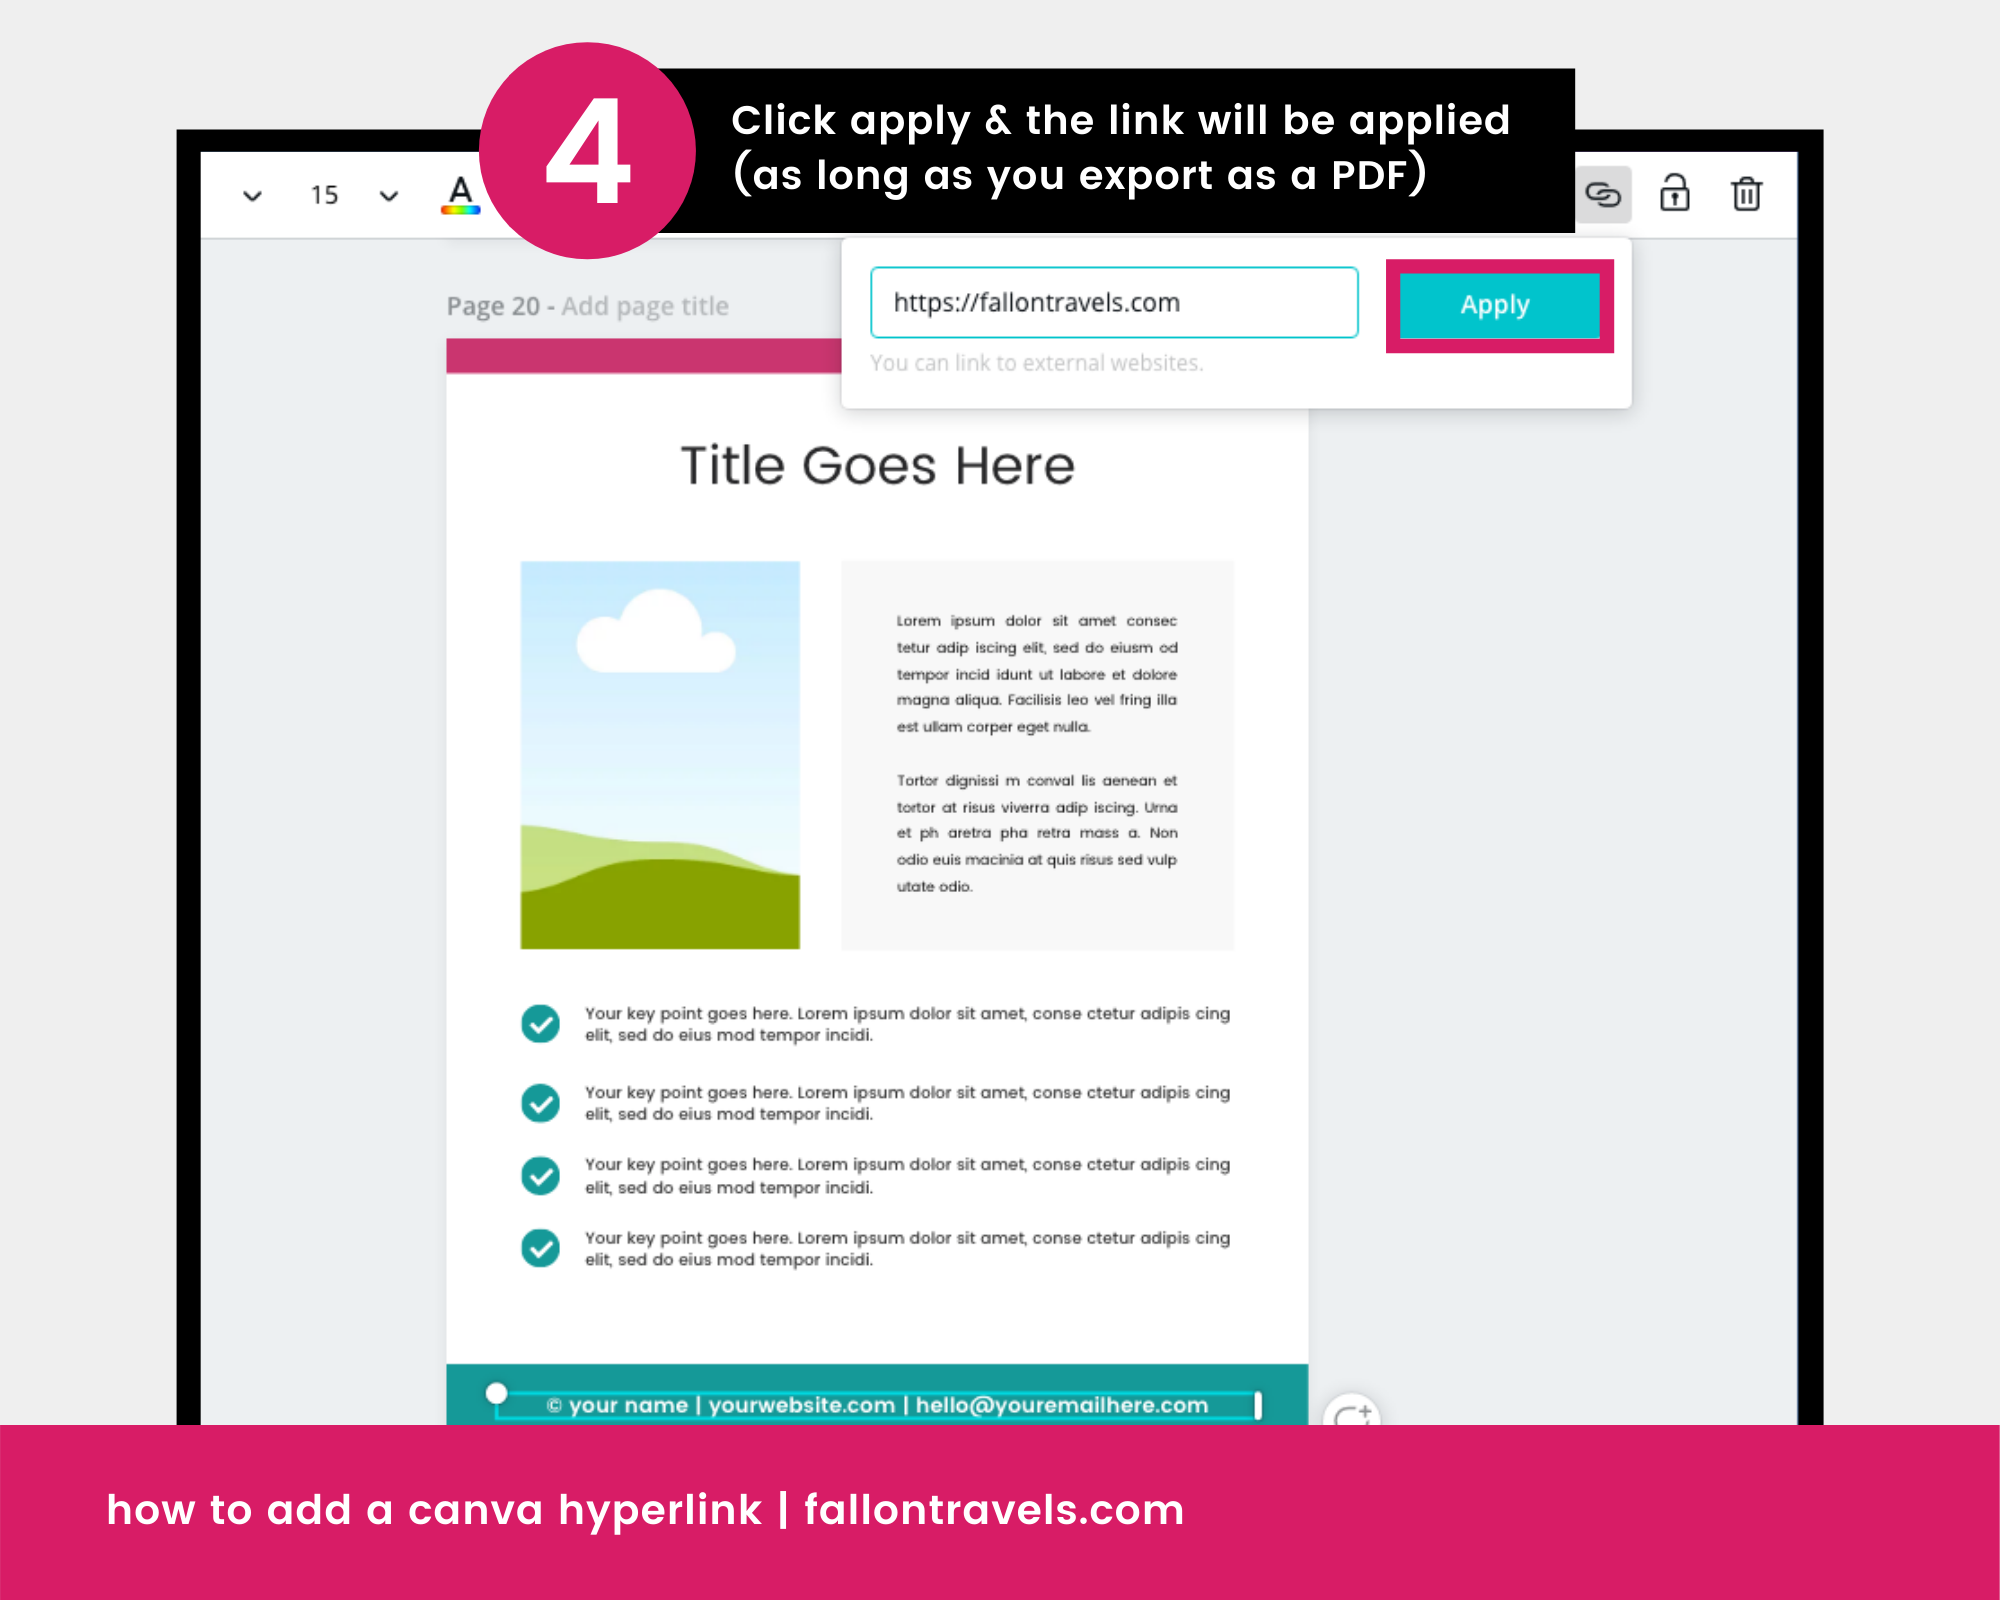
How to hyperlink on Canva
Adding a hyperlink to your PDF doc in Canva is incredibly simple, and I’ve included a step-by-step process & screenshots below in case you need a visual reference.
Step 1: Click on the design element or text box that you want to turn into a hyperlink

Step 2: Click on the link icon in the editor toolbar

Step 3: Type or paste the website URL/link
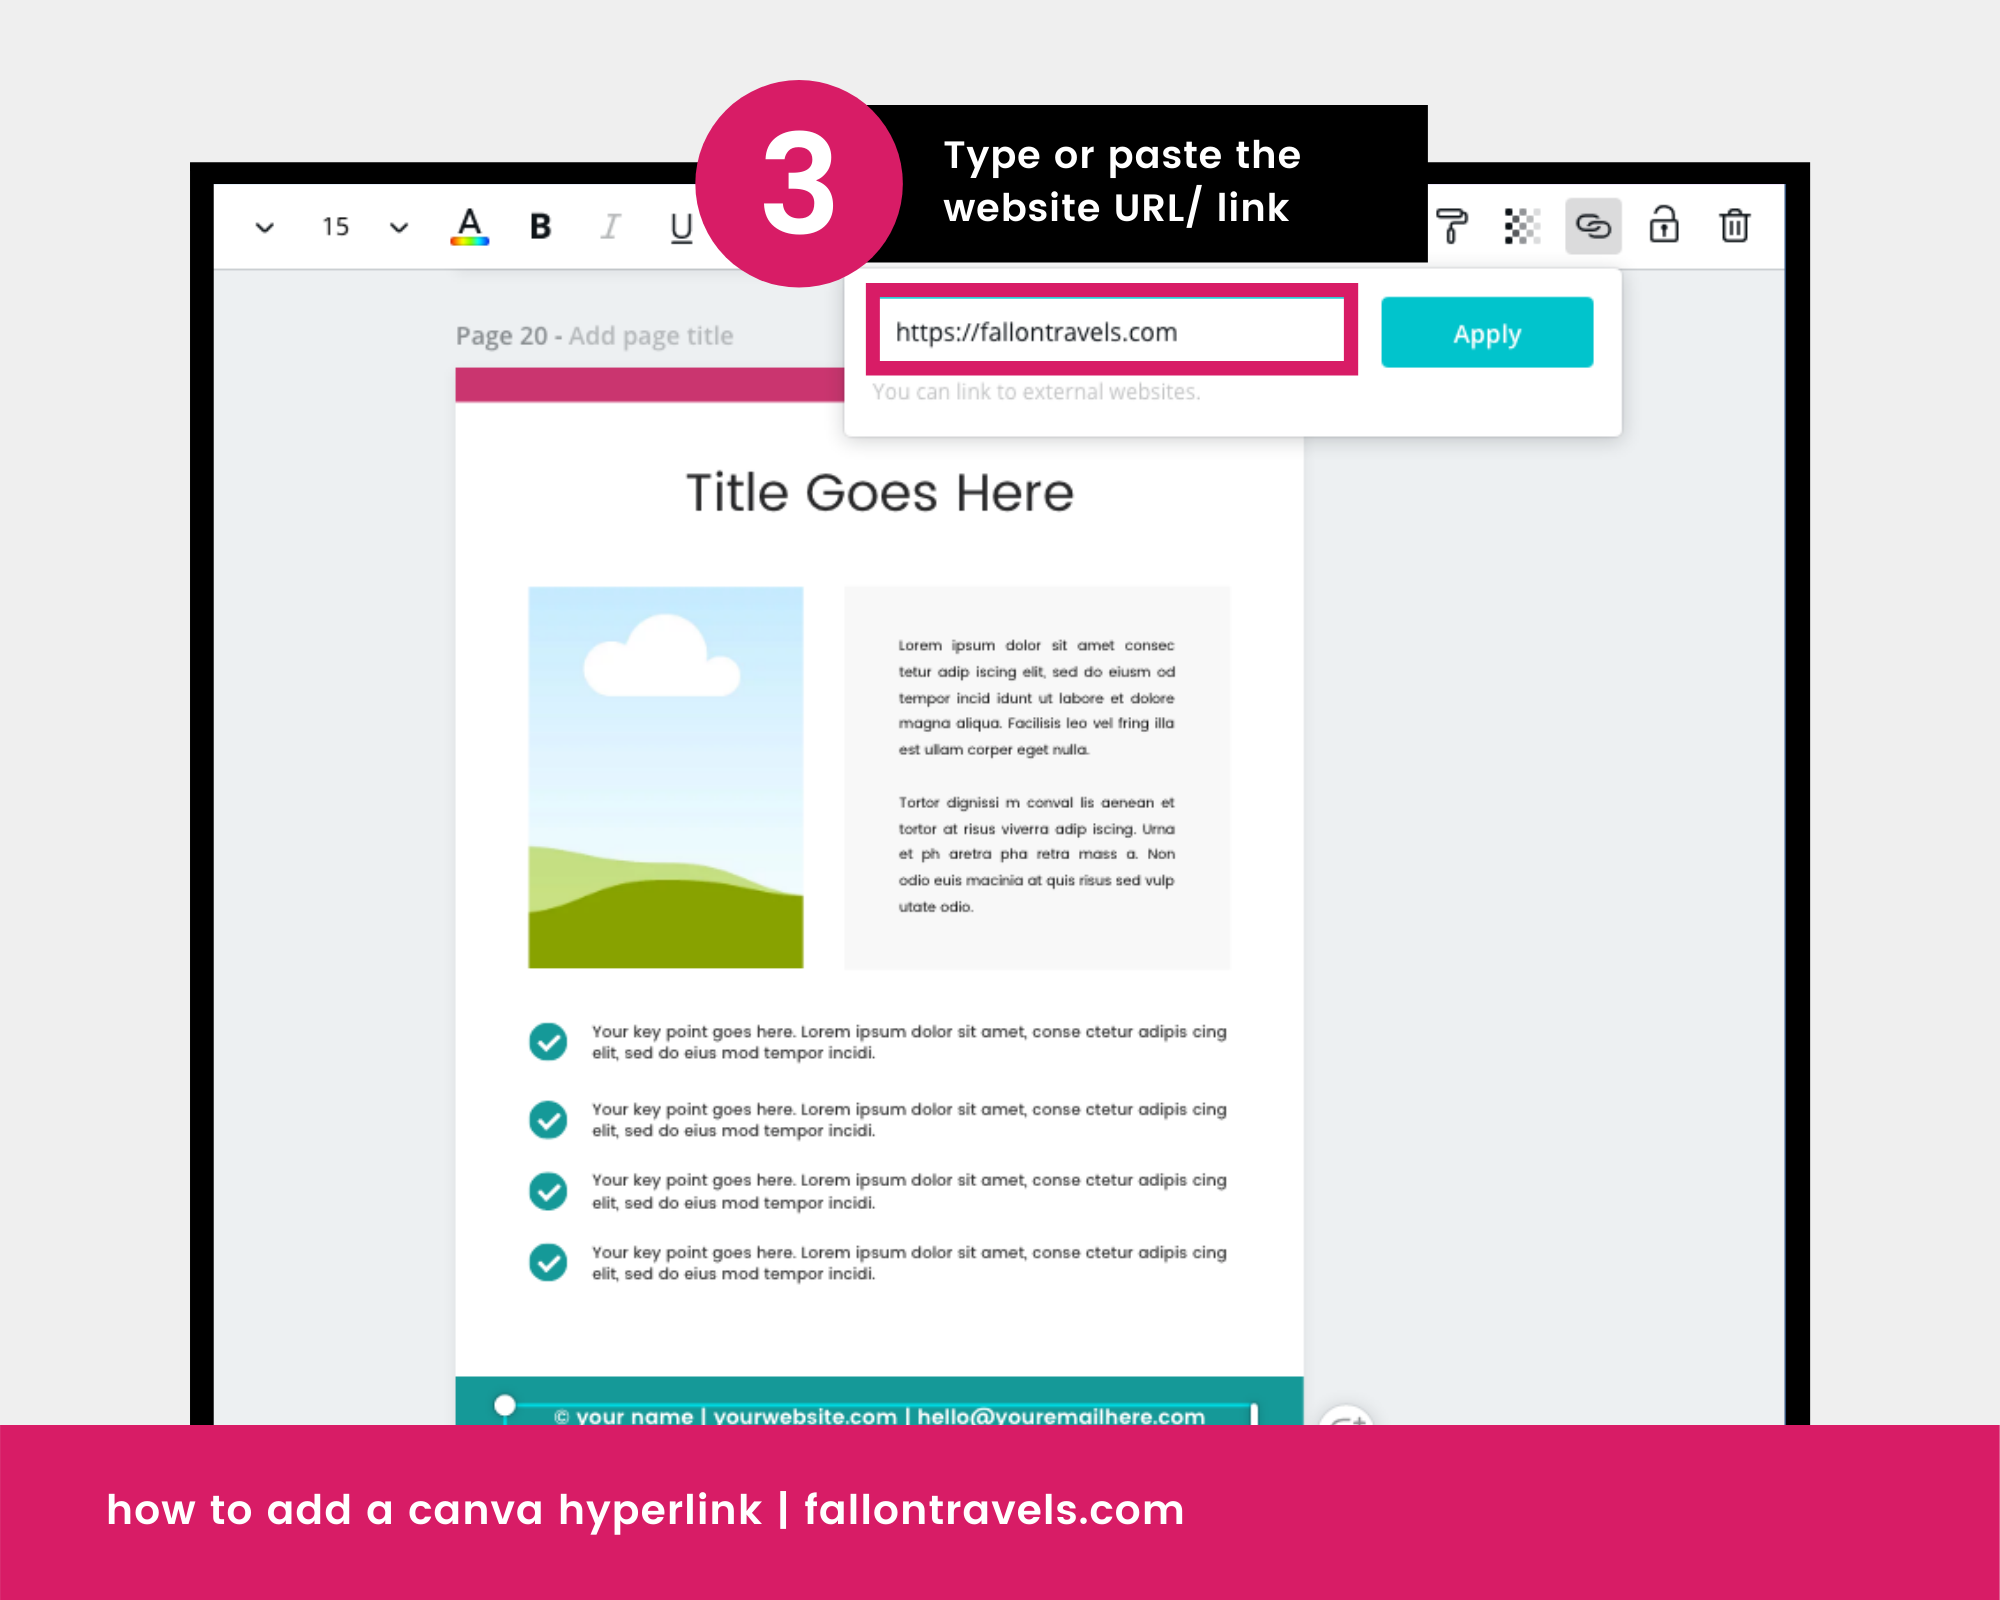
Step 4: Click the Apply button to save the link
To change the hyperlink in an element, simply repeat the steps above and replace the previous link with the new one.
You should note that there is one downside to Canva hyperlinks:
Currently, there’s no way to hyperlink an individual element. This means that you’ll need to add the link to your entire element (i.e. the text box or any other design element).
So you’ll need to make sure you create a separate text box/design element for everything you don’t want hyperlinked.
Make sense? It’s a little inconvenient… but nothing to break a sweat over!
Also… just to be clear… your link will not show up on a regular JPEG image. This feature is only designed for templates exported as a PDF.
Lock elements in Canva
Yep, you heard that right. Now, the “lock elements” feature isn’t just available for Adobe programs…
… you can do it right from Canva (can I get an amen?!).
For those of you who don’t know about the lock elements feature, it basically allows you to lock any design element in place, so you can’t accidentally move it around while you’re designing other aspects of the graphic.
This is also super useful if you share your designs often/ allow team members to edit your templates!!
I’ll use that collage I made of myself as an example :) because it has elements that are super close together/all piled on top of one another, so it’s the perfect example of when the lock elements feature might come in clutch!

How to lock elements in Canva
To lock elements, just follow these simple steps:
Click an element or select a group of elements that you want locked in place.
Click the Padlock icon— this is located in the main design editor at the top.

How to unlock elements in Canva
Now, don’t forget that you’ll need to unlock the elements if you want to edit them later on!
To unlock elements, just follow these steps:
Select the locked elements
Click the Padlock icon (again, located in the design editor/toolbar at the top).
Easy peezy lemon squeezy!
Alright, that’s a wrap on this Canva filled post! Well, at least until I find more features to add…
Hope you enjoyed the design tips & tricks and learned something cool. :)
Leave a comment below if you know a super neat Canva hack that I didn’t list here— I’d seriously love to hear about it!
Happy designing, my talented & creative friend!
XO, Fal
YOU’LL ALSO LOVE:


